Pioneer SC-27 Owner's Manual - Page 13
Auto/alc/direct, Audio Parameter
 |
UPC - 012562957487
View all Pioneer SC-27 manuals
Add to My Manuals
Save this manual to your list of manuals |
Page 13 highlights
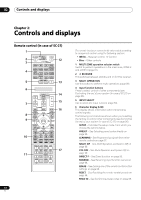
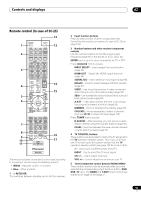
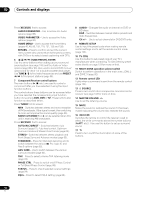
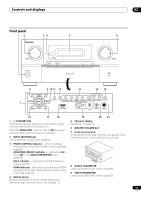
Controls and displays 02 RC MODE - See Operating multiple receivers on page 96. 7 TV CONTROL buttons These buttons are dedicated to control the TV assigned to the TV operation selector switch. Thus if you only have one TV to hook up to this system assign it to the TV operation selector switch (see page 96 or page 103 for more on this). - Use to turn on/off the power of the TV. VOL +/- - Use to adjust the volume on your TV. INPUT - Use to select the TV input signal. CH +/- - Use to select channels. MUTE - Use to mute the sound or cancel the mute mode. 8 Tuner/component control buttons/HOME MENU These button controls can be accessed after you have selected the corresponding input function button (DVD, DVR, TV, etc.). The BAND and T.EDIT tuner controls are explained on page 56. Set the remote control operation selector switch to RECEIVER to access the following controls: AUDIO PARAMETER - Use to access the Audio options (page 88). VIDEO PARAMETER - Use to access the Video options (page 90). HOME MENU - Use to access the Home Menu (pages 45, 48, 85, 109, 118, 121, 123 and 128). RETURN - Press to confirm and exit the current menu screen (also use to return to the previous menu with DVDs or to select closed captioning with DTV). 9 TUNE/PRESET) /ENTER Use the arrow buttons when setting up your surround sound system (see page 109) and the Audio or Video options (page 88 or 90). Also used to control DVD menus/ options and for deck 1 of a double cassette deck player. Use TUNE / to find radio frequencies and use PRESET / to find preset stations (page 56). 10 Component control buttons The main buttons (, , etc.) are used to control a component after you have selected it using the input function buttons. The controls above these buttons can be accessed after you have selected the corresponding input function button (for example DVD, DVR or TV). These buttons also function as described below. Press TUNER first to access: MPX - Switches between stereo and mono reception of FM broadcasts. If the signal is weak, then switching to mono will improve the sound quality (page 56). NOISE CUT MODE 1 to 2 can be selected when receiving AM broadcasts. Set the remote control operation selector switch to RECEIVER first to access: STATUS - Press to check selected receiver settings (page 94). PHASE CTRL - Press to switch on/off Phase Control or Full Band Phase Control (page 68). CH LEVEL - Press repeatedly to select a channel, then use / to adjust the level (page 126). PQLS - Press to select PQLS setting (page 86). AUTO/ALC/DIRECT - Switches between Auto Surround (page 61), Auto level control, Optimum Surround mode and Stream Direct mode (page 65). STEREO - Switches between stereo playback and Front Stage Surround Advance modes (page 65). STANDARD - Press for Standard decoding and to switch between the various 2 Pro Logic IIx and Neo:6 options (page 62). ADV SURR - Use to switch between the various surround modes (page 63). THX - Press to select a Home THX listening mode (page 63). 11 Number buttons and other receiver/component controls Use the number buttons to directly select a radio frequency (page 56) or the tracks on a CD, DVD, etc. ENTER can be used to enter commands for TV or DTV. After set the remote control operation switch to RECEIVER: SIGNAL SEL - Use to select an input signal (page 68). SLEEP - Use to put the receiver in sleep mode and select the amount of time before sleep (page 93). DIMMER - Dims or brightens the display (page 93). A.ATT - Attenuates (lowers) the level of an analog input signal to prevent distortion (page 93). SBch - Use to select the surround/virtual back channel mode (page 66). MCACC - Press to switch between MCACC presets (page 67). HDMI OUT - Switch the HDMI output terminal (page 94). Press TUNER first to access: D.ACCESS - After pressing, you can access a radio station directly using the number buttons (page 56). CLASS - Switches between the seven banks (classes) of radio station presets (page 56). 12 SOURCE Press to turn on/off other components connected to the receiver (see page 96 for more on this). 13 en
-
 1
1 -
2
-
3
-
4
-
5
-
6
-
7
-
 8
8 -
 9
9 -
 10
10 -
 11
11 -
 12
12 -
 13
13 -
 14
14 -
 15
15 -
 16
16 -
 17
17 -
 18
18 -
19
-
20
-
21
-
22
-
23
-
24
-
25
-
26
-
27
-
28
-
29
-
30
-
31
-
32
-
33
-
34
-
35
-
36
-
37
-
38
-
39
-
40
-
41
-
42
-
43
-
44
-
45
-
46
-
47
-
48
-
49
-
50
-
51
-
52
-
53
-
54
-
55
-
56
-
57
-
58
-
59
-
60
-
61
-
62
-
63
-
64
-
65
-
66
-
67
-
68
-
69
-
70
-
71
-
72
-
73
-
74
-
75
-
76
-
77
-
78
-
79
-
80
-
81
-
82
-
83
-
84
-
85
-
86
-
87
-
88
-
89
-
90
-
91
-
92
-
93
-
94
-
95
-
96
-
97
-
98
-
99
-
100
-
101
-
102
-
103
-
104
-
105
-
106
-
107
-
108
-
109
-
110
-
111
-
112
-
113
-
114
-
115
-
116
-
117
-
118
-
119
-
120
-
121
-
122
-
123
-
124
-
125
-
126
-
127
-
128
-
129
-
130
-
131
-
132
-
133
-
134
-
135
-
136
-
137
-
138
-
139
-
140
-
141
-
142
-
143
-
144
-
145
-
146
-
147
-
148
-
149
-
150
-
151
-
152
-
153
-
154
 |
 |