Pioneer VSX-49TX Owner's Manual - Page 102
Press ENTER. The new function
 |
View all Pioneer VSX-49TX manuals
Add to My Manuals
Save this manual to your list of manuals |
Page 102 highlights
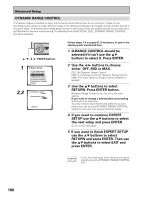
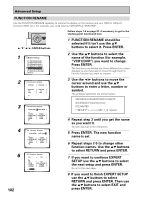
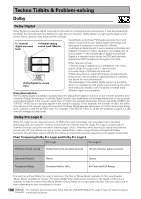
Advanced Setup FUNCTION RENAME Use the FUNCTION RENAME capability to rename the display on the receiver and your OSD for different functions (DVD, etc.). For example, you could rename VCR1/DVR as "DVR-7000". ENTER STANDBY/ON 5˜∞˜2˜3˜ENTER buttons Follow steps 1-4 on page 97, if necessary, to get to the starting point mentioned here. 1 FUNCTION RENAME should be selected if it isn't use the 5∞ buttons to select it. Press ENTER. 1 3.Expert Setup [1. OSD Adjustment ] [2. Bass Peak Level ] [3. D-Range Control ] [4. Multi-Ch In Select ] [5. Function Rename ] [6. Hi-bit/Hi-sampling ] [7. Multi-Room Setting ] [Return] 2 Use the 5∞ buttons to select the name of the function (for example, "VCR1/DVR") you want to change. Press ENTER. The functions are divided into three different on-screen displays so you may have to move through them to find the function you want to rename. 2 3.5. Function Rename DVD/LD [ DVD/LD ] DVD/LD TV SAT [ DVD/LD ] [ TV ] [ SAT ] 3 Use the 2 3 buttons to move the cursor around and use the 5∞ buttons to enter a letter, number or symbol. The possible selections are shown below. 3 3.5. Function Rename VCR1/DVR [ VCR1/DVR ] VIDEO [ VIDEO ] VCR1/DVR [ VCR1/DVR ] VCR2 [ VCR2 ] VCR3 [ VCR3 ] 4 3.5. Function Rename VCR1/DVR [ DVR-7000 ] VIDEO [ VIDEO ] VCR1/DVR [ VCR1/DVR ] VCR2 [ VCR2 ] VCR3 [ VCR3 ] 6 3.5. Function Rename CD [ CD ] CD CD-R TUNER PHONO [ CD ] [ CD-R/TAPE1 ] [ TUNER ] [ PHONO ] [Return] 102 ABCDEFGHIJKLMNOPQRSTUVWXYZ abcdefghijklmnopqrstuvwxyz 0123456789 space) 4 Repeat step 3 until you get the name as you want it. You can input up to ten characters. 5 Press ENTER. The new function name is set. 6 Repeat steps 2-5 to change other function names. Use the 5∞ buttons to select RETURN and press ENTER. 7 If you want to continue EXPERT SETUP use the 5∞ buttons to select the next setup and press ENTER. Go on to the next page. 8 If you want to finish EXPERT SETUP use the 5∞ buttons to select RETURN and press ENTER. Then use the 5∞ buttons to select EXIT and press ENTER.
-
 1
1 -
2
-
3
-
4
-
5
-
6
-
7
-
8
-
9
-
10
-
11
-
12
-
13
-
14
-
15
-
16
-
17
-
18
-
19
-
20
-
21
-
22
-
23
-
24
-
25
-
26
-
27
-
28
-
29
-
30
-
31
-
32
-
33
-
34
-
35
-
36
-
37
-
38
-
39
-
40
-
41
-
42
-
43
-
44
-
45
-
46
-
47
-
48
-
49
-
50
-
51
-
52
-
53
-
54
-
55
-
56
-
57
-
58
-
59
-
60
-
61
-
62
-
63
-
64
-
65
-
66
-
67
-
68
-
69
-
70
-
71
-
72
-
73
-
74
-
75
-
76
-
77
-
78
-
79
-
80
-
81
-
82
-
83
-
84
-
85
-
86
-
87
-
88
-
89
-
90
-
91
-
92
-
93
-
94
-
95
-
96
-
 97
97 -
 98
98 -
 99
99 -
 100
100 -
 101
101 -
 102
102 -
 103
103 -
 104
104 -
 105
105 -
 106
106 -
 107
107 -
108
-
109
-
110
-
111
-
112
-
113
-
114
-
115
-
116
-
117
-
118
-
119
-
120
 |
 |
