Pioneer VSX-49TX Owner's Manual - Page 91
Press the SETUP OK button when
 |
View all Pioneer VSX-49TX manuals
Add to My Manuals
Save this manual to your list of manuals |
Page 91 highlights
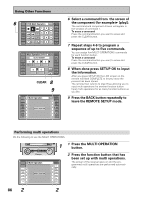
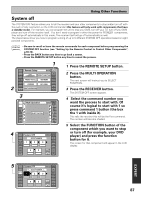
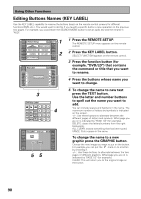
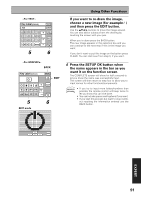
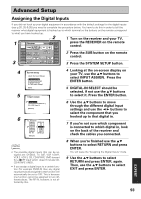
~For TEXT~ Key Label [DVD/LD] AUD BACK MAX6 + A B C D E F G ALL CLEAR HI J KLMN PAGE DELETE O P Q R S T U 1/4 - V W X Y Z SPACE SETUP OK 5 6 ~For GRAPHICs~ BACK Key Label [DVD/LD] BACK EDIT 7 80 + 2 34 ¢ PAGE 1/2 1 ¡e E - CLEAR SETUP OK EDIT 5 6 EDIT mode Using Other Functions If you want to re-draw the image, choose a new image (for example ) and then press the EDIT button. Use the 5∞2 3 buttons to move the image around. You can also add or subtract from the drawing by touching the screen with your pen. When you're done press the BACK button. The new image appears in the selection box and you can continue to the next step if this is the image you want. If you don't want to put this image on the button press CLEAR. You can start over from step 5, if you want. 6 Press the SETUP OK button when the name appears in the bar as you want it on the function screen. The COMPLETE screen will show for half a second to let you know the name was successfully input. The screen will then return to step four to allow you to input names for other functions/components. memo • If you try to input more letters/numbers than possible the remote control will beep twice to let you know this can't be done. • You can include spaces and hyphens if you want. • If you start this process but want to stop it with- out inputting the information entered use the BACK button. % @ fi# BACK EXPERT 91
-
 1
1 -
2
-
3
-
4
-
5
-
6
-
7
-
8
-
9
-
10
-
11
-
12
-
13
-
14
-
15
-
16
-
17
-
18
-
19
-
20
-
21
-
22
-
23
-
24
-
25
-
26
-
27
-
28
-
29
-
30
-
31
-
32
-
33
-
34
-
35
-
36
-
37
-
38
-
39
-
40
-
41
-
42
-
43
-
44
-
45
-
46
-
47
-
48
-
49
-
50
-
51
-
52
-
53
-
54
-
55
-
56
-
57
-
58
-
59
-
60
-
61
-
62
-
63
-
64
-
65
-
66
-
67
-
68
-
69
-
70
-
71
-
72
-
73
-
74
-
75
-
76
-
77
-
78
-
79
-
80
-
81
-
82
-
83
-
84
-
85
-
 86
86 -
 87
87 -
 88
88 -
 89
89 -
 90
90 -
 91
91 -
 92
92 -
 93
93 -
 94
94 -
 95
95 -
 96
96 -
97
-
98
-
99
-
100
-
101
-
102
-
103
-
104
-
105
-
106
-
107
-
108
-
109
-
110
-
111
-
112
-
113
-
114
-
115
-
116
-
117
-
118
-
119
-
120
 |
 |
