Pioneer VSX-49TX Owner's Manual - Page 21
Connecting VCRs or DVRs, Connecting a Video Component to the Front Panel
 |
View all Pioneer VSX-49TX manuals
Add to My Manuals
Save this manual to your list of manuals |
Page 21 highlights
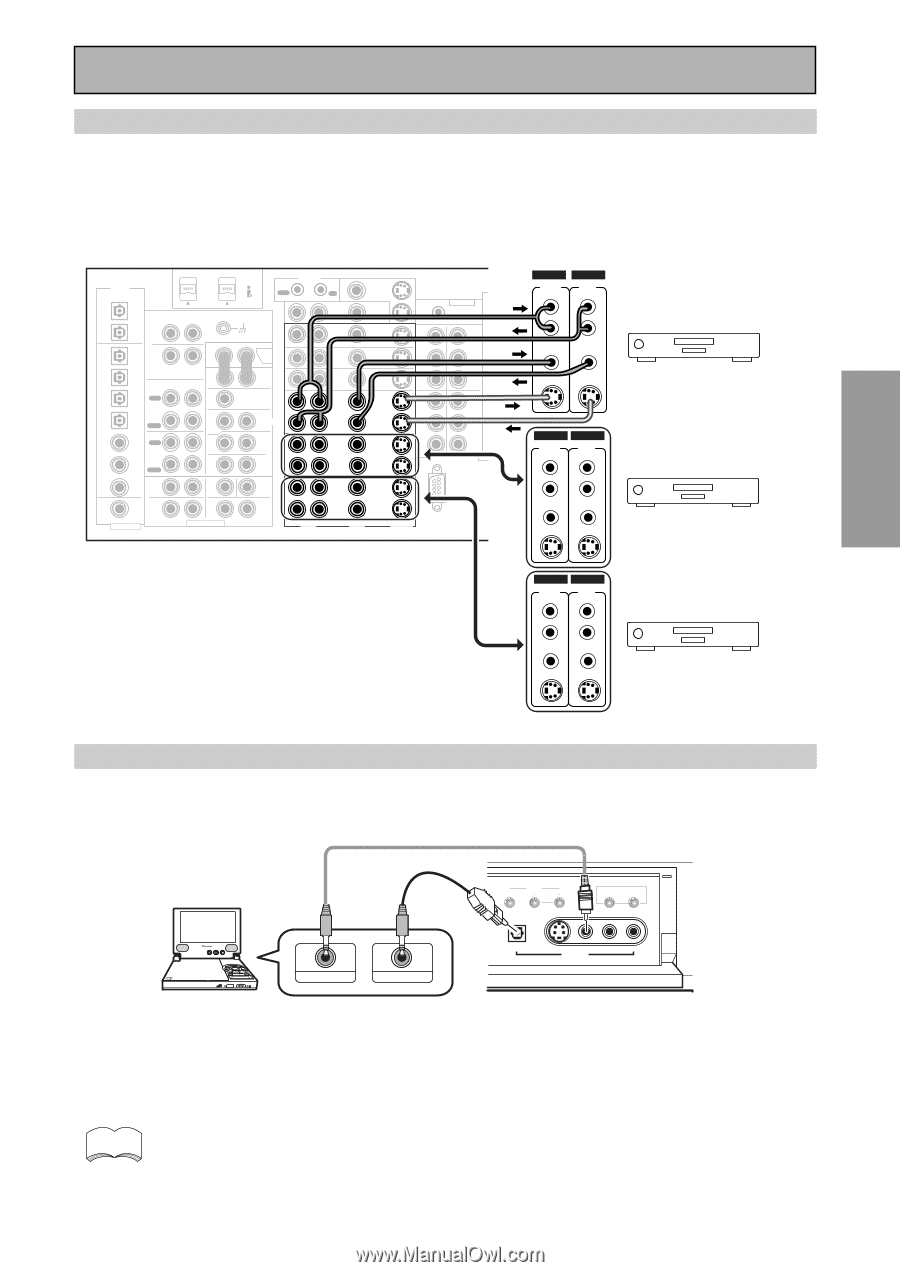
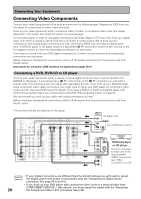
PREPARATION PREPARATION Connecting Your Equipment Connecting VCRs or DVRs Connect the video signal with either S video or composite video cords (see p.19). Use analog audio cords for the audio signal. For components you want to record into be sure to hook up both the inputs and outputs and use composite or S video cords for the source players. *The arrows indicate the direction of the signal. DIGITAL PCM/2DIGITAL /DTS 2 OUT S400 (AUDIO) OUT 1 PHONO R AUDIO L OUT IN 7 (CD-R/ CD TAPE1 IN /MD) IN 6 (VCR2) IN R 5 OUT (VCR1 REC /DVR) IN CD-R/ TAPE1 4 /MD (SAT) IN IN PLAY 3 IN OUT (CD) REC TAPE2 MONITOR 2 IN (TV) IN PLAY 1 IN (DVD /LD) 2RF IN (DVD /LD) (For LD) ASSIGNABLE FRONT R SURROUND R AUDIO POWER AMP R L IN FRONT L R L CENTER 1 (Single) R R SUB W. L LR MULTI CH INPUT SUB W. PRE OUT 2 SURROUND L SURROUND BACK L (Single) CENTER SURROUND BACK L (Single) CONTROL IN MULTIROOM & SOURCE DVD /LD IN TV IN SAT IN OUT VCR1 /DVR IN OUT VCR2 IN MONITOR OUT OUT IN IN IN OUT IN OUT IN DVD /LD IN 1 Y PB PR IN 2 Y REMOTE IN MULTIROOM & SOURCE Y MONITOR OUT PB PR IN 3 Y PB PB PR PR COMPONENT VIDEO ASSIGNABLE R L AUDIO OUT OUT VCR3 IN IN VIDEO S2 VIDEO RS-232C IN OUT AUDIO Å · AUDIO ª L ANTENNA(REC) (PLAY) L L FRONT AM LOOP ANTENNA RR R FM 75Ω UNBAL VIDEO VIDEO AC OUTLET CENTER S-VIDEO S-VIDEO VCR 1/DVRAC IN L SURROUND IN R AUDIO (REC) L L SURROUND BACK RR VIDEO OUT AUDIO (PLAY) (Single) L R VIDEO SPEAKERS S-VIDEO S-VIDEO SPEAKERS ª ı· L R VCR 2 IN AUDIO (REC) L OUT AUDIO (PLAY) L R VIDEO R VIDEO S-VIDEO S-VIDEO VCR 3 Connecting a Video Component to the Front Panel Connect a portable DVD player, video game console or any video component to the front panel as show here. Front video connections are accessed via the front panel input selector as "VIDEO." CLASS TUNER STATION CH MODE (5ch/7ch) MULTI ROOM & SOURCE CONTROL ON/OFF COLOR BRIGHT MONITOR PHONES DIGITAL OUT (OPTICAL) ON/OFF HOLD VIDEO-IN/OUT AUDIO-IN/OUT DIGITAL IN S-VIDEO VIDEO VIDEO INPUT L AUDIO R Be careful! For portable DVD players you will need a specialized optical cord (for the audio) that has a mini optical plug on one end and a regular optical plug on the other. memo You cannot assign the name of the digital input on the front panel. It will always appear as "VIDEO" in the receiver's display. See page 93 for more information on "Assigning the Digital Inputs". 21
-
 1
1 -
2
-
3
-
4
-
5
-
6
-
7
-
8
-
9
-
10
-
11
-
12
-
13
-
14
-
15
-
 16
16 -
 17
17 -
 18
18 -
 19
19 -
 20
20 -
 21
21 -
 22
22 -
 23
23 -
 24
24 -
 25
25 -
 26
26 -
27
-
28
-
29
-
30
-
31
-
32
-
33
-
34
-
35
-
36
-
37
-
38
-
39
-
40
-
41
-
42
-
43
-
44
-
45
-
46
-
47
-
48
-
49
-
50
-
51
-
52
-
53
-
54
-
55
-
56
-
57
-
58
-
59
-
60
-
61
-
62
-
63
-
64
-
65
-
66
-
67
-
68
-
69
-
70
-
71
-
72
-
73
-
74
-
75
-
76
-
77
-
78
-
79
-
80
-
81
-
82
-
83
-
84
-
85
-
86
-
87
-
88
-
89
-
90
-
91
-
92
-
93
-
94
-
95
-
96
-
97
-
98
-
99
-
100
-
101
-
102
-
103
-
104
-
105
-
106
-
107
-
108
-
109
-
110
-
111
-
112
-
113
-
114
-
115
-
116
-
117
-
118
-
119
-
120
 |
 |