Pioneer VSX-49TX Owner's Manual - Page 61
Video Select, Using the Headphones - reset
 |
View all Pioneer VSX-49TX manuals
Add to My Manuals
Save this manual to your list of manuals |
Page 61 highlights
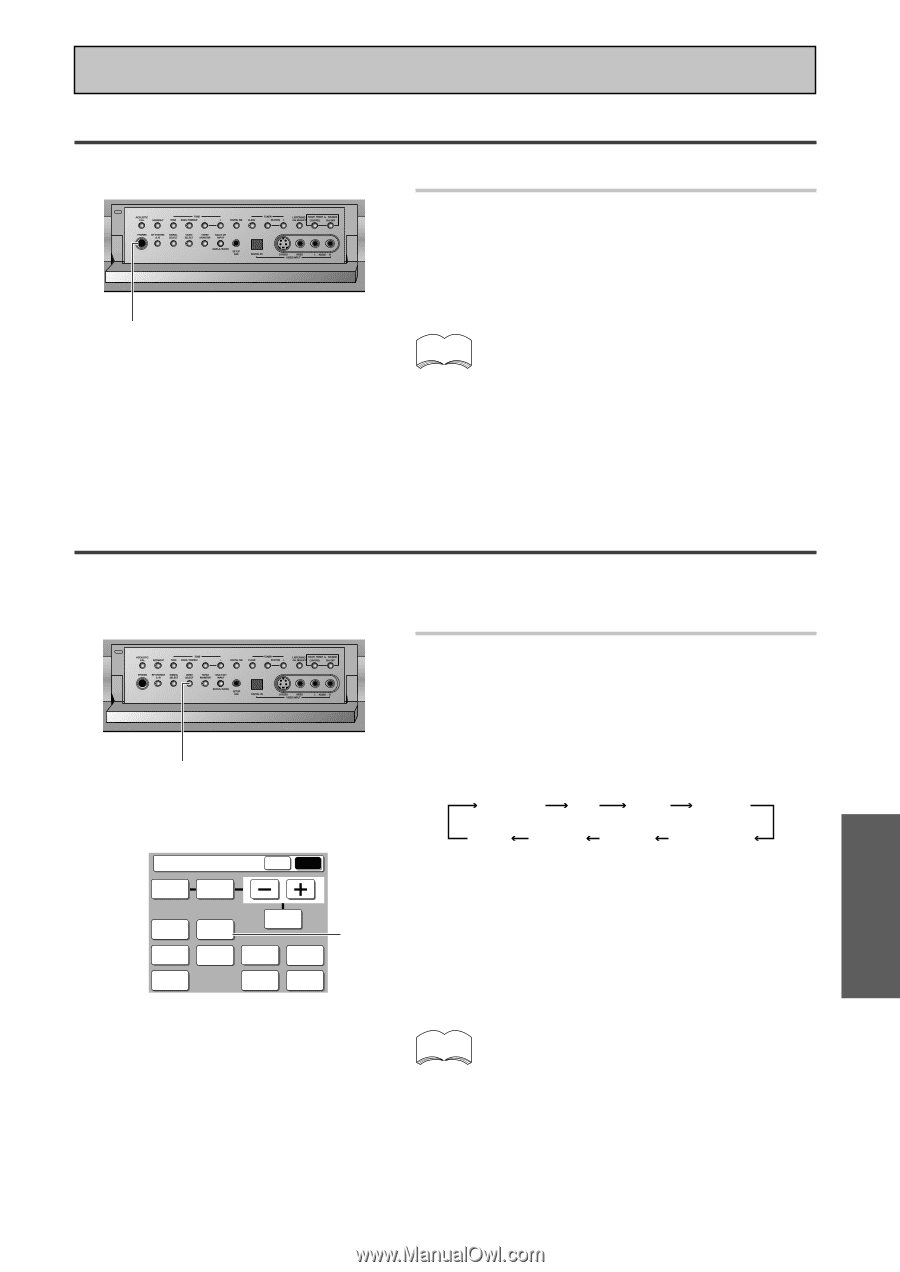
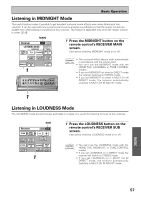
Using the Headphones The headphone feature is explained here. Basic Operation 1 Plug headphones into the Phones jack on the front of the receiver. No sound will be audible from the speakers when headphones are plugged in. 1 Phones jack Video Select memo • All listening modes will be downmixed to 2 channels. • If you're listening to a 2 channel source there will be no matrix decoding (i.e. you will not be able to get surround sound decoding). • If your U-shaped connectors (see p.34) aren't in place you won't be able to use headphones. • "SPEAKER SYSTEMS" (p.41), "SPEAKER DISTANCE" (p.44) and "Acoustic Calibration EQ" (p.45) settings have no effect on playback through headphones. This function allows you to listen to one sound source while you watch a different video source on your TV. The sound source is set in the normal fashion as is explained on p.49 & 50. You then alter the video input with the VIDEO SELECT button. 1 VIDEO SELECT Receiver MAIN SUB TONE BASS/ TREBLE EFFECT/ DISPLAY VIDEO DIMMER SELECT CH SEL. 1 STATUS SPEAKER A/B LOUDNESS INPUT ATT. SYSTEM SETUP TAPE 2 SIGNAL MONITOR SELECT 1 Use the VIDEO SELECT button on the RECEIVER'S sub screen or the front panel to cycle through the different possible video inputs. The first press shows the video input you are currently using. After that pressing VIDEO SELECT cycles though the possibilities in the following order: DVD/LD TV SAT VIDEO OFF VCR 3 VCR 2 VCR 1/DVR The OFF setting means you are listening without a video signal. After choosing a video input the display on the receiver will show that input for about 5 seconds and then revert to showing the listening mode the receiver is in. memo • The VIDEO SELECT remains set to the input you chose until you change the audio input. • If you change audio functions the receiver will reset itself to make the video and audio inputs correspond. Also, if you switch the power of the receiver off when you turn it back on the video and audio inputs will reset so that they correspond. 61 BASIC
-
 1
1 -
2
-
3
-
4
-
5
-
6
-
7
-
8
-
9
-
10
-
11
-
12
-
13
-
14
-
15
-
16
-
17
-
18
-
19
-
20
-
21
-
22
-
23
-
24
-
25
-
26
-
27
-
28
-
29
-
30
-
31
-
32
-
33
-
34
-
35
-
36
-
37
-
38
-
39
-
40
-
41
-
42
-
43
-
44
-
45
-
46
-
47
-
48
-
49
-
50
-
51
-
52
-
53
-
54
-
55
-
 56
56 -
 57
57 -
 58
58 -
 59
59 -
 60
60 -
 61
61 -
 62
62 -
 63
63 -
 64
64 -
 65
65 -
 66
66 -
67
-
68
-
69
-
70
-
71
-
72
-
73
-
74
-
75
-
76
-
77
-
78
-
79
-
80
-
81
-
82
-
83
-
84
-
85
-
86
-
87
-
88
-
89
-
90
-
91
-
92
-
93
-
94
-
95
-
96
-
97
-
98
-
99
-
100
-
101
-
102
-
103
-
104
-
105
-
106
-
107
-
108
-
109
-
110
-
111
-
112
-
113
-
114
-
115
-
116
-
117
-
118
-
119
-
120
 |
 |