Pioneer VSX-49TX Owner's Manual - Page 98
OSD On-screen Display ADJUSTMENT
 |
View all Pioneer VSX-49TX manuals
Add to My Manuals
Save this manual to your list of manuals |
Page 98 highlights
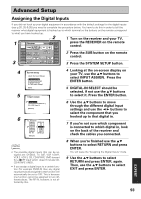
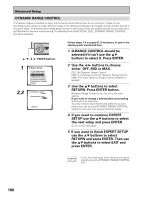
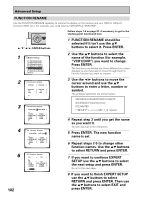
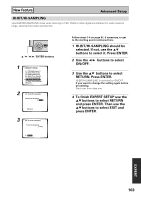
Advanced Setup OSD (On-screen Display) ADJUSTMENT Use this feature to adjust your TV display if it seems difficult to see all the instructions on the screen. This adjustment basically lets you move the screen displays up or down and left or right to get a better match between the displays for this receiver and your TV. ENTER STANDBY/ON 5˜∞˜2˜3˜ENTER buttons 1 3.Expert Setup [1. OSD Adjustment ] [2. Bass Peak Level] [3. D-Range Control] [4. Multi-Ch In Select] [5. Function Rename] [6. Hi-bit/Hi-sampling] [7. Multi-Room Setting ] [Return] 2 3.1. OSD Adjustment [Return] Follow steps 1-4 on page 97, if necessary, to get to the starting point mentioned here. 1 OSD ADJUSTMENT should be selected if it isn't use the 5∞ buttons to select it. Press ENTER. 2 Use the 2 3 5∞ buttons to move the display field around until you get one that you feel best suits your TV. 3 Press ENTER button. Your new screen display will be set. Next, move on to BASS PEAK LEVEL, if necessary. If you want to change a setting before proceeding Start over from step one. 4 If you want to continue EXPERT SETUP use the 5∞ buttons to select the next setup and press ENTER. Go on to the next page. 5 If you want to finish EXPERT SETUP use the 5∞ buttons to select RETURN and press ENTER. Then use the 5∞ buttons to select EXIT and press ENTER. 98
-
 1
1 -
2
-
3
-
4
-
5
-
6
-
7
-
8
-
9
-
10
-
11
-
12
-
13
-
14
-
15
-
16
-
17
-
18
-
19
-
20
-
21
-
22
-
23
-
24
-
25
-
26
-
27
-
28
-
29
-
30
-
31
-
32
-
33
-
34
-
35
-
36
-
37
-
38
-
39
-
40
-
41
-
42
-
43
-
44
-
45
-
46
-
47
-
48
-
49
-
50
-
51
-
52
-
53
-
54
-
55
-
56
-
57
-
58
-
59
-
60
-
61
-
62
-
63
-
64
-
65
-
66
-
67
-
68
-
69
-
70
-
71
-
72
-
73
-
74
-
75
-
76
-
77
-
78
-
79
-
80
-
81
-
82
-
83
-
84
-
85
-
86
-
87
-
88
-
89
-
90
-
91
-
92
-
 93
93 -
 94
94 -
 95
95 -
 96
96 -
 97
97 -
 98
98 -
 99
99 -
 100
100 -
 101
101 -
 102
102 -
 103
103 -
104
-
105
-
106
-
107
-
108
-
109
-
110
-
111
-
112
-
113
-
114
-
115
-
116
-
117
-
118
-
119
-
120
 |
 |
