Pioneer VSX-49TX Owner's Manual - Page 96
RETURN and press ENTER
 |
View all Pioneer VSX-49TX manuals
Add to My Manuals
Save this manual to your list of manuals |
Page 96 highlights
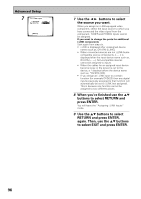
Advanced Setup 7 1.3. i.LINK Input 1 DV-757Ai 2 DV-47Ai [ i.LINK ] [ DVD/LD ] [Return] 7 Use the 2 3 buttons to select the source you want. When you assign an i.LINK-equipped video component, select the input source to which you have connected the video signal from the component. TUNER and PHONO inputs cannot be assigned. If you want to change the ports for additional i.LINK components Start again from step six. • i.LINK is displayed after unassigned device names such as, DV-47Ai [i.LINK]. • When connected devices are not i.LINK-Audio- compatible source components, [- - - -] is displayed after the input device name such as, DV-47Ai [- - - -]. Non-compatible devices cannot be assigned to inputs. • When the cables for an assigned input device become loose or the power is cut to the device, a * displays before the device name such as, *DV-47Ai [CD]. • If you assign an i.LINK input to a certain function (for example DVD/LD) then any digital inputs previously assigned to that function will automatically be set to i.LINK (not assigned). This is because one function cannot be assigned to two different places. 8 When you're finished use the 5∞ buttons to select RETURN and press ENTER. You will leave the "Assigning i.LINK Inputs" mode. 9 Use the 5∞ buttons to select RETURN and press ENTER, again. Then, use the 5∞ buttons to select EXIT and press ENTER. 96
-
 1
1 -
2
-
3
-
4
-
5
-
6
-
7
-
8
-
9
-
10
-
11
-
12
-
13
-
14
-
15
-
16
-
17
-
18
-
19
-
20
-
21
-
22
-
23
-
24
-
25
-
26
-
27
-
28
-
29
-
30
-
31
-
32
-
33
-
34
-
35
-
36
-
37
-
38
-
39
-
40
-
41
-
42
-
43
-
44
-
45
-
46
-
47
-
48
-
49
-
50
-
51
-
52
-
53
-
54
-
55
-
56
-
57
-
58
-
59
-
60
-
61
-
62
-
63
-
64
-
65
-
66
-
67
-
68
-
69
-
70
-
71
-
72
-
73
-
74
-
75
-
76
-
77
-
78
-
79
-
80
-
81
-
82
-
83
-
84
-
85
-
86
-
87
-
88
-
89
-
90
-
 91
91 -
 92
92 -
 93
93 -
 94
94 -
 95
95 -
 96
96 -
 97
97 -
 98
98 -
 99
99 -
 100
100 -
 101
101 -
102
-
103
-
104
-
105
-
106
-
107
-
108
-
109
-
110
-
111
-
112
-
113
-
114
-
115
-
116
-
117
-
118
-
119
-
120
 |
 |
