Pioneer VSX-49TX Owner's Manual - Page 11
Remote Control Backlight - 6 1 ch receiver
 |
View all Pioneer VSX-49TX manuals
Add to My Manuals
Save this manual to your list of manuals |
Page 11 highlights
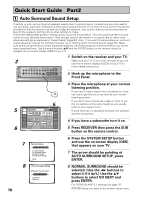
PREPARATION PREPARATION 7 RECEIVER DVD/LD LCD Commander TOUCH PANEL ADJUSTMENT VCR1 /DVR LCD CONTRAST VCR2 VCR3 TV BEEP LCD TIMER : 10 SEC OFF 1 2 BACK REMOTE SETUP CD CD-R/ TAPE1 TUNER VIDEO SAT 3 TV CONTROL 6 Before You Start 6 Decide which other adjustments you'd like to make and press those buttons. The different possibilities are: LCD CONTRAST: You can lighten or darken the contrast on the remote control screen. Use the - /+ buttons to change the contrast. LCD TIMER: In order to save the battery a timer will automatically turn the remote control off after a set amount of time if no commands are entered. You can choose how long the idle remote control will stay on before the timer turns it off. You can set this function in a range of 5-60 seconds. The default setting is 10 seconds. Use the - /+ buttons to adjust the number of seconds for the timer setting. (The REMOTE SETUP screen and its sub-screens are all fixed to stay on 60 seconds. If no command is entered they will turn off after 60 seconds.) BEEP: When you have sent a command (pushed a button) the remote control will beep once. You can choose the sound of the beep from three different possibilities here by pushing the appropriate button (1,2,3). You can also turn the beep sound off. 7 When you are finished with the adjustments press the BACK button to go back to the Remote Setup screen. Remote Control Backlight 1 LIGHT RECEIVER DVD/LD VCR1 /DVR VCR2 VCR3 TV REMOTE SETUP CD CD-R/ TAPE1 TUNER VIDEO SAT TV CONTROL use lock TV CONTROL FUNCTION CH + CH - VOL + VOL - FUNCTION ENTER STANDBY/ON MULTI SYSTEM OPERATION OFF MUTING MASTER VOLUME + - 1 Decide whether you'd like to have the backlight on or not and use the LIGHT switch to turn it on or off. This button turns the light on or off. If you leave it on the remote screen is easier to see but uses more energy and thus wears the batteries down quicker. 11
-
 1
1 -
2
-
3
-
4
-
5
-
 6
6 -
 7
7 -
 8
8 -
 9
9 -
 10
10 -
 11
11 -
 12
12 -
 13
13 -
 14
14 -
 15
15 -
 16
16 -
17
-
18
-
19
-
20
-
21
-
22
-
23
-
24
-
25
-
26
-
27
-
28
-
29
-
30
-
31
-
32
-
33
-
34
-
35
-
36
-
37
-
38
-
39
-
40
-
41
-
42
-
43
-
44
-
45
-
46
-
47
-
48
-
49
-
50
-
51
-
52
-
53
-
54
-
55
-
56
-
57
-
58
-
59
-
60
-
61
-
62
-
63
-
64
-
65
-
66
-
67
-
68
-
69
-
70
-
71
-
72
-
73
-
74
-
75
-
76
-
77
-
78
-
79
-
80
-
81
-
82
-
83
-
84
-
85
-
86
-
87
-
88
-
89
-
90
-
91
-
92
-
93
-
94
-
95
-
96
-
97
-
98
-
99
-
100
-
101
-
102
-
103
-
104
-
105
-
106
-
107
-
108
-
109
-
110
-
111
-
112
-
113
-
114
-
115
-
116
-
117
-
118
-
119
-
120
 |
 |