Pioneer VSX-49TX Owner's Manual - Page 90
Editing Buttons Names KEY LABEL
 |
View all Pioneer VSX-49TX manuals
Add to My Manuals
Save this manual to your list of manuals |
Page 90 highlights
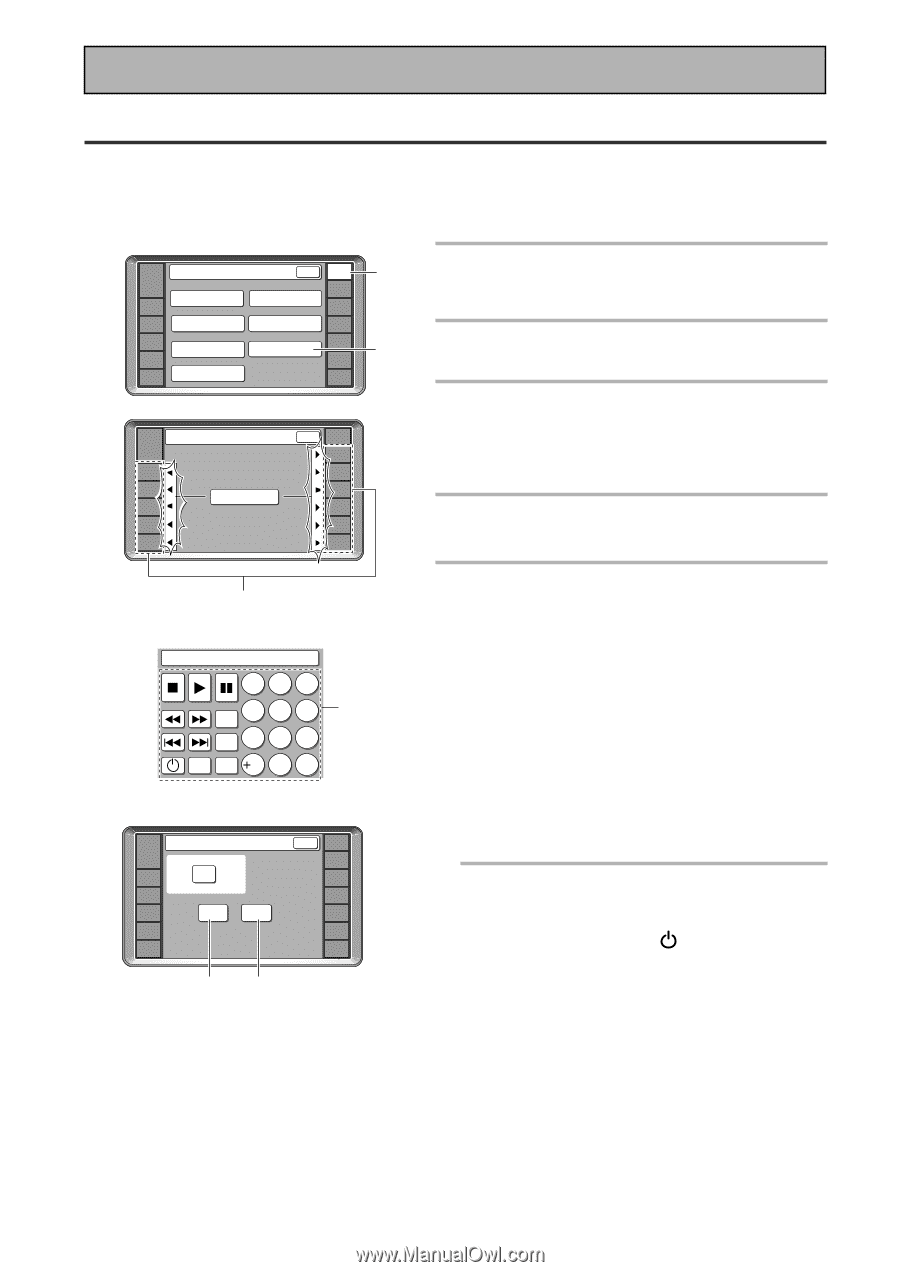
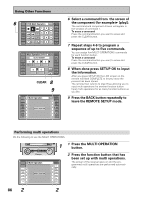
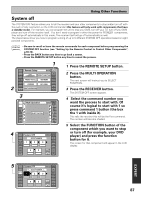
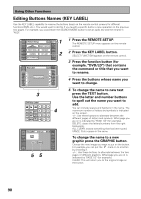
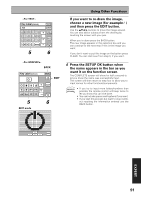
Using Other Functions Editing Buttons Names (KEY LABEL) Use the KEY LABEL capability to rename the buttons (keys) on the remote control screens for different functions (DVD, etc.). You would want to do this if you taught a specific button a new operation on the previous two pages. For example, you could teach the SEARCH MODE button to be an audio key and the rename it "AUD". RECEIVER DVD/LD VCR1 /DVR Remote Setup BACK REMOTE SETUP LCD COMMANDER PRESET RECALL DIRECT FUNCTION ITEM MEMO CD CD-R/ TAPE1 TUNER VCR2 VCR3 TV LEARNING MULTI OPERATION KEY LABEL VIDEO SAT TV CONTROL 1 2 Key Label RECEIVER DVD/LD VCR1 /DVR VCR2 VCR3 TV SELECT FUNCTION BACK REMOTE SETUP CD CD-R/ TAPE1 TUNER VIDEO SAT TV CONTROL 3 DVD:Key Label 123 SEARCH 4 5 6 4 MODE TOP 7 8 9 MENU MENU RETURN 10 0 C Key Label [DVD/LD] AMP DVD/LD VCR1 /DVR VCR2 SEARCH MODE TEXT GRAPHIC VCR3 TV BACK REMOTE SETUP CD CD-R/ TAPE1 TUNER VIDEO SAT TV CONTROL 55 1 Press the REMOTE SETUP. The REMOTE SETUP menu appears on the remote control. 2 Press the KEY LABEL button. SELECT FUNCTION appears on the remote control. 3 Press the function button (for example, "DVD/LD") that contains the command or title that you want to rename. 4 Press the buttons whose name you want to change. 5 To change the name to new text press the TEXT button. Use the letter and number buttons to spell out the name you want to add. You can include spaces and hyphens in the name. The maximum number of letters and symbols is indicated on the screen. +/-: Use these buttons to alternate between the different pages of letters and symbols. What page you are on is indicated by "PAGE 1/3" (for example). DELETE: clears the letters/numbers from the right backwards. ALL CLEAR: erases everything that has been typed. SPACE: Puts a space in the name. To change the name to a new graphic press the GRAPHIC button. Choose the new image you want to put on the button. For example you can put the mark on to a button by choosing it. +/-: Use these buttons to alternate between the two pages of different graphics. What page you are on is indicated by "PAGE 1/2" (for example). CLEAR: This will return you to the original image on the button. 90
-
 1
1 -
2
-
3
-
4
-
5
-
6
-
7
-
8
-
9
-
10
-
11
-
12
-
13
-
14
-
15
-
16
-
17
-
18
-
19
-
20
-
21
-
22
-
23
-
24
-
25
-
26
-
27
-
28
-
29
-
30
-
31
-
32
-
33
-
34
-
35
-
36
-
37
-
38
-
39
-
40
-
41
-
42
-
43
-
44
-
45
-
46
-
47
-
48
-
49
-
50
-
51
-
52
-
53
-
54
-
55
-
56
-
57
-
58
-
59
-
60
-
61
-
62
-
63
-
64
-
65
-
66
-
67
-
68
-
69
-
70
-
71
-
72
-
73
-
74
-
75
-
76
-
77
-
78
-
79
-
80
-
81
-
82
-
83
-
84
-
 85
85 -
 86
86 -
 87
87 -
 88
88 -
 89
89 -
 90
90 -
 91
91 -
 92
92 -
 93
93 -
 94
94 -
 95
95 -
96
-
97
-
98
-
99
-
100
-
101
-
102
-
103
-
104
-
105
-
106
-
107
-
108
-
109
-
110
-
111
-
112
-
113
-
114
-
115
-
116
-
117
-
118
-
119
-
120
 |
 |