Pioneer VSX-49TX Owner's Manual - Page 34
Back Panel
 |
View all Pioneer VSX-49TX manuals
Add to My Manuals
Save this manual to your list of manuals |
Page 34 highlights
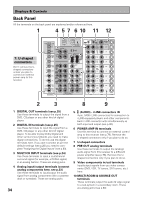
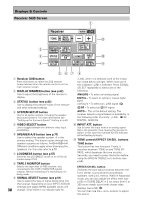
Displays & Controls Back Panel All the terminals on the back panel are explained and/or referenced here. 1 4 5 7 6 10 11 12 7: U-shaped connectors Don't remove the Ushaped connectors unless you plan to connect an external power amp to this receiver. DIGITAL PCM/2DIGITAL /DTS 2 OUT S400 (AUDIO) OUT 1 PHONO R AUDIO L OUT IN 7 (CD-R/ CD TAPE1 IN /MD) IN 6 (VCR2) IN R 5 OUT (VCR1 REC IN /DVR) CD-R/ TAPE1 4 /MD (SAT) IN IN PLAY 3 IN OUT (CD) REC TAPE2 MONITOR 2 IN (TV) IN PLAY 1 IN (DVD /LD) 2RF IN (DVD /LD) (For LD) ASSIGNABLE FRONT R SURROUND R AUDIO POWER AMP R L IN FRONT L R L CENTER 1 (Single) R R SUB W. L LR MULTI CH INPUT SUB W. PRE OUT 2 SURROUND L SURROUND BACK L (Single) CENTER SURROUND BACK L (Single) CONTROL IN MULTIROOM & SOURCE DVD /LD IN TV IN SAT IN OUT VCR1 /DVR IN MONITOR OUT OUT IN IN IN OUT IN OUT OUT VCR2 IN IN R L AUDIO OUT OUT VCR3 IN IN VIDEO S2 VIDEO 2 3 8 9 1 DIGITAL OUT terminals (see p.25) Use these terminals to output the signal from a DVD, CD player or any other kind of digital player. 2 DIGITAL IN terminals (see p.25) Use these terminals to input the signal from a DVD, CD player or any other kind of digital player. To be able to play Dolby Digital and other surround soundtracks you need to make digital connections. To do this use the digital terminals here. If you don't connect as per the default settings (see p.26) you need to complete "Assigning the Digital Inputs" (see p.93). 3 MULTI CH INPUT terminals (see p.24) Use these terminals to input a multichannel surround signal (for example, a DVD-A signal) in an analog fashion. These are analog jacks. 4 Analog input/output terminals (connect analog components here, see p.23) Use these terminals to input/output the audio signal from analog components (like a cassette deck or turntable). These are analog jacks. 34 5. (AUDIO) - i.LINK connectors 4-pin, S400 i.LINK connectors for connection to i.LINK-equipped players and other components. Each i.LINK connector acts simultaneously as both input and output (see p.30). 6 POWER AMP IN terminals Use this terminal to connect an external control amp to this receiver (see p.79). Remove the U-shaped connectors only if you plan to do so. 7 U-shaped connectors 8 PRE OUT analog terminals Use these terminals to output the (analog) audio signal from this receiver to a different power amplifier (see p.78). Remove the Ushaped connectors only if you plan to do so. 9 Video components in/out terminals Input/output signals from you video components (DVD, VCR, TV tuners, SAT tuners, etc.) here. 10 MULTI-ROOM & SOURCE OUT terminals These terminals output the audio & video signal to a sub-system in a secondary room. These are analog jacks (see p.80).
-
 1
1 -
2
-
3
-
4
-
5
-
6
-
7
-
8
-
9
-
10
-
11
-
12
-
13
-
14
-
15
-
16
-
17
-
18
-
19
-
20
-
21
-
22
-
23
-
24
-
25
-
26
-
27
-
28
-
 29
29 -
 30
30 -
 31
31 -
 32
32 -
 33
33 -
 34
34 -
 35
35 -
 36
36 -
 37
37 -
 38
38 -
 39
39 -
40
-
41
-
42
-
43
-
44
-
45
-
46
-
47
-
48
-
49
-
50
-
51
-
52
-
53
-
54
-
55
-
56
-
57
-
58
-
59
-
60
-
61
-
62
-
63
-
64
-
65
-
66
-
67
-
68
-
69
-
70
-
71
-
72
-
73
-
74
-
75
-
76
-
77
-
78
-
79
-
80
-
81
-
82
-
83
-
84
-
85
-
86
-
87
-
88
-
89
-
90
-
91
-
92
-
93
-
94
-
95
-
96
-
97
-
98
-
99
-
100
-
101
-
102
-
103
-
104
-
105
-
106
-
107
-
108
-
109
-
110
-
111
-
112
-
113
-
114
-
115
-
116
-
117
-
118
-
119
-
120
 |
 |