Samsung SGH-A697 User Manual (user Manual) (ver.f8.4) (English) - Page 78
Group Settings, Phone Number
 |
View all Samsung SGH-A697 manuals
Add to My Manuals
Save this manual to your list of manuals |
Page 78 highlights
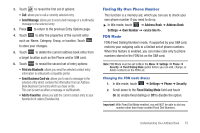
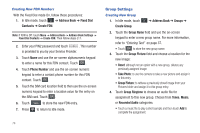
Creating New FDN Numbers With the Fixed Dial mode On, follow these procedures: 1. In Idle mode, touch ➔ Address Book ➔ Fixed Dial Contacts ➔ Create FDN. Note: If FDN is Off: touch Menu -> Address Book -> Address Book Settings -> Fixed Dial Contacts -> Create FDN. Then follow steps 2-7. 2. Enter your PIN2 password and touch . This number is provided to you by your Service Provider. 3. Touch Name and use the on-screen alphanumeric keypad to enter a name for this FDN contact. Touch OK . 4. Touch Phone Number and use the on-screen numeric keypad to enter a contact phone number for this FDN contact. Touch OK . 5. Touch the SIM card location field to then use the on-screen numeric keypad to enter a location value for the entry on the SIM card. Touch OK . 6. Touch Save to store the new FDN entry. 7. Press to return to Idle mode. Group Settings Creating New Group 1. In Idle mode, touch Create Group. ➔ Address Book ➔ Groups ➔ 2. Touch the Group Name field and use the on-screen keypad to enter a new group name. For more information, refer to "Entering Text" on page 37. • Touch OK to store the new group name. 3. Touch the Group Picture field and choose a location for the new image: • Reset: although not an option with a new group, deletes any previously assigned image. • Take Photo: to use the camera to take a new picture and assign it to this entry. • Group Picture: to retrieve a previously stored image from your Pictures folder and assign it to this group entry. 4. Touch Group Ringtone to choose an audio file for assignment to this new group. Choose from Tones, Music, or Recorded Audio categories. • Touch a music file to play a short sample and then touch Add to complete the assignment. 74
-
 1
1 -
2
-
3
-
4
-
5
-
6
-
7
-
8
-
9
-
10
-
11
-
12
-
13
-
14
-
15
-
16
-
17
-
18
-
19
-
20
-
21
-
22
-
23
-
24
-
25
-
26
-
27
-
28
-
29
-
30
-
31
-
32
-
33
-
34
-
35
-
36
-
37
-
38
-
39
-
40
-
41
-
42
-
43
-
44
-
45
-
46
-
47
-
48
-
49
-
50
-
51
-
52
-
53
-
54
-
55
-
56
-
57
-
58
-
59
-
60
-
61
-
62
-
63
-
64
-
65
-
66
-
67
-
68
-
69
-
70
-
71
-
72
-
 73
73 -
 74
74 -
 75
75 -
 76
76 -
 77
77 -
 78
78 -
 79
79 -
 80
80 -
 81
81 -
 82
82 -
 83
83 -
84
-
85
-
86
-
87
-
88
-
89
-
90
-
91
-
92
-
93
-
94
-
95
-
96
-
97
-
98
-
99
-
100
-
101
-
102
-
103
-
104
-
105
-
106
-
107
-
108
-
109
-
110
-
111
-
112
-
113
-
114
-
115
-
116
-
117
-
118
-
119
-
120
-
121
-
122
-
123
-
124
-
125
-
126
-
127
-
128
-
129
-
130
-
131
-
132
-
133
-
134
-
135
-
136
-
137
-
138
-
139
-
140
-
141
-
142
-
143
-
144
-
145
-
146
-
147
-
148
-
149
-
150
-
151
-
152
-
153
-
154
-
155
-
156
-
157
-
158
-
159
-
160
-
161
-
162
-
163
-
164
-
165
-
166
-
167
-
168
-
169
-
170
-
171
-
172
-
173
-
174
-
175
-
176
-
177
-
178
-
179
-
180
-
181
-
182
-
183
-
184
-
185
 |
 |