Yamaha 2.0 Owner's Manual - Page 107
KyTypeOB, Cmin7
 |
View all Yamaha 2.0 manuals
Add to My Manuals
Save this manual to your list of manuals |
Page 107 highlights
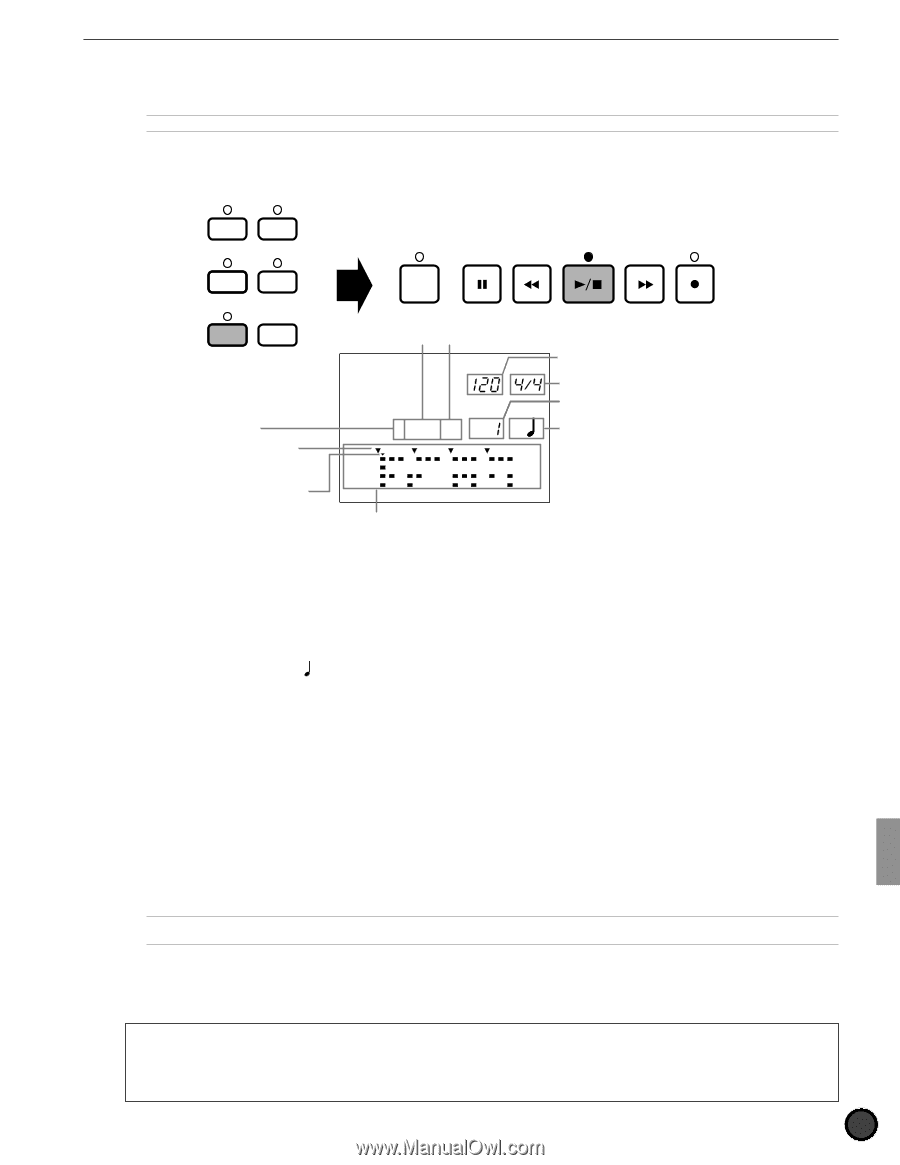
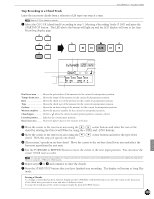
Feature Reference - Song Record Mode Step Recording to a Chord Track Enter the necessary chords from a selection of 26 types one step at a time. ARefer to P.79 for details on chords. ! Select the CHO TR (chord track) according to step 3. Selecting a Recording Track (P.100) and press the START/STOP button. The LED above the button will light up and the LCD display will turn to the Step Recording display page. TR1 MISC. TR2 CYMBAL BASS TMP TR SNARE RHYTHM PAT TR KICK CLICK CHORD CHO TR SOLO Root Beat Indicator Location pointer Type On-bass TEMPO BEAT KyTypeOB SONG MEASURE Cmin7 _ _ Tempo Beat Measure number Chord input MISC. CYMBAL SNARE KICK Data focus area Beat focus area ......... Shows the pattern beat of the measure for the current locationpointer position. Tempo focus area ..... Shows the tempo of the measure for the current locationpointer position. Root Shows the chord root of the measure for the current locationpointer position. Type Shows the chord type of the measure for the current locationpointer position. On-bass Shows the on-bass setting of the measure for the current locationpointer position. Measure number ...... Shows the measure number for the current locationpointer position. Chord input Shows a " " when the current location pointer position contains a chord. Location pointer ....... Indicates the current input position. Data focus area ......... Shows the pattern data in this measure with dots. " Move the cursor to the root focus area using the Q cursor buttons and select the root of the chord by rotating the Data Scroll Wheel or using the +1/YES and -1/NO buttons. # Move the cursor to the type focus area using the Q cursor buttons and select the type of the chord. With this step you specify one chord. $ (If necessary,) specify an on-bass chord. Move the cursor to the on-bass chord focus area and select the bass note apart from the root note. % Use the FORWARD or REWIND button to move the cursor to the next input position. You can move the cursor 1/16th note at a time. AYou can also select the input position one measure at a time by moving the cursor to the MEASURE focus area and by rotating the Data Scroll Wheel or using the +1/YES and -1/NO buttons. & Repeat steps ! to % and continue to enter the chords. ' Press the START/STOP button after you have finished step recording. The display will return to Song Play mode. Erasing a Mistake To change a chord that has been entered, simply use the FORWARD or REWIND button to move the cursor to the focus area of the chord data you want to erase and select a different chord. To erase the chord data of the current measure simply by press the ERASE button. 103
-
 1
1 -
2
-
3
-
4
-
5
-
6
-
7
-
8
-
9
-
10
-
11
-
12
-
13
-
14
-
15
-
16
-
17
-
18
-
19
-
20
-
21
-
22
-
23
-
24
-
25
-
26
-
27
-
28
-
29
-
30
-
31
-
32
-
33
-
34
-
35
-
36
-
37
-
38
-
39
-
40
-
41
-
42
-
43
-
44
-
45
-
46
-
47
-
48
-
49
-
50
-
51
-
52
-
53
-
54
-
55
-
56
-
57
-
58
-
59
-
60
-
61
-
62
-
63
-
64
-
65
-
66
-
67
-
68
-
69
-
70
-
71
-
72
-
73
-
74
-
75
-
76
-
77
-
78
-
79
-
80
-
81
-
82
-
83
-
84
-
85
-
86
-
87
-
88
-
89
-
90
-
91
-
92
-
93
-
94
-
95
-
96
-
97
-
98
-
99
-
100
-
101
-
 102
102 -
 103
103 -
 104
104 -
 105
105 -
 106
106 -
 107
107 -
 108
108 -
 109
109 -
 110
110 -
 111
111 -
 112
112 -
113
-
114
-
115
-
116
-
117
-
118
-
119
-
120
-
121
-
122
-
123
-
124
-
125
-
126
-
127
-
128
-
129
-
130
-
131
-
132
-
133
-
134
-
135
-
136
-
137
-
138
-
139
-
140
-
141
-
142
-
143
-
144
-
145
-
146
-
147
-
148
-
149
-
150
-
151
-
152
-
153
-
154
-
155
-
156
-
157
-
158
-
159
-
160
-
161
-
162
-
163
-
164
-
165
-
166
-
167
-
168
-
169
-
170
-
171
-
172
-
173
-
174
 |
 |