Yamaha 2.0 Owner's Manual - Page 85
Getting Ready to Record, Stand-by, Selecting a Track
 |
View all Yamaha 2.0 manuals
Add to My Manuals
Save this manual to your list of manuals |
Page 85 highlights
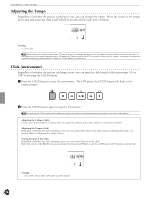
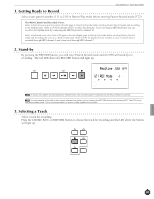
Feature Reference - Pattern Record Mode 1. Getting Ready to Record Select a user pattern number (111 to 210) in Pattern Play mode before entering Pattern Record mode (P.72). The MIDI Channel and Recorded Voices Select a drum kit you want to record on the 6th page in Pattern Job mode before entering Pattern Record mode and recording to the rhythm track. Refer to (P.92)for details on how to select the drum kit. If you are using a MIDI keyboard, you can record to the rhythm track by connecting the MIDI keyboard to channel 10. Select a keyboard voice voice from 128 types in the 6th display page in Pattern Job mode before entering Pattern Record mode and recording the voice to a chord or bass track. Refer to P.92 for details on how to select a voice. A chord track is recorded through MIDI channel 5 and a bass track through MIDI channel 7. 2. Stand-by By pressing the RECORD button, you will enter Pattern Record mode and the DTX will stand by for recording. The red LED above the RECORD button will light up. CLICK TEMPO BEAT Realtime PATTERN MEASURE QUANT. REC Mode OFF MISC. CYMBAL SNARE KICK AAn empty user pattern will automatically be selected even when a preset pattern is selected and the Record Button is pressed. AYou can erase all of the data in the currently selected user pattern just by pressing the RECORD button while holding SHIFT. The DTX will go into record-ready mode. This is convenient when you want to create a pattern from scratch. 3. Selecting a Track Select a track for recording. Press the CHORD, BASS, or RHYTHM button to choose the track for recording and the LED above the button will light up. TR1 MISC. TR2 CYMBAL BASS TMP TR SNARE RHYTHM PAT TR KICK CHORD CHO TR SOLO 81
-
 1
1 -
2
-
3
-
4
-
5
-
6
-
7
-
8
-
9
-
10
-
11
-
12
-
13
-
14
-
15
-
16
-
17
-
18
-
19
-
20
-
21
-
22
-
23
-
24
-
25
-
26
-
27
-
28
-
29
-
30
-
31
-
32
-
33
-
34
-
35
-
36
-
37
-
38
-
39
-
40
-
41
-
42
-
43
-
44
-
45
-
46
-
47
-
48
-
49
-
50
-
51
-
52
-
53
-
54
-
55
-
56
-
57
-
58
-
59
-
60
-
61
-
62
-
63
-
64
-
65
-
66
-
67
-
68
-
69
-
70
-
71
-
72
-
73
-
74
-
75
-
76
-
77
-
78
-
79
-
 80
80 -
 81
81 -
 82
82 -
 83
83 -
 84
84 -
 85
85 -
 86
86 -
 87
87 -
 88
88 -
 89
89 -
 90
90 -
91
-
92
-
93
-
94
-
95
-
96
-
97
-
98
-
99
-
100
-
101
-
102
-
103
-
104
-
105
-
106
-
107
-
108
-
109
-
110
-
111
-
112
-
113
-
114
-
115
-
116
-
117
-
118
-
119
-
120
-
121
-
122
-
123
-
124
-
125
-
126
-
127
-
128
-
129
-
130
-
131
-
132
-
133
-
134
-
135
-
136
-
137
-
138
-
139
-
140
-
141
-
142
-
143
-
144
-
145
-
146
-
147
-
148
-
149
-
150
-
151
-
152
-
153
-
154
-
155
-
156
-
157
-
158
-
159
-
160
-
161
-
162
-
163
-
164
-
165
-
166
-
167
-
168
-
169
-
170
-
171
-
172
-
173
-
174
 |
 |