Yamaha 2.0 Owner's Manual - Page 13
Setting Up
 |
View all Yamaha 2.0 manuals
Add to My Manuals
Save this manual to your list of manuals |
Page 13 highlights
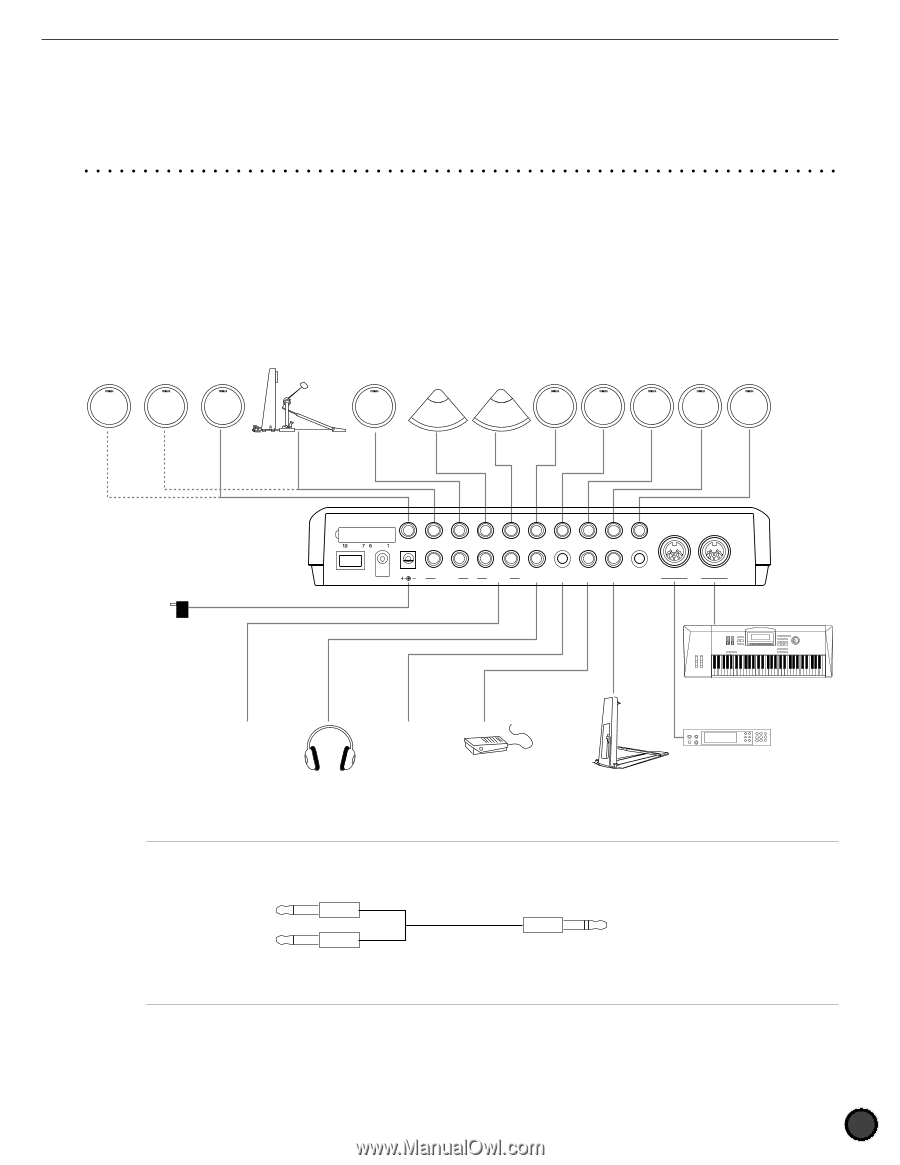
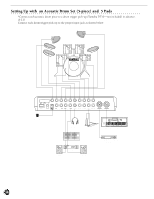
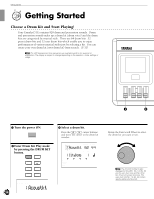
Setting Up Setting Up with Pads Only Connect each pad to the proper DTX input jack as shown below: (This illustration is an example of the pads, triggers and devices that can be connected to the DTX. Refer to P.8 for the types of pads or triggers that can be connected to each input jack.) Additional Pads TP80,etc. KP80,etc. TP80,etc. PCY80,etc. PCY80,etc. TP80,etc. TP80,etc. TP80,etc. TP80,etc. TP80,etc. INPUT ATTENUATION 12/11 10/9 KICK 8 H.HAT 7 CRASH 6 RIDE 5 TOM4 4 TOM3 3 TOM2 2 TOM1 1 SNARE POWER DC IN 12V R L AUX OUT R L/MONO PHONES AUX IN FOOT SW H.HAT CONTRAST OUTPUT CONTROL OUT IN MIDI AC Power Adaptor Audio output Headphones CD Player,etc. FS-50,etc. - MIDIkeyboard,etc. HH80,etc. MIDI tone generator,etc. ATo further add a pad, use a conversion cable (which separates the stereo plug to two monaural plugs) for INPUT 10/9 and 12/11 which enables you to enter two different trigger signals. For most preset drum kits, a cupped cymbal voice is set to INPUT 10 and asuitable percussion voice for each preset drum kit is set to INPUT 11 and 12. To the pads Two monaural plugs Conversion cable Stereo plug To the DTX Input 10/9 or 12/11 9
-
 1
1 -
2
-
3
-
4
-
5
-
6
-
7
-
 8
8 -
 9
9 -
 10
10 -
 11
11 -
 12
12 -
 13
13 -
 14
14 -
 15
15 -
 16
16 -
 17
17 -
 18
18 -
19
-
20
-
21
-
22
-
23
-
24
-
25
-
26
-
27
-
28
-
29
-
30
-
31
-
32
-
33
-
34
-
35
-
36
-
37
-
38
-
39
-
40
-
41
-
42
-
43
-
44
-
45
-
46
-
47
-
48
-
49
-
50
-
51
-
52
-
53
-
54
-
55
-
56
-
57
-
58
-
59
-
60
-
61
-
62
-
63
-
64
-
65
-
66
-
67
-
68
-
69
-
70
-
71
-
72
-
73
-
74
-
75
-
76
-
77
-
78
-
79
-
80
-
81
-
82
-
83
-
84
-
85
-
86
-
87
-
88
-
89
-
90
-
91
-
92
-
93
-
94
-
95
-
96
-
97
-
98
-
99
-
100
-
101
-
102
-
103
-
104
-
105
-
106
-
107
-
108
-
109
-
110
-
111
-
112
-
113
-
114
-
115
-
116
-
117
-
118
-
119
-
120
-
121
-
122
-
123
-
124
-
125
-
126
-
127
-
128
-
129
-
130
-
131
-
132
-
133
-
134
-
135
-
136
-
137
-
138
-
139
-
140
-
141
-
142
-
143
-
144
-
145
-
146
-
147
-
148
-
149
-
150
-
151
-
152
-
153
-
154
-
155
-
156
-
157
-
158
-
159
-
160
-
161
-
162
-
163
-
164
-
165
-
166
-
167
-
168
-
169
-
170
-
171
-
172
-
173
-
174
 |
 |