Yamaha 2.0 Owner's Manual - Page 89
Step Recording for rhythm track only
 |
View all Yamaha 2.0 manuals
Add to My Manuals
Save this manual to your list of manuals |
Page 89 highlights
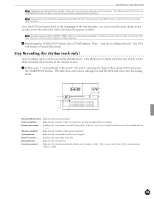
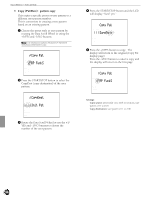
Feature Reference - Pattern Record Mode A The LED above the CLICK button will flash in time with the current tempo setting during the countdown. The LED above the CLICK button and the START/STOP button will flash in time with the current tempo setting during the recording. AThe recording to the chord track is executed through MIDI channel 5, the bass track through MIDI channel 7, and the rhythm track through MIDI channel 10. Once the DTX has looped back to the beginning of the first measure, you can record the snare drum, hi-hat, or other parts onto the track while checking the measure number. AThe data of each part (KICK, SNARE, CYMBAL, MISC.) you have played will appear in the data focus area of the LCD after recording a rhythm track. Refer to P.19, 87 for further details on the data focus area. " By pressing the START/STOP button, the LCD will display "Wait..." and the recording will end. The DTX will return to Pattern Play mode. Step Recording (for rhythm track only) Step recording can be used to record the rhythm track. This allows you to input each beat one step at a time while checking the structure in the data focus area. ! Follow steps 1. Getting Ready to Record (P. 81) and 4. Selecting the Type of Recording (P.82) and press the START/STOP button. The LED above the button will light up and the DTX will enter Step Recording mode. Pattern number Beat Indicator Location pointer Pattern number Drum voice name 0-0-00 TEMPO BEAT PATTERN MEASURE QUANT. -------- OFF Beat Measure number Quantization MISC. CYMBAL SNARE KICK Data focus area Measure/Beat/Clock .. Indicates the present position. Pattern number ........ Indicates the number of the user pattern currently designated for recording. Drum voice name ..... Displays the voice name currently being used. If there is no voice recorded at this location, the display shows "--------". Measure number ...... Indicates the number of the present measure. Quantization Indicates the quantization value (note length). Data focus area ......... Displays the input data with dots. Beat Indicator Indicates the current beat. Location pointer ....... Indicates the present position of drum voice to input or clear. The cursor can be moved by a quantization value at a time. 85
-
 1
1 -
2
-
3
-
4
-
5
-
6
-
7
-
8
-
9
-
10
-
11
-
12
-
13
-
14
-
15
-
16
-
17
-
18
-
19
-
20
-
21
-
22
-
23
-
24
-
25
-
26
-
27
-
28
-
29
-
30
-
31
-
32
-
33
-
34
-
35
-
36
-
37
-
38
-
39
-
40
-
41
-
42
-
43
-
44
-
45
-
46
-
47
-
48
-
49
-
50
-
51
-
52
-
53
-
54
-
55
-
56
-
57
-
58
-
59
-
60
-
61
-
62
-
63
-
64
-
65
-
66
-
67
-
68
-
69
-
70
-
71
-
72
-
73
-
74
-
75
-
76
-
77
-
78
-
79
-
80
-
81
-
82
-
83
-
 84
84 -
 85
85 -
 86
86 -
 87
87 -
 88
88 -
 89
89 -
 90
90 -
 91
91 -
 92
92 -
 93
93 -
 94
94 -
95
-
96
-
97
-
98
-
99
-
100
-
101
-
102
-
103
-
104
-
105
-
106
-
107
-
108
-
109
-
110
-
111
-
112
-
113
-
114
-
115
-
116
-
117
-
118
-
119
-
120
-
121
-
122
-
123
-
124
-
125
-
126
-
127
-
128
-
129
-
130
-
131
-
132
-
133
-
134
-
135
-
136
-
137
-
138
-
139
-
140
-
141
-
142
-
143
-
144
-
145
-
146
-
147
-
148
-
149
-
150
-
151
-
152
-
153
-
154
-
155
-
156
-
157
-
158
-
159
-
160
-
161
-
162
-
163
-
164
-
165
-
166
-
167
-
168
-
169
-
170
-
171
-
172
-
173
-
174
 |
 |