Yamaha 2.0 Owner's Manual - Page 11
In Pattern mode
 |
View all Yamaha 2.0 manuals
Add to My Manuals
Save this manual to your list of manuals |
Page 11 highlights
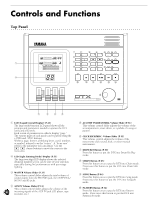
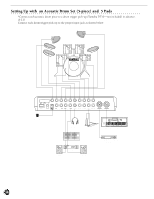
+ TRIGGER Button (P.32) Press this button to put the DTX into Drum Kit Trigger Edit mode. , VOICE Button (P.51) Press this button to put the DTX into Drum Kit Voice Edit mode. This button also acts as an "audition" button which allows you to listen to a voice without actually changing it while you are editing. - UTILITY Button (P.112) Press this button to put the DTX into Utility mode. . STORE Button (P.69) Press this button to put the DTX into Drum Kit Store mode or Chain Store mode. / PAGE¡/ERASE (MAIN A) Button (P.26, 73) This button selects the previous page. In Pattern mode, press this button while holding the SHIFT button to select the MAIN A pattern. In recording mode, press this button to erase data. 0 PAGE⁄ (MAIN B) Button (P.26, 73) This button selects the next page. In Pattern mode, press this button while holding the SHIFT button to select the MAIN B pattern. 1 ‡(FILL AB) Button (P.26, 73) This button allows you to move backward among the focus areas in a page. In Pattern mode, press this button while holding the SHIFT button to select the FILL AB Pattern. 2 ¶(FILL BA) Button (P.26, 73) This button allows you to move forward among the focus areas in a page. In Pattern mode, press this button while holding the SHIFT button to select the FILL BA Pattern. 3 -1/NO (INTRO) Button (P.27, 73) This button decreases the value of a parameter. In Pattern mode, press this button while holding the SHIFT button to select the INTRO Pattern. 4 +1/YES (ENDING) Button (P.27, 73) This button increases the value of a parameter. In Pattern mode, press this button while holding the SHIFT button to select the ENDING Pattern. 5 TEMPO Button (P.76) This button directly selects the TEMPO focus area. 6 SHIFT Button (P.73, 77) This button sets a secondary function, for example selecting a section or muting part of a rhythm, by pressing another specific button while holding this buttn. 7 TR1 (MISC.) Button (P.77) This button turns TR1 (Track 1) of the song ON or OFF. Press this button while holding, the SHIFT button, to mute the MISC. (other instruments) part of the rhythm. 8 TR2 (CYMBAL) Button (P.77) This button turns TR2 (Track 2) of the song ON or OFF. Press this button while holding, the SHIFT button, to mute the CYM (cymbal) part of the rhythm. 9 BASS TMP TR (SNARE) Button (P.77) This button turns the Bass Track or Tempo Track of the song ON or OFF. Press this button while holding, the SHIFT button, to mute the SNARE part of the rhythm. : RHYTHM PAT TR (KICK) Button (P.77) This button turns the Rhythm Track or Pattern Track of the song ON or OFF. Press this button while holding, the SHIFT button, to mute the KICK part of the rhythm. ; CHORD CHO TR Button (P.77) This button turns the Chord Track of the song ON or OFF. < SOLO Button (P.78) Press the rhythm part buttons while holding this button to listen to the soling of a rhythm part. = CLICK Button (P.76) This button turns the metronome ON or OFF. > PAUSE Button (P.74, 95) This button pauses the song. The song will start where it was stopped when the button is pressed again. ? REWIND Button (P.74, 95) This button moves the location indicator backward by a measure. Press continuously to rapidly rewind. @ START/STOP Button (P.74, 95) This button starts or stops playback or recording. A FORWARD Button (P.74, 95) This button steps the indicator forward by a measure. Press continuously to fast forward. B RECORD Button (P.81) This button switches the DTX into Record-ready (standby) mode. C Data Scroll Wheel (P.27) The Data Scroll Wheel allows rapid control over the parameters of the focus area. For fine single-step adjustments, you may want to use the +1/YES and -1/NO buttons described above. 7
-
 1
1 -
2
-
3
-
4
-
5
-
 6
6 -
 7
7 -
 8
8 -
 9
9 -
 10
10 -
 11
11 -
 12
12 -
 13
13 -
 14
14 -
 15
15 -
 16
16 -
17
-
18
-
19
-
20
-
21
-
22
-
23
-
24
-
25
-
26
-
27
-
28
-
29
-
30
-
31
-
32
-
33
-
34
-
35
-
36
-
37
-
38
-
39
-
40
-
41
-
42
-
43
-
44
-
45
-
46
-
47
-
48
-
49
-
50
-
51
-
52
-
53
-
54
-
55
-
56
-
57
-
58
-
59
-
60
-
61
-
62
-
63
-
64
-
65
-
66
-
67
-
68
-
69
-
70
-
71
-
72
-
73
-
74
-
75
-
76
-
77
-
78
-
79
-
80
-
81
-
82
-
83
-
84
-
85
-
86
-
87
-
88
-
89
-
90
-
91
-
92
-
93
-
94
-
95
-
96
-
97
-
98
-
99
-
100
-
101
-
102
-
103
-
104
-
105
-
106
-
107
-
108
-
109
-
110
-
111
-
112
-
113
-
114
-
115
-
116
-
117
-
118
-
119
-
120
-
121
-
122
-
123
-
124
-
125
-
126
-
127
-
128
-
129
-
130
-
131
-
132
-
133
-
134
-
135
-
136
-
137
-
138
-
139
-
140
-
141
-
142
-
143
-
144
-
145
-
146
-
147
-
148
-
149
-
150
-
151
-
152
-
153
-
154
-
155
-
156
-
157
-
158
-
159
-
160
-
161
-
162
-
163
-
164
-
165
-
166
-
167
-
168
-
169
-
170
-
171
-
172
-
173
-
174
 |
 |
