Yamaha 2.0 Owner's Manual - Page 37
Drum Kit Trigger Edit Mode structure and operation
 |
View all Yamaha 2.0 manuals
Add to My Manuals
Save this manual to your list of manuals |
Page 37 highlights
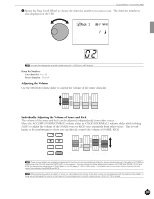
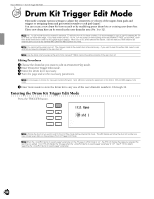
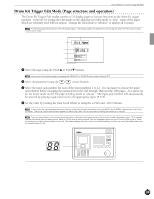
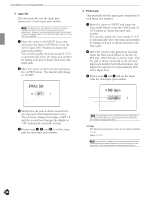
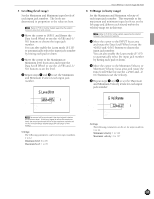
Feature Reference - Drum Kit Trigger Edit Mode Drum Kit Trigger Edit Mode (Page structure and operation) The Drum Kit Trigger Edit modes consists of 31 display pages of various functions as the drum kit trigger modules. However, by setting the Edit mode on the 2nd page in Utility mode to "easy", some of the pages which are seldomly used will not appear. Change the Edit mode to "advance" to display all 31 pages. AThe following page shows the list of the 28 display pages. The display pages with asterisks (*) will not appear when the Edit mode in Utility mode is set to "easy". Function name Page number Kit Name Parameter Input level Output MIDI velocity GM std 1 MISC. CYMBAL SNARE KICK Hi-hat control Level ! Select the page using the PAGE¡ or PAGE⁄ buttons. AJump some of the display pages by pressing the DRUM KIT or TRIGGER button while holding SHIFT. " Select the parameter using the Q cursor buttons. # Select the input jack number for each of the input numbers 1 to 12. It is necessary to choose the input jack number before changing the parameters for the 2nd through 18th and the 30th pages. As a short cut, set the Learn mode on the 4th page in Utility mode to "always". The input jack number will automatically be selected by playing a pad connected to the appropriate input (P.115). $ Set the value by rotating the Data Scroll Wheel or using the +1/YES and -1/NO buttons. A In this mode, the input level and the output velocity of the pad you play will appear next to the MISC. and CYMBAL, respectively, as a kind of VU meter. The Hi-hat control level will also appear on the kick bar chart. This is convenient in editing the sensitivity or velocity. A Once you have edited in this mode, a small dot lights on the lower right-hand corner of the drum kit number displayed on the LED to indicate that the edit results have not been stored. Refer to P.69 on how to store your edit. The dot disappears when you go to Drum Kit Play mode or Chain mode during an edit to select a different drum kit. The edited settings will return back to the default settings, but you can recall the edited data using the Recall function (P.49). Indicates you have not saved the edited settings. 33
-
 1
1 -
2
-
3
-
4
-
5
-
6
-
7
-
8
-
9
-
10
-
11
-
12
-
13
-
14
-
15
-
16
-
17
-
18
-
19
-
20
-
21
-
22
-
23
-
24
-
25
-
26
-
27
-
28
-
29
-
30
-
31
-
 32
32 -
 33
33 -
 34
34 -
 35
35 -
 36
36 -
 37
37 -
 38
38 -
 39
39 -
 40
40 -
 41
41 -
 42
42 -
43
-
44
-
45
-
46
-
47
-
48
-
49
-
50
-
51
-
52
-
53
-
54
-
55
-
56
-
57
-
58
-
59
-
60
-
61
-
62
-
63
-
64
-
65
-
66
-
67
-
68
-
69
-
70
-
71
-
72
-
73
-
74
-
75
-
76
-
77
-
78
-
79
-
80
-
81
-
82
-
83
-
84
-
85
-
86
-
87
-
88
-
89
-
90
-
91
-
92
-
93
-
94
-
95
-
96
-
97
-
98
-
99
-
100
-
101
-
102
-
103
-
104
-
105
-
106
-
107
-
108
-
109
-
110
-
111
-
112
-
113
-
114
-
115
-
116
-
117
-
118
-
119
-
120
-
121
-
122
-
123
-
124
-
125
-
126
-
127
-
128
-
129
-
130
-
131
-
132
-
133
-
134
-
135
-
136
-
137
-
138
-
139
-
140
-
141
-
142
-
143
-
144
-
145
-
146
-
147
-
148
-
149
-
150
-
151
-
152
-
153
-
154
-
155
-
156
-
157
-
158
-
159
-
160
-
161
-
162
-
163
-
164
-
165
-
166
-
167
-
168
-
169
-
170
-
171
-
172
-
173
-
174
 |
 |
