Yamaha CS6R Owner's Manual - Page 10
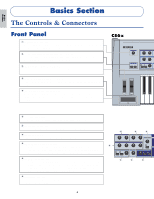
Rear Panel - synthesizer
 |
View all Yamaha CS6R manuals
Add to My Manuals
Save this manual to your list of manuals |
Page 10 highlights
Basics Section Rear Panel 1 POWER switch (Page 19) Use this to switch the synthesizer on or off. 2 AC INLET terminal (Page 12) Plug the female end of the supplied AC power cord in here before plugging it into an AC wall outlet. 3 CARD slot (Page 171) Insert a Memory Card here to transfer various data to/from the instrument. Read carefully the precautions on use of a Memory Card (Page 171) before using a card. 4 MIDI IN, OUT, and THRU connectors (Page 15) MIDI IN receives MIDI messages from an external MIDI device. Use this connector to control the synthesizer from an external MIDI device. MIDI OUT sends out MIDI messages generated by the synthesizer, such as notes played on the keyboard or panel control/knob variations, to an external MIDI sound module or device. MIDI THRU just reflects the MIDI messages received at MIDI IN. Connect other MIDI devices here. CS6x POWER ON OFF AC INLET 3.3V CARD ) FOOT CONTROLLER jack (Pages 18, 48) (CS6x only) An optional foot controller (FC7, etc.) can be connected here. Using the foot controller, you can control tones, pitches, volumes or the like by foot. ! FOOT VOLUME jack (Pages 18, 48) (CS6x only) An optional foot controller (FC7, etc.) can be connected here. You can control the output level from the instrument by foot. In Utility Mode, you can select Volume or Expression for this controller. @ INDIVIDUAL OUTPUT 1 and 2 jacks (Page 13) Line level audio signals are output from the synthesizer via these phone jacks (1/4" mono phone plug). The output is separated from that at the OUTPUT L/MONO and R jacks. In Performance Mode, you can specify which Parts can be output from these separate outputs. CS6R $% ^ MIC LINE 2 LINE 1 A D INPUT GAIN BREATH PHONES VOLUME 3.3V CARD & 3 1 POWER ON OFF 10 2 AC INLET
-
 1
1 -
2
-
3
-
4
-
 5
5 -
 6
6 -
 7
7 -
 8
8 -
 9
9 -
 10
10 -
 11
11 -
 12
12 -
 13
13 -
 14
14 -
 15
15 -
16
-
17
-
18
-
19
-
20
-
21
-
22
-
23
-
24
-
25
-
26
-
27
-
28
-
29
-
30
-
31
-
32
-
33
-
34
-
35
-
36
-
37
-
38
-
39
-
40
-
41
-
42
-
43
-
44
-
45
-
46
-
47
-
48
-
49
-
50
-
51
-
52
-
53
-
54
-
55
-
56
-
57
-
58
-
59
-
60
-
61
-
62
-
63
-
64
-
65
-
66
-
67
-
68
-
69
-
70
-
71
-
72
-
73
-
74
-
75
-
76
-
77
-
78
-
79
-
80
-
81
-
82
-
83
-
84
-
85
-
86
-
87
-
88
-
89
-
90
-
91
-
92
-
93
-
94
-
95
-
96
-
97
-
98
-
99
-
100
-
101
-
102
-
103
-
104
-
105
-
106
-
107
-
108
-
109
-
110
-
111
-
112
-
113
-
114
-
115
-
116
-
117
-
118
-
119
-
120
-
121
-
122
-
123
-
124
-
125
-
126
-
127
-
128
-
129
-
130
-
131
-
132
-
133
-
134
-
135
-
136
-
137
-
138
-
139
-
140
-
141
-
142
-
143
-
144
-
145
-
146
-
147
-
148
-
149
-
150
-
151
-
152
-
153
-
154
-
155
-
156
-
157
-
158
-
159
-
160
-
161
-
162
-
163
-
164
-
165
-
166
-
167
-
168
-
169
-
170
-
171
-
172
-
173
-
174
-
175
-
176
-
177
-
178
-
179
-
180
-
181
-
182
-
183
-
184
-
185
-
186
-
187
-
188
-
189
-
190
-
191
-
192
-
193
-
194
-
195
-
196
 |
 |
