Yamaha CS6R Owner's Manual - Page 78
DATA] knob or [INC/YES] or [DEC/NO] key, Knob [C], Common Edit and editing each Element
 |
View all Yamaha CS6R manuals
Add to My Manuals
Save this manual to your list of manuals |
Page 78 highlights
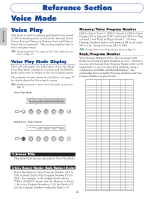
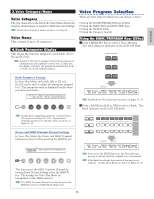
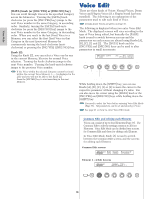
Voice Mode [DATA] knob (or [INC/YES] or [DEC/NO] key) You can scroll through Voices in the specified Category across the Memories. Turning the [DATA] knob clockwise (or press the [INC/YES] key) jumps to the next Voice number in the same Category, in ascending order. Similarly, turning the [DATA] knob anticlockwise (or press the [DEC/NO] key) jumps to the next Voice number in the same Category, in descending order. When you reach to the last (first) Voice in a Memory, you can select the first (last) Voice in that Category in the next (previous) Memory by continuously turning the knob clockwise (anticlockwise) or pressing the [INC/YES] ([DEC/NO]) key. Knob [C]: Using the Knob [C], you can select a Voice one by one in the current Memory, likewise for normal Voice selection. Turning the knob clockwise jumps to the next Voice number. Turning the knob anti-clockwise jumps to the previous Voice number. If the Voice within the selected Category cannot be found within the current Voice Memory, [------] is displayed in the LCD and you will not be able to use Knob [2]. Press the [ENTER] key to start searching in the next Memory. Voice Edit There are three kinds of Voices: Normal Voices, Drum Voices and Plug-in Voices (if a Plug-in board has been installed). The following is an explanation of the parameters used to edit each kind of Voice. Details about Voices are given on Page 36. The following is displayed when you enter Voice Edit Mode. The displayed screens will vary according to the type of Voice being edited, but basically the [PAGE] knob is used to switch between screens and the parameters on each screen are altered using Knobs [A], [B], [C], [1] and [2]. The [DATA] knob and the [INC/YES] and [DEC/NO] keys can be used to alter parameters in small increments. GEN Name) Ctgry C 1234 a-Z 0-? Cursor [Pf:Init Voice] SHIFT PAGE A B C 1 2 DATA PART/ELEMENT Change pages Set the value Choose Common or Elements 1 to 4 While holding down the [SHIFT] key, you can use Knobs [A], [B], [C], [1] or [2] to move the cursor to the respective parameter without changing it's value. You can also move the cursor using the [DATA] knob or the [INC/YES] and [DEC/NO] keys while holding down the [SHIFT] key. You need to select the Voice before entering Voice Edit Mode (Page 75). All parameters can be set and stored per Voice. See page 21 on how to enter Voice Edit mode. Common Edit and editing each Element Voices can consist of up to four Elements (Page 37). Use Common Edit to edit the settings common to all four Elements. Voice Edit Mode can be divided into screens for Common Edit and those for editing each Element. In Voice Edit Mode, Knob [A] is used to switch between the Common Edit screens and the screens for editing each Element. Common Edit screens GEN Other) Mode Assign C 1234 poly single Common Element 1~4 Edit Screens MicroTuning 31:Indian OSC Wave) EL1234 Number Ctgry 001[Pf:Grand 1 ] Elements 1~4 SHIFT PAGE A B C 1 2 DATA PART/ELEMENT 78
-
 1
1 -
2
-
3
-
4
-
5
-
6
-
7
-
8
-
9
-
10
-
11
-
12
-
13
-
14
-
15
-
16
-
17
-
18
-
19
-
20
-
21
-
22
-
23
-
24
-
25
-
26
-
27
-
28
-
29
-
30
-
31
-
32
-
33
-
34
-
35
-
36
-
37
-
38
-
39
-
40
-
41
-
42
-
43
-
44
-
45
-
46
-
47
-
48
-
49
-
50
-
51
-
52
-
53
-
54
-
55
-
56
-
57
-
58
-
59
-
60
-
61
-
62
-
63
-
64
-
65
-
66
-
67
-
68
-
69
-
70
-
71
-
72
-
 73
73 -
 74
74 -
 75
75 -
 76
76 -
 77
77 -
 78
78 -
 79
79 -
 80
80 -
 81
81 -
 82
82 -
 83
83 -
84
-
85
-
86
-
87
-
88
-
89
-
90
-
91
-
92
-
93
-
94
-
95
-
96
-
97
-
98
-
99
-
100
-
101
-
102
-
103
-
104
-
105
-
106
-
107
-
108
-
109
-
110
-
111
-
112
-
113
-
114
-
115
-
116
-
117
-
118
-
119
-
120
-
121
-
122
-
123
-
124
-
125
-
126
-
127
-
128
-
129
-
130
-
131
-
132
-
133
-
134
-
135
-
136
-
137
-
138
-
139
-
140
-
141
-
142
-
143
-
144
-
145
-
146
-
147
-
148
-
149
-
150
-
151
-
152
-
153
-
154
-
155
-
156
-
157
-
158
-
159
-
160
-
161
-
162
-
163
-
164
-
165
-
166
-
167
-
168
-
169
-
170
-
171
-
172
-
173
-
174
-
175
-
176
-
177
-
178
-
179
-
180
-
181
-
182
-
183
-
184
-
185
-
186
-
187
-
188
-
189
-
190
-
191
-
192
-
193
-
194
-
195
-
196
 |
 |
