Yamaha CS6R Owner's Manual - Page 44
Using the Arpeggiator Hold, Setting the Tempo, Setting the Note Limit
 |
View all Yamaha CS6R manuals
Add to My Manuals
Save this manual to your list of manuals |
Page 44 highlights
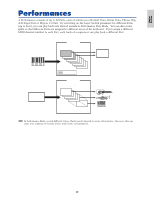
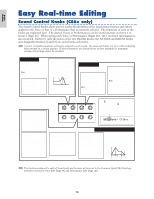
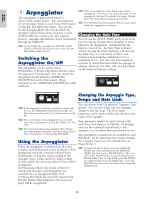
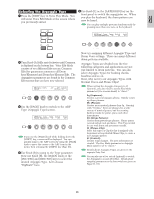
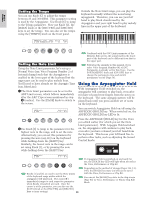
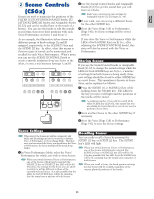
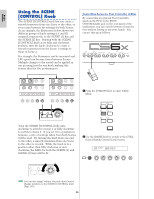
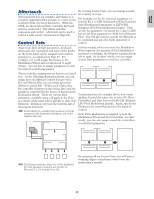
Basics Section Setting the Tempo You can use Knob [C] to adjust the tempo between 25 and 300 BPM. This parameter setting is used by the Arpeggiator. Use Knob [C] to jump to the Tempo parameter. Now use Knob [C], the [DATA] knob or the [INC/YES] and [DEC/NO] keys to set the tempo. You can also set the tempo using the [TEMPO] knob on the front panel. Outside the Note Limit range, you can play the keyboard normally without the notes being arpeggiated. Therefore, you can use your left hand to play block chords used by the Arpeggiator and your right hand to play melody lines in the upper part of the keyboard. Arpeggiator Range Area for Playing Melody ARPíType) Type Tempo Switch C_ 1234 BigBeat2:Ct≥ 127 on Hold off SHIFT PAGE A B C 1 2 DATA Arp Note Low Arp Note High PART/ELEMENT Setting the Note Limit Using the Note Limit parameter, let's set up a Normal Voice (say, Voice Program Number 2 of Internal:champ) such that the Arpeggiator is enabled in the lower part of the keyboard but the upper part can be used to play melody lines. You'll need to have already set the Arpeggio Type (say, MuteLine). 1The Note Limit parameters can be set in the ARP Limit screen, which follows immediately after the ARP Type screen mentioned in step 3 (earlier). Use the [PAGE] knob to switch to the screen. Combined with the OSC Limit parameter of the Element Edit screen, the sound used in the lower part of the keyboard can be different from that in the upper part. Following the example in this manual, if you select Voice Program Number 002 of INT, Portamento is already set for this Voice. Use the PORTAMENTO knob and [ON/OFF] keys to change the portamento time and switch portamento on/off (Page 59). Using the Arpeggiator Hold With Arpeggiator Hold switched on, the arpeggiator will continue to play back, even after you have released your fingers from the notes on the keyboard. The same arpeggio pattern will be played back until you press another set of notes on the keyboard. ARPíLimit) C_ 1234 Note Limit C -2 - G 8 SHIFT PAGE A B C 1 2 DATA PART/ELEMENT 2Use Knob [2] to jump to the parameter for the highest note in the range, and to set the note. Alternatively, you can set this parameter by pressing the note (say, E3) on the keyboard while holding down the [SHIFT] key. Similarly, the lowest note in the range can be set using Knob [1], or by pressing the note while holding down the [SHIFT] key. You can switch Arpeggiator Hold on/off using the ARPEGGIO [HOLD] key. When switched on, the ARPEGGIO [HOLD] key LED is lit. Press the ARPEGGIO [HOLD] key for the Voice you edited earlier (for which you set the Note Limit parameter). With Arpeggio Hold switched on, the Arpeggiator will continue to play back, even after you have released your left hand from the keyboard. This leaves your left hand free to perform other tasks, such as adjusting the Sound Control knobs. ARPEGGIO HOLD ON/ OFF ARPíLimit) C_ 1234 Note Limit C1- E3 SHIFT PAGE A B C 1 2 DATA GATE TIME If Arpeggiator Hold is switched on and ready for use, the [HOLD] key LED will light when you select the Voice, Performance or Clip Kit. PART/ELEMENT Knobs [1] and [2] are used to set the Note Limits of the keyboard range within which the arpeggiator will play back. The cursor (≥) immediately jumps to each respective parameter when Knobs [1] and [2] are used. Once the cursor is at the parameter, you can also use the [DATA] knob or the [INC/YES] and [DEC/NO] keys to enter settings. 44 Depending on the method of storage (Pages 116, 141, 160), the [HOLD] key state (on/off) can be saved with the Voice, Performance or Clip Kit. You can set the [HOLD] key state in the Arp screen (Page 82) in Voice, Performance or Phrase Clip Edit Mode.
-
 1
1 -
2
-
3
-
4
-
5
-
6
-
7
-
8
-
9
-
10
-
11
-
12
-
13
-
14
-
15
-
16
-
17
-
18
-
19
-
20
-
21
-
22
-
23
-
24
-
25
-
26
-
27
-
28
-
29
-
30
-
31
-
32
-
33
-
34
-
35
-
36
-
37
-
38
-
 39
39 -
 40
40 -
 41
41 -
 42
42 -
 43
43 -
 44
44 -
 45
45 -
 46
46 -
 47
47 -
 48
48 -
 49
49 -
50
-
51
-
52
-
53
-
54
-
55
-
56
-
57
-
58
-
59
-
60
-
61
-
62
-
63
-
64
-
65
-
66
-
67
-
68
-
69
-
70
-
71
-
72
-
73
-
74
-
75
-
76
-
77
-
78
-
79
-
80
-
81
-
82
-
83
-
84
-
85
-
86
-
87
-
88
-
89
-
90
-
91
-
92
-
93
-
94
-
95
-
96
-
97
-
98
-
99
-
100
-
101
-
102
-
103
-
104
-
105
-
106
-
107
-
108
-
109
-
110
-
111
-
112
-
113
-
114
-
115
-
116
-
117
-
118
-
119
-
120
-
121
-
122
-
123
-
124
-
125
-
126
-
127
-
128
-
129
-
130
-
131
-
132
-
133
-
134
-
135
-
136
-
137
-
138
-
139
-
140
-
141
-
142
-
143
-
144
-
145
-
146
-
147
-
148
-
149
-
150
-
151
-
152
-
153
-
154
-
155
-
156
-
157
-
158
-
159
-
160
-
161
-
162
-
163
-
164
-
165
-
166
-
167
-
168
-
169
-
170
-
171
-
172
-
173
-
174
-
175
-
176
-
177
-
178
-
179
-
180
-
181
-
182
-
183
-
184
-
185
-
186
-
187
-
188
-
189
-
190
-
191
-
192
-
193
-
194
-
195
-
196
 |
 |
