Yamaha CS6R Owner's Manual - Page 60
Voice Edit
 |
View all Yamaha CS6R manuals
Add to My Manuals
Save this manual to your list of manuals |
Page 60 highlights
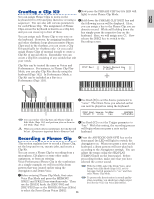
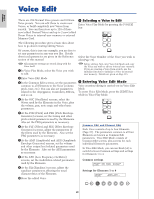
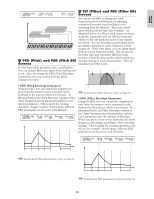
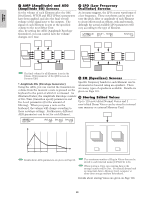
Voice Edit Basics Section There are 256 Normal Voice presets and 8 Drum Voice presets. You can edit these to create new Voices, or build completely new Voices from scratch. You can then store up to 128 of these new/edited Normal Voices and up to 2 new/edited Drum Voices to internal user memory or external Memory Card. 1 Selecting a Voice to Edit Enter Voice Play Mode by pressing the [VOICE] key. MODE VOICE PERFORM UTILITY CARD The following procedure gives a basic idea about how to go about creating/editing Voices. Of course, this is just one example; you are free to set any parameters in any way you like. Details about each parameter are given in the Reference section of this manual. EDIT JOB COMPARE STORE Select the Voice Number of the Voice you wish to edit (Page 75). All parameter settings are stored along with the Voice itself. 1In Voice Play Mode, select the Voice you wish to edit. Before editing, first enter Voice Job Mode and copy the Voice you wish to edit to internal user memory. If you are creating a Voice from scratch, use the Initialize function to initialize a Voice in internal user memory. Details are given on Page 115. 2Enter Voice Edit Mode. 3In the Common Edit screens, set the parameters 2 Entering Voice Edit Mode common to all Elements in the Voice (volume, Voice creation/editing is carried out in Voice Edit pitch, tone, etc.) You can also set parameters Mode. related to the Arpeggiator, Controllers, Effects, To enter Voice Edit Mode, press the [EDIT] key and so on. while in Voice Play Mode. 4At the OSC (Oscillator) screens, select the Waves used by the Elements in the Voice, plus the volume, pan, note range and other basic parameters. 5At the PCH (Pitch) and PEG (Pitch Envelope Generator) screens, set the tuning and other pitch-related parameters used by the Elements. Also set the PEG parameters as necessary. 6At the FLT (Filter) and FEG (Filter Envelope Generator) screens, adjust the parameters of the filters used by the Elements. Also set the FEG parameters as necessary. 7At the AMP (Amplitude) and AEG (Amplitude Envelope Generator) screens, set the volume and other output level-related parameters used by the Elements. Also set the AEG parameters as necessary. 8At the LFO (Low Frequency Oscillator) screens, set the modulation-related parameters used by the Elements. 9At the EQ (Equalizer) screens, adjust the equalizer parameters affecting the tonal characteristics of the Elements. )Store the edited Voice. MODE VOICE PERFORM UTILITY CARD EDIT JOB COMPARE STORE Common Edit and Element Edit Each Voice consists of up to four Elements (Page 37). The parameters common to all four Elements are known as Common Edit parameters. Voice Edit Mode consists of Common Edit screens, plus screens for each individual Element's parameters. In Voice Edit Mode, you can use Knob [A] to switch between Common settings and settings for Elements 1 to 4. Common settings GEN Other) Mode Assign C 1234 poly single Common MicroTuning 31:Indian Settings for Elements 1 to 4 OSC Wave) EL1234 Number Ctgry 001[Pf:Grand 1 ] Element 1~4 SHIFT PAGE A B C 1 2 DATA 60 PART/ELEMENT
-
 1
1 -
2
-
3
-
4
-
5
-
6
-
7
-
8
-
9
-
10
-
11
-
12
-
13
-
14
-
15
-
16
-
17
-
18
-
19
-
20
-
21
-
22
-
23
-
24
-
25
-
26
-
27
-
28
-
29
-
30
-
31
-
32
-
33
-
34
-
35
-
36
-
37
-
38
-
39
-
40
-
41
-
42
-
43
-
44
-
45
-
46
-
47
-
48
-
49
-
50
-
51
-
52
-
53
-
54
-
 55
55 -
 56
56 -
 57
57 -
 58
58 -
 59
59 -
 60
60 -
 61
61 -
 62
62 -
 63
63 -
 64
64 -
 65
65 -
66
-
67
-
68
-
69
-
70
-
71
-
72
-
73
-
74
-
75
-
76
-
77
-
78
-
79
-
80
-
81
-
82
-
83
-
84
-
85
-
86
-
87
-
88
-
89
-
90
-
91
-
92
-
93
-
94
-
95
-
96
-
97
-
98
-
99
-
100
-
101
-
102
-
103
-
104
-
105
-
106
-
107
-
108
-
109
-
110
-
111
-
112
-
113
-
114
-
115
-
116
-
117
-
118
-
119
-
120
-
121
-
122
-
123
-
124
-
125
-
126
-
127
-
128
-
129
-
130
-
131
-
132
-
133
-
134
-
135
-
136
-
137
-
138
-
139
-
140
-
141
-
142
-
143
-
144
-
145
-
146
-
147
-
148
-
149
-
150
-
151
-
152
-
153
-
154
-
155
-
156
-
157
-
158
-
159
-
160
-
161
-
162
-
163
-
164
-
165
-
166
-
167
-
168
-
169
-
170
-
171
-
172
-
173
-
174
-
175
-
176
-
177
-
178
-
179
-
180
-
181
-
182
-
183
-
184
-
185
-
186
-
187
-
188
-
189
-
190
-
191
-
192
-
193
-
194
-
195
-
196
 |
 |
