Yamaha CS6R Owner's Manual - Page 67
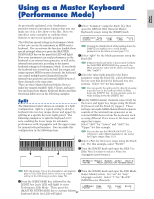
Using as a Master Keyboard (Performance Mode - cs6x manual
 |
View all Yamaha CS6R manuals
Add to My Manuals
Save this manual to your list of manuals |
Page 67 highlights
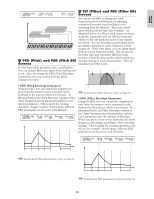
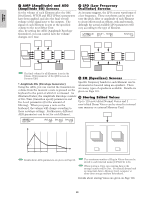
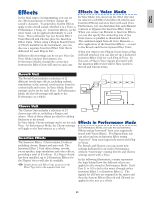
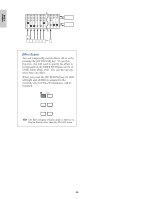
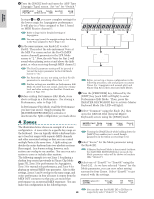
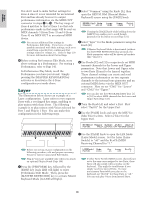
Using as a Master Keyboard (Performance Mode) Basics Section As previously explained, your Synthesizer 2Select "Common" using the Knob [A], then provides several convenient features that you can open the GEN M. Kbd (General Master make use of in a live show or the like. Here we Keyboard) screen using the [PAGE] knob. introduce some examples to combine those features to meet your specific purposes. GENíM.Kbd) Mode Lower Upper Point Common split ch01 ch02 C 3 The CS6x has special settings in Performance Mode so that you can use the instrument as MIDI master keyboard. You can activate the function (enable those Turning the [PAGE] knob while holding down the [SHIFT] key enables you to scroll though special settings) when you press the [MASTER parameters in the Menu screens (page 121). KEYBOARD] key on the panel (its LED will light). Now your instrument can send performance on the keyboard to an external tone generator, as well as the internal tone generator, according to the master keyboard settings in Performance Mode. If you divide the keyboard into several (up to four) key ranges and assign separate MIDI transmit channels, the keyboard can control multiple parts (channels) from the internal tone generator and external MIDI devices of those channels at the same time. There are three Master Keyboard Modes (how to 3Select "split" for the Mode parameter using the Knob [B]. If Master Keyboard Mode is deactivated (without the [MASTER KEYBOARD] key pressed), the Mode parameter value will be shown in brackets (like "(split)"). 4Select the value (split point) for the Point parameter using the Knob [2], which determines the key note that divide the keyboard into two sections. Select "C3" for this example. make key ranges) available: Split, 4 Zones, and Layer. You can specify the split point by directly pressing You can learn these Master Keyboard Modes and their functional differences in the following examples. a specific key on the keyboard while holding down the [SHIFT] key. In this example, press C3 while holding down the [SHIFT] key. Split The illustration below shows an example of a Split configuration. Split is a typical setting to divide a keyboard into two key ranges (lower and upper) by splitting at a specific key note (split point). The following example is to split the keyboard at C3 note, enabling the lower range for automatic performance with Arpeggiator and the upper range for manual solo performance. You can make this configuration in the following steps. Lower Split point (C3) Upper 5Specify MIDI transmit channels respectively for the lower and upper key ranges using the Knob [C] (lower) and the Knob [1] (upper). These settings can make MIDI-channel-based separate controls of the internal tone generator or an external MIDI devices from the keyboard, such as using different Voice tones in the lower and upper key ranges. Select "ch01" for "Lower" and "ch02" for "Upper" for this example. You can also use the PROGRAM/PART [1] to [16] keys to select MIDI channels for the Lower and Upper ranges (Page 123). 6Select a Part for the lower range using the Knob [A]. For this example, select "Part01". Ch1 Part1 Performance by Arpeggiator Ch2 Part2 Manual play 7Turn the [PAGE] knob and open the MIX Vce (Mix Voice) screen to select a Voice for Arpeggiator performance. MIXíVce) Memory Number Ctgry Search Part01 PRE1:128(H16)[Pf:GrandPiano] Edit and prepare Voices for Arpeggiator and manual 8Turn the [PAGE] knob and open the LYR Mode play in Voice Edit Mode before you set up a Split (Layer Mode) screen. Set "on" for "Arp" setting in the following procedure (page 78). (Arpeggio switch). Select "1" for "RcvCh" 1Press the [PERFORM] key, followed by the (MIDI Receive Channel). [EDIT] key (each LED will light) to enter Performance Edit Mode. Then, press the LYRíMode) Mode Part01 poly Arp Layer RcvCh on off 1 [MASTER KEYBOARD] Keyboard Mode (its LED key will to activate light). Master67
-
 1
1 -
2
-
3
-
4
-
5
-
6
-
7
-
8
-
9
-
10
-
11
-
12
-
13
-
14
-
15
-
16
-
17
-
18
-
19
-
20
-
21
-
22
-
23
-
24
-
25
-
26
-
27
-
28
-
29
-
30
-
31
-
32
-
33
-
34
-
35
-
36
-
37
-
38
-
39
-
40
-
41
-
42
-
43
-
44
-
45
-
46
-
47
-
48
-
49
-
50
-
51
-
52
-
53
-
54
-
55
-
56
-
57
-
58
-
59
-
60
-
61
-
 62
62 -
 63
63 -
 64
64 -
 65
65 -
 66
66 -
 67
67 -
 68
68 -
 69
69 -
 70
70 -
 71
71 -
 72
72 -
73
-
74
-
75
-
76
-
77
-
78
-
79
-
80
-
81
-
82
-
83
-
84
-
85
-
86
-
87
-
88
-
89
-
90
-
91
-
92
-
93
-
94
-
95
-
96
-
97
-
98
-
99
-
100
-
101
-
102
-
103
-
104
-
105
-
106
-
107
-
108
-
109
-
110
-
111
-
112
-
113
-
114
-
115
-
116
-
117
-
118
-
119
-
120
-
121
-
122
-
123
-
124
-
125
-
126
-
127
-
128
-
129
-
130
-
131
-
132
-
133
-
134
-
135
-
136
-
137
-
138
-
139
-
140
-
141
-
142
-
143
-
144
-
145
-
146
-
147
-
148
-
149
-
150
-
151
-
152
-
153
-
154
-
155
-
156
-
157
-
158
-
159
-
160
-
161
-
162
-
163
-
164
-
165
-
166
-
167
-
168
-
169
-
170
-
171
-
172
-
173
-
174
-
175
-
176
-
177
-
178
-
179
-
180
-
181
-
182
-
183
-
184
-
185
-
186
-
187
-
188
-
189
-
190
-
191
-
192
-
193
-
194
-
195
-
196
 |
 |
