Yamaha CS6R Owner's Manual - Page 69
the LYR Mode Layer Mode screen and set RcvCh, Next go to the MIX Vce Mix Voice
 |
View all Yamaha CS6R manuals
Add to My Manuals
Save this manual to your list of manuals |
Page 69 highlights
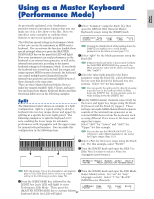
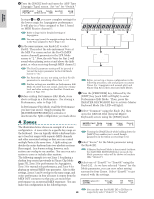
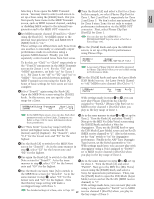
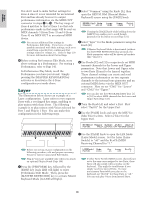
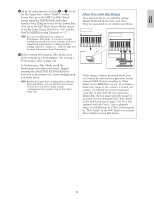
Basics Section Selecting a Zone opens the MKB Transmit !Turn the Knob [A] and select a Part for a Zone. screen. You may want to select a sub screen to In this example, we select Phrase Clip Part for set up a Zone using the [PAGE] knob. But you Zone 1, Part 2 and Part 3 respectively for Zone first specify basic items in the MKB Transmit 2 and Zone 3. We don't select any internal Part screen, such as MIDI transmit channel, enabling for Zone 4 since Zone 4 is set only to output or disabling MIDI output to the internal tone performance information via the MIDI OUT generator and to the MIDI OUT connector. connector. First, select Phrase Clip Part 5Set MIDI transmit channel (TrnsCh) to "Ch01" (PartCL) for Zone 1. using the Knob [C]. Set MIDI output to the internal tone generator (TG) and MIDI OUT (MIDI) both to "on." You can also use the MEMORY or PROGRAM/PART keys to select a Part for a Zone (Page 119). These settings can differentiate each Zone from one another, to internally or externally output performance made in each Zone using a separate MIDI channel. Finally, you will @Use the [PAGE] knob and open the MIX Kit screen, to set up a Clip Kit for performance using Phrase Clips. separately control sound tones from four zones. To do this, set "Ch01" to "Ch04" respectively to MIXíKit) PartCL Number 001(A01)[Dr:Clip Kit] the "TrnsCh" parameters in the MKB Transmit screens for Zones 1 to 4. For the "TG" and "MIDI" parameters, set both "on" for Zones 1 A necessary Phrase Clip Kit should be prepared in Phrase Clip Mode before you use in this setting in Performance Mode. to 3. For Zone 4, set "off" to "TG" and "on" to "MIDI." You can switch between multiple #Use the [PAGE] knob and open the Layer Mode MKB Transmit screens using the Knob [A]. (LYR Mode) screen. Set Layer Switch (Layer) Some of basic settings for four zones are now to "off," MIDI receive channel (RcvCh) to "1." complete. 6Select "Zone01" again using the Knob [A]. LYRíMode) PartCL Arp Layer RcvCh on off 1 Open the MKB Note screen using the [PAGE] knob. In this screen, you can specify a key With settings made in steps ! to #, you can range for a Zone. now play Phrase Clips from the Clip Kit assigned to "PartCL" (Phrase Clip Part) set to MKBíNote)Octave Transpose Note Limit Zone01 +1 +11 C-2 - G 8 MIDI receive channel 1 (RcvCh) when you play in the key range of Zone 1. In the MKB Note screen, you can also find other $As in the same manner in steps ! to #, set up for parameters such as Note Limit, Transpose, etc. Refer to Page 138 for more information about these parameters. Zone 2. Turn the Knob [A] and select "Part02". Next go to the MIX Vce (Mix Voice) screen using the [PAGE] knob, and select a Voice for 7Set "Note Limit" (zone key range) with the Arpeggiator. Then, use the [PAGE] knob to open lowest and highest notes using Knobs [1] the LYR Mode (Layer Mode) screen and set RcvCh (lowest) and [2] (highest). For "Zone01", select (MIDI receive channel) to "2". Also in this screen, "C-2" for the lowest note and "B1" for the set the "Arp" switch to "on" for Arpeggiator highest. performance. Finally in the ARP Type (Arpeggio 8Use the Knob [A] to switch to the MKB Note screen for "Zone02". As in the same manner in step 7, select "C2" for the lowest note and "B2" for the highest. 9Use again the Knob [A] to switch to the MKB Type) screen, set the Switch parameter to "on". With settings made here, you can now play with Arpeggiator using a Voice assigned to "Part02" set to MIDI receive channel 2 (RcvCh) when you play in the key range of Zone 2. Note screen for "Zone03". As in the same manner in step 7, select "C3" for the lowest note and "G8" for the highest. %As in the same manner in steps ! to #, set up for Zone 3. Turn the Knob [A] and select "Part03". Next go to the MIX Vce (Mix Voice) )Use the Knob one more time [A] to switch to the MKB Note screen for "Zone04". As in the same manner in step 7, select "C3" for the lowest note and "G8" for the highest. Note that this key range setting will make a overlapped range with Zone 3. For detailed settings of a Zone, refer to Page 137. 69 screen using the [PAGE] knob, and select a Voice for manual solo performance. Then, use the [PAGE] knob to open the LYR Mode (Layer Mode) screen and set the RcvCh (MIDI receive channel) to "3". With settings made here, you can now play solo using a Voice assigned to "Part03" set to MIDI receive channel 3 (RcvCh) when you play in the key range of Zone 3.
-
 1
1 -
2
-
3
-
4
-
5
-
6
-
7
-
8
-
9
-
10
-
11
-
12
-
13
-
14
-
15
-
16
-
17
-
18
-
19
-
20
-
21
-
22
-
23
-
24
-
25
-
26
-
27
-
28
-
29
-
30
-
31
-
32
-
33
-
34
-
35
-
36
-
37
-
38
-
39
-
40
-
41
-
42
-
43
-
44
-
45
-
46
-
47
-
48
-
49
-
50
-
51
-
52
-
53
-
54
-
55
-
56
-
57
-
58
-
59
-
60
-
61
-
62
-
63
-
 64
64 -
 65
65 -
 66
66 -
 67
67 -
 68
68 -
 69
69 -
 70
70 -
 71
71 -
 72
72 -
 73
73 -
 74
74 -
75
-
76
-
77
-
78
-
79
-
80
-
81
-
82
-
83
-
84
-
85
-
86
-
87
-
88
-
89
-
90
-
91
-
92
-
93
-
94
-
95
-
96
-
97
-
98
-
99
-
100
-
101
-
102
-
103
-
104
-
105
-
106
-
107
-
108
-
109
-
110
-
111
-
112
-
113
-
114
-
115
-
116
-
117
-
118
-
119
-
120
-
121
-
122
-
123
-
124
-
125
-
126
-
127
-
128
-
129
-
130
-
131
-
132
-
133
-
134
-
135
-
136
-
137
-
138
-
139
-
140
-
141
-
142
-
143
-
144
-
145
-
146
-
147
-
148
-
149
-
150
-
151
-
152
-
153
-
154
-
155
-
156
-
157
-
158
-
159
-
160
-
161
-
162
-
163
-
164
-
165
-
166
-
167
-
168
-
169
-
170
-
171
-
172
-
173
-
174
-
175
-
176
-
177
-
178
-
179
-
180
-
181
-
182
-
183
-
184
-
185
-
186
-
187
-
188
-
189
-
190
-
191
-
192
-
193
-
194
-
195
-
196
 |
 |
