Computer Associates ARB6002700WF0. ..... Administration Guide - Page 194
Submitting a Restore Job, Open the Restore Manager.
 |
UPC - 757943246315
View all Computer Associates ARB6002700WF0. ..... manuals
Add to My Manuals
Save this manual to your list of manuals |
Page 194 highlights
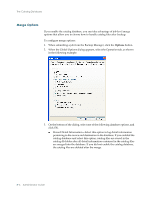
The Catalog Database 10. When the Submit Job page appears, select to run the job immediately by selecting Run Now, or select Run On and select a date and time when you want the job to run. 11. Enter a description for your job. 12. If you selected multiple sources to back up and want to set the priority in which the job sessions initiate, click Source Priority. Use the Top, Up, Down, and Bottom buttons to change the order in which the jobs are processed. When you finish setting priorities, click OK. 13. On the Submit Job page, click OK to submit your job. Note: For more information on submitting backup jobs, see the chapter "Backing Up Data" and the online help. Submitting a Restore Job If you are restoring a whole session, follow the normal restore procedure provided in the online help. Before you submit a restore job, you need to locate the folder or file you want to restore. To locate a folder or file, open Windows File Explorer and use the Search In Files function to search the catalog database folder for the folder or file you want to restore. If you are looking for a folder or file under a particular date, sort the catalog files by date to easily determine the time stamp of a file or folder. To submit a restore job of a specific folder or file using the catalog database: 1. Open the Restore Manager. 2. Select the items from the machine tree on the Source tab that you want to restore. 3. Click the session you want located in the file or folder. If the session does not contain detail information, a dialog box appears asking if you want to merge the detail information. Click Yes to start merging the detail information. Note: You can also use the Filter function to restore a file or folder. To do this, click the Filter button. When the Filter dialog appears, use the Include and Exclude functions to select the particular files or folders you want to restore, and then click OK. For more information on filters, see the chapter "Customizing Your Jobs" and the online help. 4. Click the Destination tab and select where you want the files restored to. 5. Click the Schedule tab and select a repeat method if you want to repeat this job. 6. Click the Start button and when the Security and Agent Information dialog appears, edit or confirm the security and agent information for the job, and then click OK. 8-8 Administrator Guide
-
 1
1 -
2
-
3
-
4
-
5
-
6
-
7
-
8
-
9
-
10
-
11
-
12
-
13
-
14
-
15
-
16
-
17
-
18
-
19
-
20
-
21
-
22
-
23
-
24
-
25
-
26
-
27
-
28
-
29
-
30
-
31
-
32
-
33
-
34
-
35
-
36
-
37
-
38
-
39
-
40
-
41
-
42
-
43
-
44
-
45
-
46
-
47
-
48
-
49
-
50
-
51
-
52
-
53
-
54
-
55
-
56
-
57
-
58
-
59
-
60
-
61
-
62
-
63
-
64
-
65
-
66
-
67
-
68
-
69
-
70
-
71
-
72
-
73
-
74
-
75
-
76
-
77
-
78
-
79
-
80
-
81
-
82
-
83
-
84
-
85
-
86
-
87
-
88
-
89
-
90
-
91
-
92
-
93
-
94
-
95
-
96
-
97
-
98
-
99
-
100
-
101
-
102
-
103
-
104
-
105
-
106
-
107
-
108
-
109
-
110
-
111
-
112
-
113
-
114
-
115
-
116
-
117
-
118
-
119
-
120
-
121
-
122
-
123
-
124
-
125
-
126
-
127
-
128
-
129
-
130
-
131
-
132
-
133
-
134
-
135
-
136
-
137
-
138
-
139
-
140
-
141
-
142
-
143
-
144
-
145
-
146
-
147
-
148
-
149
-
150
-
151
-
152
-
153
-
154
-
155
-
156
-
157
-
158
-
159
-
160
-
161
-
162
-
163
-
164
-
165
-
166
-
167
-
168
-
169
-
170
-
171
-
172
-
173
-
174
-
175
-
176
-
177
-
178
-
179
-
180
-
181
-
182
-
183
-
184
-
185
-
186
-
187
-
188
-
 189
189 -
 190
190 -
 191
191 -
 192
192 -
 193
193 -
 194
194 -
 195
195 -
 196
196 -
 197
197 -
 198
198 -
 199
199 -
200
-
201
-
202
-
203
-
204
-
205
-
206
-
207
-
208
-
209
-
210
-
211
-
212
-
213
-
214
-
215
-
216
-
217
-
218
-
219
-
220
-
221
-
222
-
223
-
224
-
225
-
226
-
227
-
228
-
229
-
230
-
231
-
232
-
233
-
234
-
235
-
236
-
237
-
238
-
239
-
240
-
241
-
242
-
243
-
244
-
245
-
246
-
247
-
248
-
249
-
250
-
251
-
252
-
253
-
254
-
255
-
256
-
257
-
258
-
259
-
260
-
261
-
262
-
263
-
264
-
265
-
266
-
267
-
268
-
269
-
270
-
271
-
272
-
273
-
274
-
275
-
276
-
277
-
278
-
279
-
280
-
281
-
282
-
283
-
284
-
285
-
286
-
287
-
288
-
289
-
290
-
291
-
292
-
293
-
294
-
295
-
296
-
297
-
298
-
299
-
300
-
301
-
302
-
303
-
304
-
305
-
306
-
307
-
308
-
309
-
310
-
311
-
312
-
313
-
314
-
315
-
316
-
317
-
318
-
319
-
320
-
321
-
322
-
323
-
324
-
325
-
326
-
327
-
328
-
329
-
330
-
331
-
332
-
333
-
334
-
335
-
336
-
337
-
338
-
339
-
340
-
341
-
342
-
343
-
344
-
345
-
346
-
347
-
348
-
349
-
350
-
351
-
352
-
353
-
354
-
355
-
356
-
357
-
358
-
359
-
360
-
361
-
362
-
363
-
364
-
365
-
366
-
367
-
368
-
369
-
370
-
371
-
372
-
373
-
374
-
375
-
376
-
377
-
378
-
379
-
380
-
381
-
382
 |
 |
