Dell OptiPlex Gs Reference and Installation Guide (.pdf) - Page 74
Installing a SIMM, Diagnostics and Troubleshooting Guide
 |
View all Dell OptiPlex Gs manuals
Add to My Manuals
Save this manual to your list of manuals |
Page 74 highlights
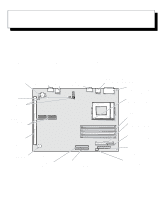
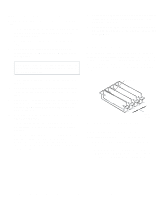
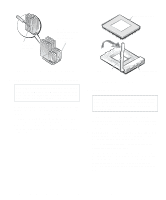
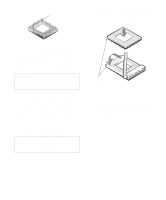
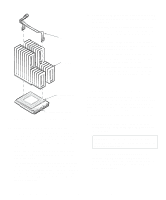
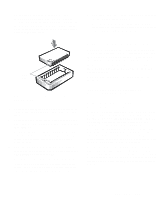
4. Replace the computer cover, reconnect your computer and peripherals to their power sources, and turn them on. After the system completes the power-on self-test (POST) routine, the system runs a memory test that displays the total memory of all installed SIMMs, including those you just installed. If you hear a beep code, the SIMM is installed incorrectly. NOTE: If the memory total is incorrect, turn off and disconnect your computer and peripherals from their power sources, remove the computer cover, and make sure that the installed SIMMs are seated properly in their sockets. Then repeat this step. The system detects that the new memory does not match the existing system configuration information, which is stored in nonvolatile random-access memory (NVRAM), and generates the following message: The amount of system memory has changed. Strike the F1 key to continue, F2 to run the setup utility 5. Press to enter the System Setup program, and check the SYSTEM MEMORY category in the lower-right corner of Page 1. The system should have already changed the value in the SYSTEM MEMORY category to reflect the newly installed memory. Verify the new total. NOTES: The value of SYSTEM MEMORY is given in kilobytes. To convert kilobytes to megabytes, divide the kilobyte total by 1024. If the memory total is incorrect, turn off and disconnect your computer and peripherals from their power sources, remove the computer cover, and check the installed SIMMs to make sure that they are seated properly in their sockets. Then repeat steps 4 and 5. 6. When the SYSTEM MEMORY total is correct, press the key to exit the System Setup program. 7. Run the Dell diagnostics to verify that the SIMMs are operating properly. See your Diagnostics and Troubleshooting Guide for information on running the diskette-based diagnostics and troubleshooting any problems that may occur. Installing a SIMM NOTE: In the following instructions, left and right refer to your left and right as you face the front of the computer. See Figure 5-5 to orient yourself. When installing SIMMs, begin with socket SIMM_A. Use the following procedure to install a SIMM: 1. See Figure 6-7 to locate the cutout area on one corner of the SIMM. 2. Hold the SIMM at a 45-degree angle (as shown in Figure 6-7) and with the cutout facing the left side of the chassis. Align the SIMM's edge connector with the slot in the center of the SIMM socket. 3. Press the SIMM's edge connector firmly into the SIMM socket. 4. Pivot the SIMM upward until it clicks into place. You should hear a click as the plastic tabs at each end of the socket snap into place around the SIMM and the small retention pegs snap into the holes at each end of the SIMM. If you have misaligned or only partially seated the SIMM, you will not hear a sharp click and the retention pegs will not snap cleanly into the holes. You can easily remove the SIMM (see the next subsection, "Removing a SIMM") and reinstall it. 5. Continue with step 4 of "Performing a Memory Upgrade" found earlier in this section. 6-6 Dell OptiPlex Gs and Gs+ Low-Profile Systems Reference and Installation Guide
-
 1
1 -
2
-
3
-
4
-
5
-
6
-
7
-
8
-
9
-
10
-
11
-
12
-
13
-
14
-
15
-
16
-
17
-
18
-
19
-
20
-
21
-
22
-
23
-
24
-
25
-
26
-
27
-
28
-
29
-
30
-
31
-
32
-
33
-
34
-
35
-
36
-
37
-
38
-
39
-
40
-
41
-
42
-
43
-
44
-
45
-
46
-
47
-
48
-
49
-
50
-
51
-
52
-
53
-
54
-
55
-
56
-
57
-
58
-
59
-
60
-
61
-
62
-
63
-
64
-
65
-
66
-
67
-
68
-
 69
69 -
 70
70 -
 71
71 -
 72
72 -
 73
73 -
 74
74 -
 75
75 -
 76
76 -
 77
77 -
 78
78 -
 79
79 -
80
-
81
-
82
-
83
-
84
-
85
-
86
-
87
-
88
-
89
-
90
-
91
-
92
-
93
-
94
-
95
-
96
-
97
-
98
-
99
-
100
-
101
-
102
-
103
-
104
-
105
-
106
-
107
-
108
-
109
-
110
-
111
-
112
-
113
-
114
-
115
-
116
-
117
-
118
-
119
-
120
-
121
 |
 |