Dell OptiPlex Gs Reference and Installation Guide (.pdf) - Page 89
Partitioning and Logically Formatting Your EIDE Ha..., Attaching Hard-Disk Drive, Cables
 |
View all Dell OptiPlex Gs manuals
Add to My Manuals
Save this manual to your list of manuals |
Page 89 highlights
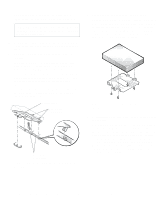
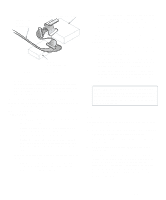
8. Connect one end of the EIDE cable to the 40-pin interface connector on the back of the hard-disk drive (see Figure 7-14). The cable is keyed so that the colored strip on the EIDE cable lines up with the pin-1 end of the interface connector. CAUTION: You must match the colored strip on the EIDE cable with pin 1 on the drive's interface connector to avoid possible damage to your system. DC power cable EIDE cable IDE1 connector Figure 7-14. Attaching Hard-Disk Drive Cables 9. If it is not already connected, connect the other end of the EIDE cable to the IDE1 connector on the system board. CAUTION: You must match the colored strip on the EIDE cable with pin 1 on the IDE1 connector to avoid possible damage to your system. To locate the IDE1 connector, see Figure 6-1. 10. Connect a DC power cable to the power input connector on the back of the drive (see Figure 7-14). Check all connectors to be certain that they are properly cabled and firmly seated. 11. Replace the expansion-card cage as instructed in "Replacing the Expansion-Card Cage" in Chapter 5. 12. Replace the computer cover. Then reconnect your computer and peripherals to their power source, and turn them on. 13. Insert a bootable diskette (such as the diagnostics diskette) into drive A, and turn on the computer system. 14. Enter the System Setup program, and update the DRIVE 0 category under DRIVES: PRIMARY. See "Drives: Primary and Secondary" in Chapter 2. After you update the drive setting, reboot the system. 15. Partition and logically format your drive as described in the next subsection before proceeding to the next step. 16. Test the hard-disk drive by running the HardDisk Drive(s) Test Group in the Dell diagnostics. See your Diagnostics and Troubleshooting Guide for information on running the diskette-based diagnostics and troubleshooting any problems that may occur. 17. Install your operating system on your hard-disk drive. Refer to the documentation that came with your operating system. Partitioning and Logically Formatting Your EIDE Hard-Disk Drive EIDE hard-disk drives must be physically formatted, partitioned, and logically formatted before they can be used to store data. Every hard-disk drive from Dell is physically formatted before it is sent to you. NOTE: On systems with hard-disk drives larger than 2 gigabytes (GB), create a primary partition of 2 GB and divide the remaining capacity into partitions of 2 GB or less. For example, a system with a 2.5-GB hard-disk drive would have a primary partition of 2 GB (drive C) and a Installing Drives 7-9
-
 1
1 -
2
-
3
-
4
-
5
-
6
-
7
-
8
-
9
-
10
-
11
-
12
-
13
-
14
-
15
-
16
-
17
-
18
-
19
-
20
-
21
-
22
-
23
-
24
-
25
-
26
-
27
-
28
-
29
-
30
-
31
-
32
-
33
-
34
-
35
-
36
-
37
-
38
-
39
-
40
-
41
-
42
-
43
-
44
-
45
-
46
-
47
-
48
-
49
-
50
-
51
-
52
-
53
-
54
-
55
-
56
-
57
-
58
-
59
-
60
-
61
-
62
-
63
-
64
-
65
-
66
-
67
-
68
-
69
-
70
-
71
-
72
-
73
-
74
-
75
-
76
-
77
-
78
-
79
-
80
-
81
-
82
-
83
-
 84
84 -
 85
85 -
 86
86 -
 87
87 -
 88
88 -
 89
89 -
 90
90 -
 91
91 -
 92
92 -
 93
93 -
 94
94 -
95
-
96
-
97
-
98
-
99
-
100
-
101
-
102
-
103
-
104
-
105
-
106
-
107
-
108
-
109
-
110
-
111
-
112
-
113
-
114
-
115
-
116
-
117
-
118
-
119
-
120
-
121
 |
 |
