Dell OptiPlex Gs Reference and Installation Guide (.pdf) - Page 87
Installing an EIDE Hard-Disk Drive, Connecting the Y-Shaped, Power Cable Extension
 |
View all Dell OptiPlex Gs manuals
Add to My Manuals
Save this manual to your list of manuals |
Page 87 highlights
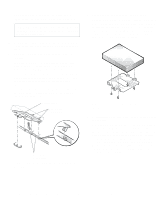
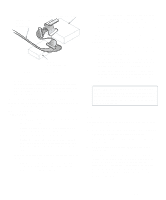
2. Remove the computer cover as instructed in "Removing the Computer Cover" in Chapter 5. CAUTION: See "Protecting Against Electrostatic Discharge" in the safety instructions at the front of this guide. 3. Install the controller card in an expansion slot. See "Installing an Expansion Card" in Chapter 6. 4. If necessary, connect a DC power cable to the 4-pin power input connector on the controller card. See the documentation that you received with the tape drive for power requirement information. If none of the DC power cables can reach the controller card, connect one end of an optional Y-shaped power cable extension to one of the DC power cables from the power supply (see Figure 7-11). Connect another end of the Y-shaped power cable extension to the controller card. DC power cable from power supply connectors for controller card Y-shaped power cable extension Figure 7-11. Connecting the Y-Shaped Power Cable Extension Check all cable connections. Fold cables out of the way to provide airflow for the fan and cooling vents. 5. Replace the computer cover. 6. Connect the tape drive's interface cable to the external connector on the back of the controller card; secure the cable by tightening the screws on the connector. 7. Reconnect your computer and peripherals to their power sources, and turn them on. 8. Verify the correct operation of your drive. NOTE: You do not need to update the system configuration information for a tape drive attached to its own dedicated controller card. Perform a tape backup and verification test with the tape drive as instructed in the documentation for the tape drive software that came with the drive. NOTE: The tape drives sold by Dell come with their own software and documentation. After you install a tape drive, refer to the documentation that came with the drive for instructions on installing and using the tape drive software. Installing an EIDE Hard-Disk Drive This section includes information on installing, partitioning, and formatting EIDE hard-disk drives. For instructions on installing, partitioning, and formatting a SCSI hard-disk drive, see "Installing SCSI Devices" found later in this chapter. An EIDE drive (which must be 1 inch high or less) can be installed in the hard-disk drive bracket in the left front corner of the chassis. Install an EIDE hard-disk drive in the hard-disk drive bracket as follows: 1. If you are replacing a hard-disk drive that contains data you want to keep, be sure to make a backup of your files before you begin this procedure. See your operating system documentation for instructions. 2. Prepare the drive for installation. Ground yourself by touching an unpainted metal surface on the back of the computer, and unpack the drive. Check the documentation that accompanied the drive to verify that it is configured for your computer system. Installing Drives 7-7
-
 1
1 -
2
-
3
-
4
-
5
-
6
-
7
-
8
-
9
-
10
-
11
-
12
-
13
-
14
-
15
-
16
-
17
-
18
-
19
-
20
-
21
-
22
-
23
-
24
-
25
-
26
-
27
-
28
-
29
-
30
-
31
-
32
-
33
-
34
-
35
-
36
-
37
-
38
-
39
-
40
-
41
-
42
-
43
-
44
-
45
-
46
-
47
-
48
-
49
-
50
-
51
-
52
-
53
-
54
-
55
-
56
-
57
-
58
-
59
-
60
-
61
-
62
-
63
-
64
-
65
-
66
-
67
-
68
-
69
-
70
-
71
-
72
-
73
-
74
-
75
-
76
-
77
-
78
-
79
-
80
-
81
-
 82
82 -
 83
83 -
 84
84 -
 85
85 -
 86
86 -
 87
87 -
 88
88 -
 89
89 -
 90
90 -
 91
91 -
 92
92 -
93
-
94
-
95
-
96
-
97
-
98
-
99
-
100
-
101
-
102
-
103
-
104
-
105
-
106
-
107
-
108
-
109
-
110
-
111
-
112
-
113
-
114
-
115
-
116
-
117
-
118
-
119
-
120
-
121
 |
 |
