Dell PowerConnect J-8216 Hardware Guide - Page 80
General Site Guidelines for J-EX Series Switches, Table 30: Site Preparation Checklist
 |
View all Dell PowerConnect J-8216 manuals
Add to My Manuals
Save this manual to your list of manuals |
Page 80 highlights
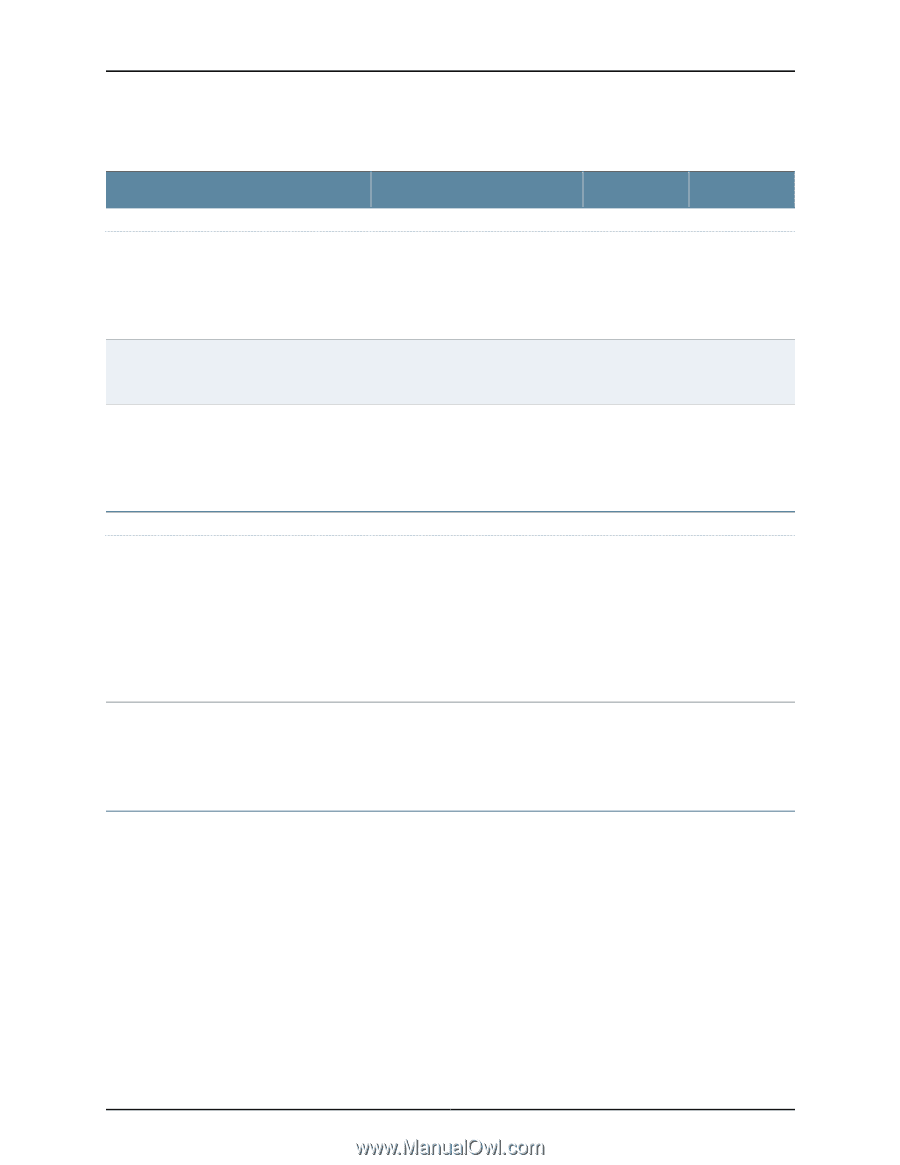
Dell PowerConnect J-Series J-EX8216 Ethernet Switch Hardware Guide Table 30: Site Preparation Checklist (continued) Item or Task For More Information Performed By Date Rack or Cabinet Select the type of rack or cabinet and verify that it meets the minimum requirements for the installation of the switch. "Rack Requirements for a J-EX8216 Switch" on page 69 "Cabinet Requirements and Specifications for a J-EX8216 Switch" on page 71 Plan rack or cabinet location, ensuring the required space clearances. "Clearance Requirements for Airflow and Hardware Maintenance for a J-EX8216 Switch" on page 73 Secure the rack or cabinet to the floor and building structure. "Rack Requirements for a J-EX8216 Switch" on page 69 "Cabinet Requirements and Specifications for a J-EX8216 Switch" on page 71 Cables Plan the cable routing and management. Acquire cables and connectors: • Determine the number of cables needed based on your planned configuration. • Ensure that the distance between hardware components to be connected allows for cable lengths to be within the specified maximum limits. Related • General Safety Guidelines and Warnings for J-EX Series Switches on page 201 Documentation • Mounting a J-EX8216 Switch on a Rack or Cabinet on page 108 General Site Guidelines for J-EX Series Switches Efficient switch operation requires proper site planning and maintenance and proper layout of the equipment, rack or cabinet (if used), and wiring closet. To plan and create an acceptable operating environment for your J-EX Series switch and prevent environmentally caused equipment failures: • Keep the area around the chassis free from dust and conductive material, such as metal flakes. • Follow prescribed airflow guidelines to ensure that the cooling system functions properly and that exhaust from other equipment does not blow into the intake vents of the switch. 64
-
 1
1 -
2
-
3
-
4
-
5
-
6
-
7
-
8
-
9
-
10
-
11
-
12
-
13
-
14
-
15
-
16
-
17
-
18
-
19
-
20
-
21
-
22
-
23
-
24
-
25
-
26
-
27
-
28
-
29
-
30
-
31
-
32
-
33
-
34
-
35
-
36
-
37
-
38
-
39
-
40
-
41
-
42
-
43
-
44
-
45
-
46
-
47
-
48
-
49
-
50
-
51
-
52
-
53
-
54
-
55
-
56
-
57
-
58
-
59
-
60
-
61
-
62
-
63
-
64
-
65
-
66
-
67
-
68
-
69
-
70
-
71
-
72
-
73
-
74
-
 75
75 -
 76
76 -
 77
77 -
 78
78 -
 79
79 -
 80
80 -
 81
81 -
 82
82 -
 83
83 -
 84
84 -
 85
85 -
86
-
87
-
88
-
89
-
90
-
91
-
92
-
93
-
94
-
95
-
96
-
97
-
98
-
99
-
100
-
101
-
102
-
103
-
104
-
105
-
106
-
107
-
108
-
109
-
110
-
111
-
112
-
113
-
114
-
115
-
116
-
117
-
118
-
119
-
120
-
121
-
122
-
123
-
124
-
125
-
126
-
127
-
128
-
129
-
130
-
131
-
132
-
133
-
134
-
135
-
136
-
137
-
138
-
139
-
140
-
141
-
142
-
143
-
144
-
145
-
146
-
147
-
148
-
149
-
150
-
151
-
152
-
153
-
154
-
155
-
156
-
157
-
158
-
159
-
160
-
161
-
162
-
163
-
164
-
165
-
166
-
167
-
168
-
169
-
170
-
171
-
172
-
173
-
174
-
175
-
176
-
177
-
178
-
179
-
180
-
181
-
182
-
183
-
184
-
185
-
186
-
187
-
188
-
189
-
190
-
191
-
192
-
193
-
194
-
195
-
196
-
197
-
198
-
199
-
200
-
201
-
202
-
203
-
204
-
205
-
206
-
207
-
208
-
209
-
210
-
211
-
212
-
213
-
214
-
215
-
216
-
217
-
218
-
219
-
220
-
221
-
222
-
223
-
224
-
225
-
226
-
227
-
228
-
229
-
230
-
231
-
232
-
233
-
234
-
235
-
236
-
237
-
238
-
239
-
240
-
241
-
242
-
243
-
244
-
245
-
246
-
247
-
248
-
249
-
250
-
251
-
252
-
253
-
254
-
255
-
256
-
257
-
258
-
259
-
260
-
261
-
262
-
263
-
264
-
265
-
266
-
267
-
268
-
269
-
270
 |
 |