Dell PowerEdge SC440 Hardware Owner's Manual - Page 48
Replace the front drive bezel. See Replacing the Front Drive Bezel
 |
View all Dell PowerEdge SC440 manuals
Add to My Manuals
Save this manual to your list of manuals |
Page 48 highlights
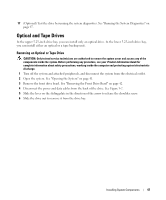
Figure 3-7. Removing and Installing an Optical or Tape Drive 2 3 1 4 1 sliding plate 4 IDE connector on system board 2 IDE data cable to drive 3 power cable to drive 7 If you are installing another drive in the bay, see "Installing an Optical or Tape Drive" on page 49. 8 If the drive is being permanently removed, install an insert on front drive bezel. See "Replacing an Insert on the Front Drive Bezel" on page 44. 9 Replace the front drive bezel. See "Replacing the Front Drive Bezel" on page 43. 10 Close the system. See "Closing the System" on page 41. 11 Reconnect the system to the electrical outlet, and turn on the system and attached peripherals. 48 Installing System Components
-
 1
1 -
2
-
3
-
4
-
5
-
6
-
7
-
8
-
9
-
10
-
11
-
12
-
13
-
14
-
15
-
16
-
17
-
18
-
19
-
20
-
21
-
22
-
23
-
24
-
25
-
26
-
27
-
28
-
29
-
30
-
31
-
32
-
33
-
34
-
35
-
36
-
37
-
38
-
39
-
40
-
41
-
42
-
 43
43 -
 44
44 -
 45
45 -
 46
46 -
 47
47 -
 48
48 -
 49
49 -
 50
50 -
 51
51 -
 52
52 -
 53
53 -
54
-
55
-
56
-
57
-
58
-
59
-
60
-
61
-
62
-
63
-
64
-
65
-
66
-
67
-
68
-
69
-
70
-
71
-
72
-
73
-
74
-
75
-
76
-
77
-
78
-
79
-
80
-
81
-
82
-
83
-
84
-
85
-
86
-
87
-
88
-
89
-
90
-
91
-
92
-
93
-
94
-
95
-
96
-
97
-
98
-
99
-
100
-
101
-
102
-
103
-
104
-
105
-
106
-
107
-
108
-
109
-
110
-
111
-
112
-
113
-
114
-
115
-
116
-
117
-
118
-
119
-
120
-
121
-
122
-
123
-
124
-
125
-
126
-
127
-
128
-
129
-
130
-
131
-
132
-
133
-
134
-
135
-
136
-
137
-
138
-
139
-
140
-
141
-
142
-
143
-
144
 |
 |

48
Installing System Components
Figure 3-7.
Removing and Installing an Optical or Tape Drive
7
If you are installing another drive in the bay, see "Installing an Optical or Tape Drive" on page49.
8
If the drive is being permanently removed, install an insert on front drive bezel. See "Replacing an
Insert on the Front Drive Bezel" on page 44.
9
Replace the front drive bezel. See "Replacing the Front Drive Bezel" on page 43.
10
Close the system. See "Closing the System" on page 41.
11
Reconnect the system to the electrical outlet, and turn on the system and attached peripherals.
1
sliding plate
2
IDE data cable to drive
3
power cable to drive
4
IDE connector on system
board
2
3
1
4