Dell PowerEdge SC440 Hardware Owner's Manual - Page 67
Replacing the Cooling Fans, System Battery, Removing the System Battery
 |
View all Dell PowerEdge SC440 manuals
Add to My Manuals
Save this manual to your list of manuals |
Page 67 highlights
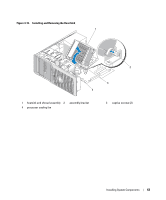
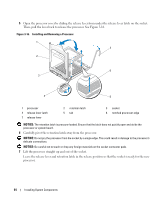
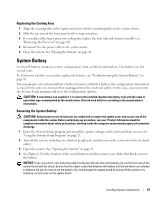
Replacing the Cooling Fans 1 Align the securing tabs on the replacement fan with the mounting holes in the system chassis. 2 Slide the fan toward the front panel until it snaps into place. 3 If you replaced the larger processor cooling fan, replace the heat sink and shroud assembly (see "Removing the Processor" on page 62). 4 Reconnect the fan power cable to the system board. 5 Close the system. See "Closing the System" on page 41. System Battery A coin-cell battery maintains system configuration, date, and time information. The battery can last several years. To determine whether you need to replace the battery, see "Troubleshooting the System Battery" on page 85. You can operate your system without a battery; however, without a battery, the configuration information is erased if the system is turned off or unplugged from the electrical outlet. In this case, you must enter the System Setup program and reset the configuration options. CAUTION: A new battery can explode if it is incorrectly installed. Replace the battery only with the same or equivalent type recommended by the manufacturer. Discard used batteries according to the manufacturer's instructions. Removing the System Battery CAUTION: Only trained service technicians are authorized to remove the system cover and access any of the components inside the system. Before performing any procedure, see your Product Information Guide for complete information about safety precautions, working inside the computer and protecting against electrostatic discharge. 1 Enter the System Setup program and record the option settings on the System Setup screens. See "Using the System Setup Program" on page 27. 2 Turn off the system, including any attached peripherals, and disconnect the system from the electrical outlet. 3 Open the system. See "Opening the System" on page 41. 4 See Figure 6-2 for the location of the system battery and then remove any cables that block access to the battery. NOTICE: If you use a blunt, nonconductive object to depress the tab next to the battery, be careful not to touch the system board with the object. Ensure that the object is inserted between the battery and the tab before you attempt to depress the tab. Do not pry out the battery. You may damage the system board by prying off the socket or by breaking circuit traces on the system board. Installing System Components 67
-
 1
1 -
2
-
3
-
4
-
5
-
6
-
7
-
8
-
9
-
10
-
11
-
12
-
13
-
14
-
15
-
16
-
17
-
18
-
19
-
20
-
21
-
22
-
23
-
24
-
25
-
26
-
27
-
28
-
29
-
30
-
31
-
32
-
33
-
34
-
35
-
36
-
37
-
38
-
39
-
40
-
41
-
42
-
43
-
44
-
45
-
46
-
47
-
48
-
49
-
50
-
51
-
52
-
53
-
54
-
55
-
56
-
57
-
58
-
59
-
60
-
61
-
 62
62 -
 63
63 -
 64
64 -
 65
65 -
 66
66 -
 67
67 -
 68
68 -
 69
69 -
 70
70 -
 71
71 -
 72
72 -
73
-
74
-
75
-
76
-
77
-
78
-
79
-
80
-
81
-
82
-
83
-
84
-
85
-
86
-
87
-
88
-
89
-
90
-
91
-
92
-
93
-
94
-
95
-
96
-
97
-
98
-
99
-
100
-
101
-
102
-
103
-
104
-
105
-
106
-
107
-
108
-
109
-
110
-
111
-
112
-
113
-
114
-
115
-
116
-
117
-
118
-
119
-
120
-
121
-
122
-
123
-
124
-
125
-
126
-
127
-
128
-
129
-
130
-
131
-
132
-
133
-
134
-
135
-
136
-
137
-
138
-
139
-
140
-
141
-
142
-
143
-
144
 |
 |
