Dell PowerEdge SC440 Hardware Owner's Manual - Page 68
Installing the System Battery, Using the System - release date
 |
View all Dell PowerEdge SC440 manuals
Add to My Manuals
Save this manual to your list of manuals |
Page 68 highlights
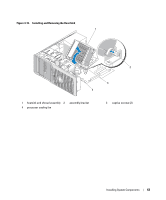
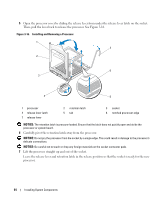
5 Press the tab on the battery socket to release the battery, then lift the battery out of the socket. See Figure 3-18. Figure 3-18. Removing and Installing the System Battery 2 1 3 1 battery socket 2 system battery 3 tab Installing the System Battery 1 Install the new battery with the "+" facing up, and press down until it snaps into place. See Figure 3-18. 2 Close the system. See "Closing the System" on page 41. 3 Reconnect the system to the electrical outlet and turn on the system and attached peripherals. 4 Enter the System Setup program to confirm that the battery operates properly. See "Using the System Setup Program" on page 27. 5 From the main screen, select System Time to enter the correct time and date. 6 Re-enter any system configuration information that is no longer displayed on the System Setup screens, and then exit the System Setup program. 7 To test the newly installed battery, see "Troubleshooting the System Battery" on page 85. 8 After an hour, reconnect the system to a power source and turn it on. 9 Enter the System Setup program. If the time and date are still incorrect, see "Getting Help" on page 107. 10 Properly dispose of the old battery. For more information, see your Product Information Guide. 68 Installing System Components
-
 1
1 -
2
-
3
-
4
-
5
-
6
-
7
-
8
-
9
-
10
-
11
-
12
-
13
-
14
-
15
-
16
-
17
-
18
-
19
-
20
-
21
-
22
-
23
-
24
-
25
-
26
-
27
-
28
-
29
-
30
-
31
-
32
-
33
-
34
-
35
-
36
-
37
-
38
-
39
-
40
-
41
-
42
-
43
-
44
-
45
-
46
-
47
-
48
-
49
-
50
-
51
-
52
-
53
-
54
-
55
-
56
-
57
-
58
-
59
-
60
-
61
-
62
-
 63
63 -
 64
64 -
 65
65 -
 66
66 -
 67
67 -
 68
68 -
 69
69 -
 70
70 -
 71
71 -
 72
72 -
 73
73 -
74
-
75
-
76
-
77
-
78
-
79
-
80
-
81
-
82
-
83
-
84
-
85
-
86
-
87
-
88
-
89
-
90
-
91
-
92
-
93
-
94
-
95
-
96
-
97
-
98
-
99
-
100
-
101
-
102
-
103
-
104
-
105
-
106
-
107
-
108
-
109
-
110
-
111
-
112
-
113
-
114
-
115
-
116
-
117
-
118
-
119
-
120
-
121
-
122
-
123
-
124
-
125
-
126
-
127
-
128
-
129
-
130
-
131
-
132
-
133
-
134
-
135
-
136
-
137
-
138
-
139
-
140
-
141
-
142
-
143
-
144
 |
 |
