Epson PhotoPC 850Z User Manual - Page 106
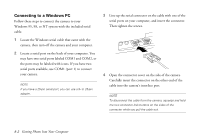
Connecting the Camera
 |
View all Epson PhotoPC 850Z manuals
Add to My Manuals
Save this manual to your list of manuals |
Page 106 highlights
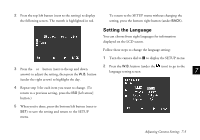
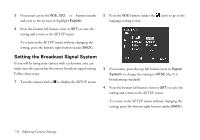
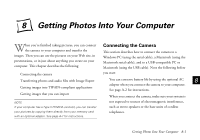
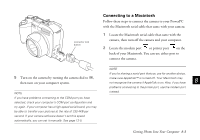
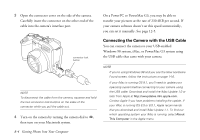
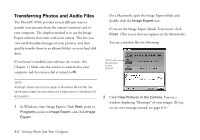
. 8 Getting Photos Into Your Computer When you're finished taking pictures, you can connect the camera to your computer and transfer the images. Then you can use the pictures on your Web site, in presentations, or in just about anything you create on your computer. This chapter describes the following: Connecting the Camera This section describes how to connect the camera to a Windows PC (using the serial cable), a Macintosh (using the Macintosh serial cable), and to a USB-compatible PC or Macintosh (using the USB cable). Note the following before Connecting the camera you start: Transferring photos and audio files with Image Expert You can conserve battery life by using the optional AC 8 Getting images into TWAIN-compliant applications adapter when you connect the camera to your computer. See page A-2 for instructions. Getting images that you can import When you connect the camera, make sure your system is NOTE If your computer has a Type II PCMCIA card slot, you can transfer not exposed to sources of electromagnetic interference, such as stereo speakers or the base units of cordless A your pictures by copying them directly from your memory card telephones. with an optional adapter. See page A-7 for instructions. B Getting Photos Into Your Computer 8-1
-
 1
1 -
2
-
3
-
4
-
5
-
6
-
7
-
8
-
9
-
10
-
11
-
12
-
13
-
14
-
15
-
16
-
17
-
18
-
19
-
20
-
21
-
22
-
23
-
24
-
25
-
26
-
27
-
28
-
29
-
30
-
31
-
32
-
33
-
34
-
35
-
36
-
37
-
38
-
39
-
40
-
41
-
42
-
43
-
44
-
45
-
46
-
47
-
48
-
49
-
50
-
51
-
52
-
53
-
54
-
55
-
56
-
57
-
58
-
59
-
60
-
61
-
62
-
63
-
64
-
65
-
66
-
67
-
68
-
69
-
70
-
71
-
72
-
73
-
74
-
75
-
76
-
77
-
78
-
79
-
80
-
81
-
82
-
83
-
84
-
85
-
86
-
87
-
88
-
89
-
90
-
91
-
92
-
93
-
94
-
95
-
96
-
97
-
98
-
99
-
100
-
 101
101 -
 102
102 -
 103
103 -
 104
104 -
 105
105 -
 106
106 -
 107
107 -
 108
108 -
 109
109 -
 110
110 -
 111
111 -
112
-
113
-
114
-
115
-
116
-
117
-
118
-
119
-
120
-
121
-
122
-
123
-
124
-
125
-
126
-
127
-
128
-
129
-
130
-
131
-
132
-
133
-
134
-
135
-
136
-
137
-
138
-
139
-
140
-
141
-
142
-
143
-
144
-
145
-
146
-
147
-
148
-
149
-
150
-
151
-
152
-
153
-
154
-
155
-
156
-
157
-
158
-
159
-
160
-
161
-
162
-
163
-
164
-
165
-
166
-
167
-
168
-
169
-
170
-
171
-
172
-
173
-
174
-
175
-
176
-
177
-
178
-
179
-
180
-
181
-
182
-
183
-
184
-
185
-
186
-
187
-
188
-
189
-
190
-
191
-
192
-
193
-
194
-
195
-
196
-
197
-
198
-
199
-
200
-
201
-
202
-
203
-
204
-
205
-
206
-
207
-
208
-
209
-
210
-
211
-
212
-
213
-
214
-
215
-
216
-
217
-
218
-
219
-
220
-
221
-
222
-
223
-
224
-
225
-
226
-
227
-
228
-
229
-
230
-
231
-
232
-
233
-
234
-
235
-
236
-
237
-
238
-
239
-
240
-
241
-
242
-
243
-
244
-
245
-
246
-
247
-
248
-
249
 |
 |
