Epson PhotoPC 850Z User Manual - Page 113
from the Edit menu. You see a, confirmation message.
 |
View all Epson PhotoPC 850Z manuals
Add to My Manuals
Save this manual to your list of manuals |
Page 113 highlights
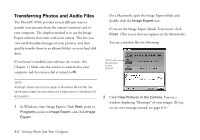
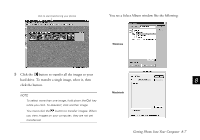
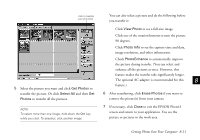
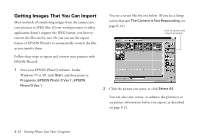
Image Expert will automatically create an album (folder) for your pictures with the current date as its name. You can type your own name for the album if you want, or choose an existing album. 4 Click Open (or OK on a Macintosh) to begin transferring your pictures. You see a confirmation message asking if you want to download selected images only. 5 Click Selected to download the selected images, or All to download all images. A window like the following shows you the progress of each image: 6 When you're finished, close the filmstrip window. 7 To erase all images from the camera's memory card, select Erase All Images from the Camera menu. To erase a particular image, click the image to select it and choose Delete from the Edit menu. You see a confirmation message. 8 Click Yes to erase the image(s), or No to cancel. You can double-click an image to open it in Image Expert. You can display your images one by one, edit, print, and copy them to diskettes, or place them in your documents and presentations. See Chapters 9, 10, and 11 for more information about working with images in Image Expert. click if you want to stop transferring images 8-8 Getting Photos Into Your Computer
-
 1
1 -
2
-
3
-
4
-
5
-
6
-
7
-
8
-
9
-
10
-
11
-
12
-
13
-
14
-
15
-
16
-
17
-
18
-
19
-
20
-
21
-
22
-
23
-
24
-
25
-
26
-
27
-
28
-
29
-
30
-
31
-
32
-
33
-
34
-
35
-
36
-
37
-
38
-
39
-
40
-
41
-
42
-
43
-
44
-
45
-
46
-
47
-
48
-
49
-
50
-
51
-
52
-
53
-
54
-
55
-
56
-
57
-
58
-
59
-
60
-
61
-
62
-
63
-
64
-
65
-
66
-
67
-
68
-
69
-
70
-
71
-
72
-
73
-
74
-
75
-
76
-
77
-
78
-
79
-
80
-
81
-
82
-
83
-
84
-
85
-
86
-
87
-
88
-
89
-
90
-
91
-
92
-
93
-
94
-
95
-
96
-
97
-
98
-
99
-
100
-
101
-
102
-
103
-
104
-
105
-
106
-
107
-
 108
108 -
 109
109 -
 110
110 -
 111
111 -
 112
112 -
 113
113 -
 114
114 -
 115
115 -
 116
116 -
 117
117 -
 118
118 -
119
-
120
-
121
-
122
-
123
-
124
-
125
-
126
-
127
-
128
-
129
-
130
-
131
-
132
-
133
-
134
-
135
-
136
-
137
-
138
-
139
-
140
-
141
-
142
-
143
-
144
-
145
-
146
-
147
-
148
-
149
-
150
-
151
-
152
-
153
-
154
-
155
-
156
-
157
-
158
-
159
-
160
-
161
-
162
-
163
-
164
-
165
-
166
-
167
-
168
-
169
-
170
-
171
-
172
-
173
-
174
-
175
-
176
-
177
-
178
-
179
-
180
-
181
-
182
-
183
-
184
-
185
-
186
-
187
-
188
-
189
-
190
-
191
-
192
-
193
-
194
-
195
-
196
-
197
-
198
-
199
-
200
-
201
-
202
-
203
-
204
-
205
-
206
-
207
-
208
-
209
-
210
-
211
-
212
-
213
-
214
-
215
-
216
-
217
-
218
-
219
-
220
-
221
-
222
-
223
-
224
-
225
-
226
-
227
-
228
-
229
-
230
-
231
-
232
-
233
-
234
-
235
-
236
-
237
-
238
-
239
-
240
-
241
-
242
-
243
-
244
-
245
-
246
-
247
-
248
-
249
 |
 |
