Epson PhotoPC 850Z User Manual - Page 201
Reading Error Messages, Creating DPOF Files for Processing, LCD screen messages - maximum memory
 |
View all Epson PhotoPC 850Z manuals
Add to My Manuals
Save this manual to your list of manuals |
Page 201 highlights
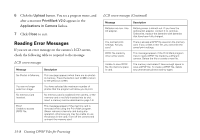
6 Click the Upload button. You see a progress meter, and after a moment PrintMark V2.0 appears in the Applications in Camera listbox. 7 Click Close to exit. Reading Error Messages If you see an error message on the camera's LCD screen, check the following table to respond to the message. LCD screen messages Message Description No Photos in Memory. This message appears when there are no photos in memory. Press the button next to OK to return to the previous screen. You can no longer select an image. You have selected the maximum number of photos that the program will allow you to print. No memory Card Inserted. No memory card is installed in the camera, or the memory card is not fully inserted into its slot. Insert a memory card as described on page 1-8. Error! Unable to access DPOF file. This message appears if the memory card is removed while using the Print Mark program. (Never remove a memory card during any operation, otherwise you may be unable to use the photos in the card.) Turn off the camera and re-insert the memory card. LCD screen messages (Continued) Message Batteries are low. Use AC adapter. You lost last print settings. Are you sure? DPOF file made by other writer exists. Unable to save DPOF file. No memory space in card. Description Battery power is almost out. If you have the optional AC adapter, connect it to continue. Otherwise, replace the batteries with batteries that have been fully charged. There is already a DPOF file saved on the memory card. If you create a new file, you overwrite the saved print settings. This message appears if the Print Mark program tries to read a DPOF file made by a different camera. Delete the file or create a new file. The memory card doesn't have enough space to save a DPOF file. To create a DPOF file, delete any unnecessary photos and try again. 15-8 Creating DPOF Files for Processing
-
 1
1 -
2
-
3
-
4
-
5
-
6
-
7
-
8
-
9
-
10
-
11
-
12
-
13
-
14
-
15
-
16
-
17
-
18
-
19
-
20
-
21
-
22
-
23
-
24
-
25
-
26
-
27
-
28
-
29
-
30
-
31
-
32
-
33
-
34
-
35
-
36
-
37
-
38
-
39
-
40
-
41
-
42
-
43
-
44
-
45
-
46
-
47
-
48
-
49
-
50
-
51
-
52
-
53
-
54
-
55
-
56
-
57
-
58
-
59
-
60
-
61
-
62
-
63
-
64
-
65
-
66
-
67
-
68
-
69
-
70
-
71
-
72
-
73
-
74
-
75
-
76
-
77
-
78
-
79
-
80
-
81
-
82
-
83
-
84
-
85
-
86
-
87
-
88
-
89
-
90
-
91
-
92
-
93
-
94
-
95
-
96
-
97
-
98
-
99
-
100
-
101
-
102
-
103
-
104
-
105
-
106
-
107
-
108
-
109
-
110
-
111
-
112
-
113
-
114
-
115
-
116
-
117
-
118
-
119
-
120
-
121
-
122
-
123
-
124
-
125
-
126
-
127
-
128
-
129
-
130
-
131
-
132
-
133
-
134
-
135
-
136
-
137
-
138
-
139
-
140
-
141
-
142
-
143
-
144
-
145
-
146
-
147
-
148
-
149
-
150
-
151
-
152
-
153
-
154
-
155
-
156
-
157
-
158
-
159
-
160
-
161
-
162
-
163
-
164
-
165
-
166
-
167
-
168
-
169
-
170
-
171
-
172
-
173
-
174
-
175
-
176
-
177
-
178
-
179
-
180
-
181
-
182
-
183
-
184
-
185
-
186
-
187
-
188
-
189
-
190
-
191
-
192
-
193
-
194
-
195
-
 196
196 -
 197
197 -
 198
198 -
 199
199 -
 200
200 -
 201
201 -
 202
202 -
 203
203 -
 204
204 -
 205
205 -
 206
206 -
207
-
208
-
209
-
210
-
211
-
212
-
213
-
214
-
215
-
216
-
217
-
218
-
219
-
220
-
221
-
222
-
223
-
224
-
225
-
226
-
227
-
228
-
229
-
230
-
231
-
232
-
233
-
234
-
235
-
236
-
237
-
238
-
239
-
240
-
241
-
242
-
243
-
244
-
245
-
246
-
247
-
248
-
249
 |
 |
