Epson PhotoPC 850Z User Manual - Page 38
with the image quality and flash settings in the upper
 |
View all Epson PhotoPC 850Z manuals
Add to My Manuals
Save this manual to your list of manuals |
Page 38 highlights
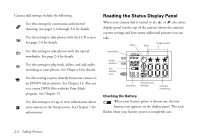
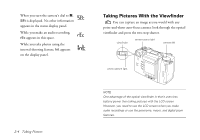
Follow these steps: 1 Make sure you are at least 20 inches (50 cm) away from your subject. (If you want to get closer, use macro mode as described on page 4-4.) 2 Turn the camera dial to to see the View menu. Wait until the camera status light turns green. You see a preview of your picture on the LCD screen, with the image quality and flash settings in the upper right corner of the screen. The following screen illustrates what you see if your camera is set to Full Auto user mode, the default setting. 2 The settings look different if you're using Program or Manual user mode. See page 1-13 to change your setting. A B Taking Pictures 2-7
-
 1
1 -
2
-
3
-
4
-
5
-
6
-
7
-
8
-
9
-
10
-
11
-
12
-
13
-
14
-
15
-
16
-
17
-
18
-
19
-
20
-
21
-
22
-
23
-
24
-
25
-
26
-
27
-
28
-
29
-
30
-
31
-
32
-
 33
33 -
 34
34 -
 35
35 -
 36
36 -
 37
37 -
 38
38 -
 39
39 -
 40
40 -
 41
41 -
 42
42 -
 43
43 -
44
-
45
-
46
-
47
-
48
-
49
-
50
-
51
-
52
-
53
-
54
-
55
-
56
-
57
-
58
-
59
-
60
-
61
-
62
-
63
-
64
-
65
-
66
-
67
-
68
-
69
-
70
-
71
-
72
-
73
-
74
-
75
-
76
-
77
-
78
-
79
-
80
-
81
-
82
-
83
-
84
-
85
-
86
-
87
-
88
-
89
-
90
-
91
-
92
-
93
-
94
-
95
-
96
-
97
-
98
-
99
-
100
-
101
-
102
-
103
-
104
-
105
-
106
-
107
-
108
-
109
-
110
-
111
-
112
-
113
-
114
-
115
-
116
-
117
-
118
-
119
-
120
-
121
-
122
-
123
-
124
-
125
-
126
-
127
-
128
-
129
-
130
-
131
-
132
-
133
-
134
-
135
-
136
-
137
-
138
-
139
-
140
-
141
-
142
-
143
-
144
-
145
-
146
-
147
-
148
-
149
-
150
-
151
-
152
-
153
-
154
-
155
-
156
-
157
-
158
-
159
-
160
-
161
-
162
-
163
-
164
-
165
-
166
-
167
-
168
-
169
-
170
-
171
-
172
-
173
-
174
-
175
-
176
-
177
-
178
-
179
-
180
-
181
-
182
-
183
-
184
-
185
-
186
-
187
-
188
-
189
-
190
-
191
-
192
-
193
-
194
-
195
-
196
-
197
-
198
-
199
-
200
-
201
-
202
-
203
-
204
-
205
-
206
-
207
-
208
-
209
-
210
-
211
-
212
-
213
-
214
-
215
-
216
-
217
-
218
-
219
-
220
-
221
-
222
-
223
-
224
-
225
-
226
-
227
-
228
-
229
-
230
-
231
-
232
-
233
-
234
-
235
-
236
-
237
-
238
-
239
-
240
-
241
-
242
-
243
-
244
-
245
-
246
-
247
-
248
-
249
 |
 |

Taking Pictures
2-7
A
B
2
Follow these steps:
1
Make sure you are at least 20 inches (50 cm) away from
your subject. (If you want to get closer, use macro mode
as described on page 4-4.)
2
Turn the camera dial to
to see the View menu. Wait
until the camera status light turns green.
You see a preview of your picture on the LCD screen,
with the image quality and flash settings in the upper
right corner of the screen.
The following screen illustrates what you see if your
camera is set to Full Auto user mode, the default setting.
The settings look different if you’re using Program or
Manual user mode. See page 1-13 to change your
setting.