Epson PhotoPC 850Z User Manual - Page 37
Taking Pictures With the LCD Screen, Saved images remain on the memory card even when
 |
View all Epson PhotoPC 850Z manuals
Add to My Manuals
Save this manual to your list of manuals |
Page 37 highlights
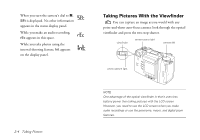
While holding down the shutter button, you can reframe your picture and move your subject off-center if you want. 7 Press the shutter button the rest of the way down to take the picture. 8 Hold the camera still until it clicks, then release the shutter button. NOTE You may notice a brief delay between the time you press the shutter button and when the camera clicks. To avoid blurring your images, make sure you hold the camera still until it clicks. After you take a picture, the photo capture light flashes. This indicates that the image was captured and the camera is processing it. When the light stops flashing, the image is saved. CAUTION If you set the camera down while the light is still flashing, make sure you handle it carefully. The camera may lose your image if you set it down too hard. Saved images remain on the memory card even when you turn the camera off or remove the memory card or the batteries. Taking Pictures With the LCD Screen The LCD screen lets you see a live preview of what the camera's lens sees at any moment. Although you can use this setting anytime, you always choose it when you want to use the macro, panorama, or digital zoom features; or when you want to make audio recordings to go with your photos. NOTE Before you begin to take pictures, you can use the SETUP menu to turn on audio recording. See page 2-16 for details. 2-6 Taking Pictures
-
 1
1 -
2
-
3
-
4
-
5
-
6
-
7
-
8
-
9
-
10
-
11
-
12
-
13
-
14
-
15
-
16
-
17
-
18
-
19
-
20
-
21
-
22
-
23
-
24
-
25
-
26
-
27
-
28
-
29
-
30
-
31
-
 32
32 -
 33
33 -
 34
34 -
 35
35 -
 36
36 -
 37
37 -
 38
38 -
 39
39 -
 40
40 -
 41
41 -
 42
42 -
43
-
44
-
45
-
46
-
47
-
48
-
49
-
50
-
51
-
52
-
53
-
54
-
55
-
56
-
57
-
58
-
59
-
60
-
61
-
62
-
63
-
64
-
65
-
66
-
67
-
68
-
69
-
70
-
71
-
72
-
73
-
74
-
75
-
76
-
77
-
78
-
79
-
80
-
81
-
82
-
83
-
84
-
85
-
86
-
87
-
88
-
89
-
90
-
91
-
92
-
93
-
94
-
95
-
96
-
97
-
98
-
99
-
100
-
101
-
102
-
103
-
104
-
105
-
106
-
107
-
108
-
109
-
110
-
111
-
112
-
113
-
114
-
115
-
116
-
117
-
118
-
119
-
120
-
121
-
122
-
123
-
124
-
125
-
126
-
127
-
128
-
129
-
130
-
131
-
132
-
133
-
134
-
135
-
136
-
137
-
138
-
139
-
140
-
141
-
142
-
143
-
144
-
145
-
146
-
147
-
148
-
149
-
150
-
151
-
152
-
153
-
154
-
155
-
156
-
157
-
158
-
159
-
160
-
161
-
162
-
163
-
164
-
165
-
166
-
167
-
168
-
169
-
170
-
171
-
172
-
173
-
174
-
175
-
176
-
177
-
178
-
179
-
180
-
181
-
182
-
183
-
184
-
185
-
186
-
187
-
188
-
189
-
190
-
191
-
192
-
193
-
194
-
195
-
196
-
197
-
198
-
199
-
200
-
201
-
202
-
203
-
204
-
205
-
206
-
207
-
208
-
209
-
210
-
211
-
212
-
213
-
214
-
215
-
216
-
217
-
218
-
219
-
220
-
221
-
222
-
223
-
224
-
225
-
226
-
227
-
228
-
229
-
230
-
231
-
232
-
233
-
234
-
235
-
236
-
237
-
238
-
239
-
240
-
241
-
242
-
243
-
244
-
245
-
246
-
247
-
248
-
249
 |
 |
