HP H470 User Manual - Page 71
Maintain and troubleshoot, Work with print cartridges, Replace the print cartridges - ink module
 |
UPC - 883585461585
View all HP H470 manuals
Add to My Manuals
Save this manual to your list of manuals |
Page 71 highlights
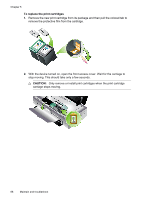
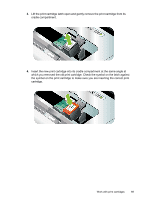
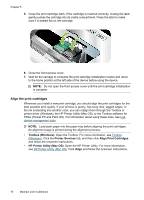
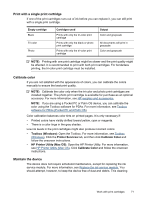
5 Maintain and troubleshoot This section contains the following topics: • Work with print cartridges • Replace the ink service module • Troubleshooting tips and resources • Solve printing problems • Poor print quality and unexpected printouts • Solve paper-feed problems • Troubleshoot installation issues • Clear jams Work with print cartridges This section contains the following topics: • Replace the print cartridges • Align the print cartridges • Print with a single print cartridge • Calibrate color • Maintain the device • Store printing supplies Replace the print cartridges You can check the estimated ink levels from the Toolbox (Windows), the HP Printer Utility (Mac OS), or the Toolbox software for PDAs (Pocket PC and Palm OS). For information about using these tools, see Use device management tools. You can also print the self-test diagnostic page to view this information (see Understand the device information pages). NOTE: The ink levels shown are an estimate only. Actual ink volumes may vary. After removing a cartridge from its package, install it right away. Do not remove a cartridge from the device for long periods of time. To find out which print cartridges work with your device, see Supplies. CAUTION: To prevent clogs, ink failure, and bad electrical connections, do not touch the print cartridge ink nozzles or copper contacts, and do not remove the copper strips. Maintain and troubleshoot 67
-
 1
1 -
2
-
3
-
4
-
5
-
6
-
7
-
8
-
9
-
10
-
11
-
12
-
13
-
14
-
15
-
16
-
17
-
18
-
19
-
20
-
21
-
22
-
23
-
24
-
25
-
26
-
27
-
28
-
29
-
30
-
31
-
32
-
33
-
34
-
35
-
36
-
37
-
38
-
39
-
40
-
41
-
42
-
43
-
44
-
45
-
46
-
47
-
48
-
49
-
50
-
51
-
52
-
53
-
54
-
55
-
56
-
57
-
58
-
59
-
60
-
61
-
62
-
63
-
64
-
65
-
 66
66 -
 67
67 -
 68
68 -
 69
69 -
 70
70 -
 71
71 -
 72
72 -
 73
73 -
 74
74 -
 75
75 -
 76
76 -
77
-
78
-
79
-
80
-
81
-
82
-
83
-
84
-
85
-
86
-
87
-
88
-
89
-
90
-
91
-
92
-
93
-
94
-
95
-
96
-
97
-
98
-
99
-
100
-
101
-
102
-
103
-
104
-
105
-
106
-
107
-
108
-
109
-
110
-
111
-
112
-
113
-
114
-
115
-
116
-
117
-
118
-
119
-
120
-
121
-
122
-
123
-
124
-
125
-
126
-
127
-
128
-
129
-
130
-
131
-
132
 |
 |
