HP H470 User Manual - Page 73
the symbol on the print cartridge to make sure you are inserting the correct print
 |
UPC - 883585461585
View all HP H470 manuals
Add to My Manuals
Save this manual to your list of manuals |
Page 73 highlights
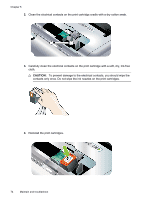
3. Lift the print cartridge latch open and gently remove the print cartridge from its cradle compartment. 4. Insert the new print cartridge into its cradle compartment at the same angle at which you removed the old print cartridge. Check the symbol on the latch against the symbol on the print cartridge to make sure you are inserting the correct print cartridge. Work with print cartridges 69
-
 1
1 -
2
-
3
-
4
-
5
-
6
-
7
-
8
-
9
-
10
-
11
-
12
-
13
-
14
-
15
-
16
-
17
-
18
-
19
-
20
-
21
-
22
-
23
-
24
-
25
-
26
-
27
-
28
-
29
-
30
-
31
-
32
-
33
-
34
-
35
-
36
-
37
-
38
-
39
-
40
-
41
-
42
-
43
-
44
-
45
-
46
-
47
-
48
-
49
-
50
-
51
-
52
-
53
-
54
-
55
-
56
-
57
-
58
-
59
-
60
-
61
-
62
-
63
-
64
-
65
-
66
-
67
-
 68
68 -
 69
69 -
 70
70 -
 71
71 -
 72
72 -
 73
73 -
 74
74 -
 75
75 -
 76
76 -
 77
77 -
 78
78 -
79
-
80
-
81
-
82
-
83
-
84
-
85
-
86
-
87
-
88
-
89
-
90
-
91
-
92
-
93
-
94
-
95
-
96
-
97
-
98
-
99
-
100
-
101
-
102
-
103
-
104
-
105
-
106
-
107
-
108
-
109
-
110
-
111
-
112
-
113
-
114
-
115
-
116
-
117
-
118
-
119
-
120
-
121
-
122
-
123
-
124
-
125
-
126
-
127
-
128
-
129
-
130
-
131
-
132
 |
 |

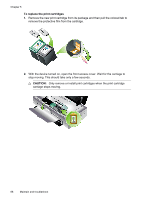
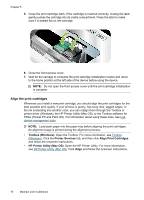
3.
Lift the print cartridge latch open and gently remove the print cartridge from its
cradle compartment.
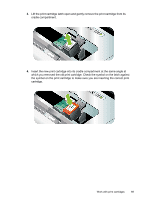
4.
Insert the new print cartridge into its cradle compartment at the same angle at
which you removed the old print cartridge. Check the symbol on the latch against
the symbol on the print cartridge to make sure you are inserting the correct print
cartridge.
Work with print cartridges
69