HP Officejet Pro 6830 User Guide - Page 131
Clear the print carriage, Restore defaults and settings
 |
View all HP Officejet Pro 6830 manuals
Add to My Manuals
Save this manual to your list of manuals |
Page 131 highlights
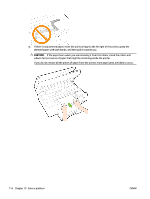
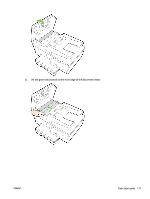
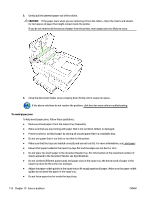
● If you are printing on both sides of a page, do not print highly saturated images on light weight paper. ● Use paper types that are recommended for the printer. For more information, see Recommended papers for printing. ● If the printer is about to run out of paper, allow the printer to run out of paper first, and then add paper. Do not load paper when the printer is printing. ● Make sure that the printer is clean. For more information, see Maintain the printer. Clear the print carriage Remove any objects, such as paper, that are blocking the print carriage. See Clear paper jams for more information. NOTE: Do not use any tools or other devices to remove jammed paper. Always use caution when removing jammed paper from inside the printer. If the print carriage cannot move, click here to use the HP online troubleshooter to resolve a print carriage jam. At this time, this website might not be available in all languages. Restore defaults and settings If you disable some functions or change some settings and want to change them back, you can restore the printer to the original factory settings or network settings. To restore the printer to the original factory settings 1. From the printer control panel display, touch Setup . 2. Touch Printer Maintenance . 3. Touch Restore. 4. Touch Restore Settings. 5. Select which function you would like to restore to the original factory settings: ● Copy ● Scan ● Fax ● Photo ● Network ● Web Services ● Printer Setup Touch Restore. 6. A message appears stating that the settings will be restored. Touch Yes. ENWW Clear the print carriage 119
-
 1
1 -
2
-
3
-
4
-
5
-
6
-
7
-
8
-
9
-
10
-
11
-
12
-
13
-
14
-
15
-
16
-
17
-
18
-
19
-
20
-
21
-
22
-
23
-
24
-
25
-
26
-
27
-
28
-
29
-
30
-
31
-
32
-
33
-
34
-
35
-
36
-
37
-
38
-
39
-
40
-
41
-
42
-
43
-
44
-
45
-
46
-
47
-
48
-
49
-
50
-
51
-
52
-
53
-
54
-
55
-
56
-
57
-
58
-
59
-
60
-
61
-
62
-
63
-
64
-
65
-
66
-
67
-
68
-
69
-
70
-
71
-
72
-
73
-
74
-
75
-
76
-
77
-
78
-
79
-
80
-
81
-
82
-
83
-
84
-
85
-
86
-
87
-
88
-
89
-
90
-
91
-
92
-
93
-
94
-
95
-
96
-
97
-
98
-
99
-
100
-
101
-
102
-
103
-
104
-
105
-
106
-
107
-
108
-
109
-
110
-
111
-
112
-
113
-
114
-
115
-
116
-
117
-
118
-
119
-
120
-
121
-
122
-
123
-
124
-
125
-
 126
126 -
 127
127 -
 128
128 -
 129
129 -
 130
130 -
 131
131 -
 132
132 -
 133
133 -
 134
134 -
 135
135 -
 136
136 -
137
-
138
-
139
-
140
-
141
-
142
-
143
-
144
-
145
-
146
-
147
-
148
-
149
-
150
-
151
-
152
-
153
-
154
-
155
-
156
-
157
-
158
-
159
-
160
-
161
-
162
-
163
-
164
-
165
-
166
-
167
-
168
-
169
-
170
-
171
-
172
-
173
-
174
-
175
-
176
-
177
-
178
-
179
-
180
-
181
-
182
-
183
-
184
-
185
-
186
 |
 |