HP ProLiant DL170e HP ProLiant DL170e G6 Server Maintenance and Service Guide - Page 66
To install the system fan, Removal and replacement procedures
 |
View all HP ProLiant DL170e manuals
Add to My Manuals
Save this manual to your list of manuals |
Page 66 highlights
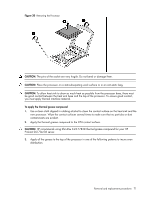
To install the system fan: 1. Press the system fan into the system fan bracket. 2. Connect the fan cable to its corresponding fan power connector attached on the fan cage. Figure 26 Reinstalling the System Fan 3. Reinstall the top cover as described in the section "System covers". 4. Connect the power cord(s). To install the system fan cage: After the operations with midplane module and HDD backplane, the system fan cage (with fans installed) that have been removed and placed on top of the staked hood can be reinstalled into place. 1. Align the fan cage to the stand-offs on the system tray and plug the fan cage to the system tray. Make sure the stand-offs are fully inserted to the flexible retainers on the fan cage. Figure 27 Installing the System Fan Cage 2. Reinstall the top cover as described in the section "System covers". 3. Connect the power cord(s). Removal and replacement procedures 66
-
 1
1 -
2
-
3
-
4
-
5
-
6
-
7
-
8
-
9
-
10
-
11
-
12
-
13
-
14
-
15
-
16
-
17
-
18
-
19
-
20
-
21
-
22
-
23
-
24
-
25
-
26
-
27
-
28
-
29
-
30
-
31
-
32
-
33
-
34
-
35
-
36
-
37
-
38
-
39
-
40
-
41
-
42
-
43
-
44
-
45
-
46
-
47
-
48
-
49
-
50
-
51
-
52
-
53
-
54
-
55
-
56
-
57
-
58
-
59
-
60
-
 61
61 -
 62
62 -
 63
63 -
 64
64 -
 65
65 -
 66
66 -
 67
67 -
 68
68 -
 69
69 -
 70
70 -
 71
71 -
72
-
73
-
74
-
75
-
76
-
77
-
78
-
79
-
80
-
81
-
82
-
83
-
84
-
85
-
86
-
87
-
88
-
89
-
90
-
91
-
92
-
93
-
94
-
95
-
96
-
97
-
98
-
99
-
100
-
101
-
102
-
103
-
104
-
105
-
106
-
107
-
108
-
109
-
110
-
111
-
112
-
113
-
114
-
115
-
116
-
117
-
118
-
119
-
120
-
121
-
122
-
123
-
124
-
125
-
126
-
127
-
128
-
129
-
130
-
131
-
132
-
133
-
134
-
135
-
136
-
137
-
138
-
139
-
140
-
141
-
142
-
143
-
144
-
145
-
146
-
147
-
148
-
149
-
150
-
151
-
152
-
153
-
154
-
155
-
156
-
157
-
158
-
159
-
160
-
161
-
162
-
163
-
164
-
165
-
166
-
167
-
168
-
169
-
170
-
171
-
172
-
173
-
174
-
175
-
176
-
177
-
178
-
179
-
180
 |
 |
