HP ProLiant DL170e HP ProLiant DL170e G6 Server Maintenance and Service Guide - Page 85
Reinstalling the PCIe cage assemblies, To install the 1U PCIe cage assembly
 |
View all HP ProLiant DL170e manuals
Add to My Manuals
Save this manual to your list of manuals |
Page 85 highlights
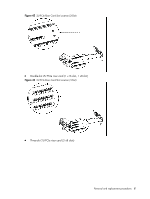
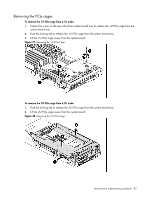
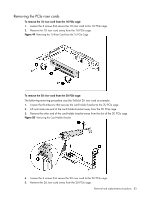
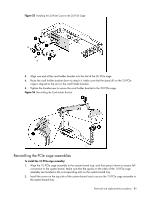
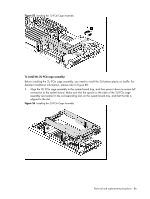
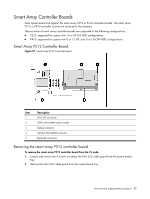
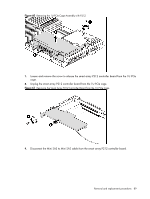
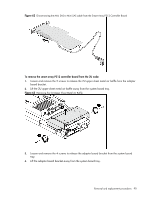
Figure 53 Installing the 2U Riser Card on the 2U PCIe Cage 3. Align one end of the card holder bracket into the slot of the 2U PCIe cage. 4. Route the card holder bracket down to attach it. Make sure that the stand off on the 2U PCIe cage is aligned to the slot on the card holder bracket. 5. Tighten the thumbscrew to secure the card holder bracket to the 2U PCIe cage. Figure 54 Reinstalling the Card Holder Bracket Reinstalling the PCIe cage assemblies To install the 1U PCIe cage assembly: 1. Align the 1U PCIe cage assembly to the system board tray, and then press it down to ensure full connection to the system board. Make sure that the spools on the sides of the 1U PCIe cage assembly are located in the corresponding slots on the system board tray. 2. Install the screw on the top side of the system board tray to secure the 1U PCIe cage assembly to the system board tray. Removal and replacement procedures 85
-
 1
1 -
2
-
3
-
4
-
5
-
6
-
7
-
8
-
9
-
10
-
11
-
12
-
13
-
14
-
15
-
16
-
17
-
18
-
19
-
20
-
21
-
22
-
23
-
24
-
25
-
26
-
27
-
28
-
29
-
30
-
31
-
32
-
33
-
34
-
35
-
36
-
37
-
38
-
39
-
40
-
41
-
42
-
43
-
44
-
45
-
46
-
47
-
48
-
49
-
50
-
51
-
52
-
53
-
54
-
55
-
56
-
57
-
58
-
59
-
60
-
61
-
62
-
63
-
64
-
65
-
66
-
67
-
68
-
69
-
70
-
71
-
72
-
73
-
74
-
75
-
76
-
77
-
78
-
79
-
 80
80 -
 81
81 -
 82
82 -
 83
83 -
 84
84 -
 85
85 -
 86
86 -
 87
87 -
 88
88 -
 89
89 -
 90
90 -
91
-
92
-
93
-
94
-
95
-
96
-
97
-
98
-
99
-
100
-
101
-
102
-
103
-
104
-
105
-
106
-
107
-
108
-
109
-
110
-
111
-
112
-
113
-
114
-
115
-
116
-
117
-
118
-
119
-
120
-
121
-
122
-
123
-
124
-
125
-
126
-
127
-
128
-
129
-
130
-
131
-
132
-
133
-
134
-
135
-
136
-
137
-
138
-
139
-
140
-
141
-
142
-
143
-
144
-
145
-
146
-
147
-
148
-
149
-
150
-
151
-
152
-
153
-
154
-
155
-
156
-
157
-
158
-
159
-
160
-
161
-
162
-
163
-
164
-
165
-
166
-
167
-
168
-
169
-
170
-
171
-
172
-
173
-
174
-
175
-
176
-
177
-
178
-
179
-
180
 |
 |
