HP ProLiant DL170e HP ProLiant DL170e G6 Server Maintenance and Service Guide - Page 96
Removing the Originally Attached Bracket from the Smart Array P212 Controller Board
 |
View all HP ProLiant DL170e manuals
Add to My Manuals
Save this manual to your list of manuals |
Page 96 highlights
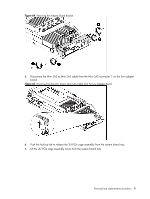
Figure 73 Removing the Originally Attached Bracket from the Smart Array P212 Controller Board 12. Install the low-profile vented bracket on the smart array P212 controller board. a. Insert the smart array P212 controller board to the matching slot on the low-profile vented bracket. Make sure the smart array P212 controller board is aligned to the bracket by the 2 screw holes. b. Install the 2 screws to install the low-profile vented bracket to smart array P212 controller board. Figure 74 Installing the Low-Profile Vented Bracket to the Smart Array P212 Controller Board 13. Install the Mini SAS to Mini SAS cable to the Mini SAS connector J6 on the smart array P212 controller board. Removal and replacement procedures 96
-
 1
1 -
2
-
3
-
4
-
5
-
6
-
7
-
8
-
9
-
10
-
11
-
12
-
13
-
14
-
15
-
16
-
17
-
18
-
19
-
20
-
21
-
22
-
23
-
24
-
25
-
26
-
27
-
28
-
29
-
30
-
31
-
32
-
33
-
34
-
35
-
36
-
37
-
38
-
39
-
40
-
41
-
42
-
43
-
44
-
45
-
46
-
47
-
48
-
49
-
50
-
51
-
52
-
53
-
54
-
55
-
56
-
57
-
58
-
59
-
60
-
61
-
62
-
63
-
64
-
65
-
66
-
67
-
68
-
69
-
70
-
71
-
72
-
73
-
74
-
75
-
76
-
77
-
78
-
79
-
80
-
81
-
82
-
83
-
84
-
85
-
86
-
87
-
88
-
89
-
90
-
 91
91 -
 92
92 -
 93
93 -
 94
94 -
 95
95 -
 96
96 -
 97
97 -
 98
98 -
 99
99 -
 100
100 -
 101
101 -
102
-
103
-
104
-
105
-
106
-
107
-
108
-
109
-
110
-
111
-
112
-
113
-
114
-
115
-
116
-
117
-
118
-
119
-
120
-
121
-
122
-
123
-
124
-
125
-
126
-
127
-
128
-
129
-
130
-
131
-
132
-
133
-
134
-
135
-
136
-
137
-
138
-
139
-
140
-
141
-
142
-
143
-
144
-
145
-
146
-
147
-
148
-
149
-
150
-
151
-
152
-
153
-
154
-
155
-
156
-
157
-
158
-
159
-
160
-
161
-
162
-
163
-
164
-
165
-
166
-
167
-
168
-
169
-
170
-
171
-
172
-
173
-
174
-
175
-
176
-
177
-
178
-
179
-
180
 |
 |

Removal and replacement procedures
96
Figure 73
Removing the Originally Attached Bracket from the Smart Array P212 Controller Board
12.
Install the low-profile vented bracket on the smart array P212 controller board.
a.
Insert the smart array P212 controller board to the matching slot on the low-profile vented
bracket. Make sure the smart array P212 controller board is aligned to the bracket by the 2
screw holes.
b.
Install the 2 screws to install the low-profile vented bracket to smart array P212 controller
board.
Figure 74
Installing the Low-Profile Vented Bracket to the Smart Array P212 Controller Board
13.
Install the Mini SAS to Mini SAS cable to the Mini SAS connector J6 on the smart array P212
controller board.