HP Z3100 HP Designjet Z3100ps GP Photo Printer - User's Guide - Page 106
button in the Book Layout Editor
 |
UPC - 882780677531
View all HP Z3100 manuals
Add to My Manuals
Save this manual to your list of manuals |
Page 106 highlights
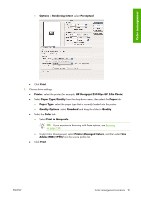
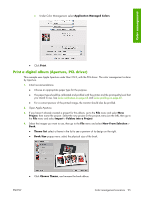
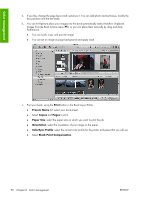
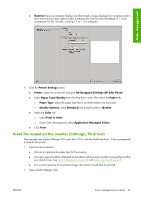
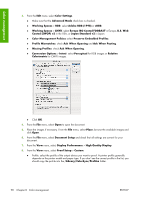
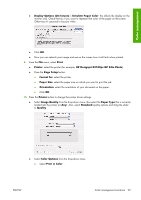
Color management 5. If you like, change the page layout and customize it. You can add photo and text boxes, modify the box positions and the text styles. 6. You can let Aperture place your images into the book automatically (select Autoflow Unplaced Images from the Book Actions menu ), or you can place them manually by drag and drop. Furthermore: ● You can scale, crop, and pan the image. ● You can set an image as page background and apply wash. 7. Print your book, using the Print button in the Book Layout Editor. ● Presets Name list: select your book preset. ● Select Copies and Pages to print. ● Paper Size: select the paper size on which you want to print the job. ● Orientation: select the orientation of your image on the paper. ● ColorSync Profile: select the correct color profile for the printer and paper that you will use. ● Select Black Point Compensation. 96 Chapter 6 Color management ENWW
-
 1
1 -
2
-
3
-
4
-
5
-
6
-
7
-
8
-
9
-
10
-
11
-
12
-
13
-
14
-
15
-
16
-
17
-
18
-
19
-
20
-
21
-
22
-
23
-
24
-
25
-
26
-
27
-
28
-
29
-
30
-
31
-
32
-
33
-
34
-
35
-
36
-
37
-
38
-
39
-
40
-
41
-
42
-
43
-
44
-
45
-
46
-
47
-
48
-
49
-
50
-
51
-
52
-
53
-
54
-
55
-
56
-
57
-
58
-
59
-
60
-
61
-
62
-
63
-
64
-
65
-
66
-
67
-
68
-
69
-
70
-
71
-
72
-
73
-
74
-
75
-
76
-
77
-
78
-
79
-
80
-
81
-
82
-
83
-
84
-
85
-
86
-
87
-
88
-
89
-
90
-
91
-
92
-
93
-
94
-
95
-
96
-
97
-
98
-
99
-
100
-
 101
101 -
 102
102 -
 103
103 -
 104
104 -
 105
105 -
 106
106 -
 107
107 -
 108
108 -
 109
109 -
 110
110 -
 111
111 -
112
-
113
-
114
-
115
-
116
-
117
-
118
-
119
-
120
-
121
-
122
-
123
-
124
-
125
-
126
-
127
-
128
-
129
-
130
-
131
-
132
-
133
-
134
-
135
-
136
-
137
-
138
-
139
-
140
-
141
-
142
-
143
-
144
-
145
-
146
-
147
-
148
-
149
-
150
-
151
-
152
-
153
-
154
-
155
-
156
-
157
-
158
-
159
-
160
-
161
-
162
-
163
-
164
-
165
-
166
-
167
-
168
-
169
-
170
-
171
-
172
-
173
-
174
-
175
-
176
-
177
-
178
-
179
-
180
-
181
-
182
-
183
-
184
-
185
-
186
-
187
-
188
-
189
-
190
-
191
-
192
-
193
-
194
-
195
-
196
-
197
-
198
-
199
-
200
-
201
-
202
-
203
-
204
-
205
-
206
-
207
-
208
-
209
-
210
-
211
-
212
-
213
-
214
-
215
-
216
-
217
-
218
-
219
-
220
-
221
 |
 |