HP Z3100 HP Designjet Z3100ps GP Photo Printer - User's Guide - Page 184
Corrective action, If the problem remains, clean the printheads again
 |
UPC - 882780677531
View all HP Z3100 manuals
Add to My Manuals
Save this manual to your list of manuals |
Page 184 highlights
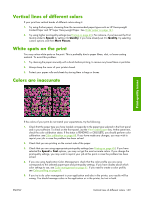
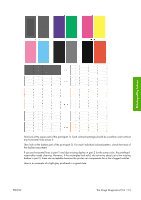
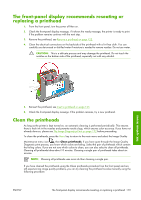
And here is an example of the same printhead in a bad state: Print-quality issues The gloss enhancer (E) cannot be seen when printed on its own, because it is a clear fluid. To make it visible in the Image Diagnostics Print, it is printed over gray ink (G). ● In part 1 (top), the gloss enhancer is seen as a slightly different gray inner section of a gray rectangle. On some papers the inner section may look darker, on other papers it may look lighter. ● In part 2 (bottom), the small dashes of gloss enhancer, one for each nozzle of the printhead, are seen as small lighter gray dashes on top of a gray area. On most plain and coated papers the gloss enhancer can barely be seen, so such papers are not suitable for troubleshooting the gloss enhancer. Corrective action 1. Clean any faulty printheads (see Clean the printheads on page 179). Then reprint the Image Diagnostics Print to see whether the problem has been solved. 2. If the problem remains, clean the printheads again, and reprint the Image Diagnostics Print to see whether the problem has been solved. 3. If the problem remains, consider cleaning your printheads manually (see Clean the printheads on page 179). You could also try reprinting your current print job, in case it now prints satisfactorily. 174 Chapter 13 Troubleshooting print-quality issues ENWW
-
 1
1 -
2
-
3
-
4
-
5
-
6
-
7
-
8
-
9
-
10
-
11
-
12
-
13
-
14
-
15
-
16
-
17
-
18
-
19
-
20
-
21
-
22
-
23
-
24
-
25
-
26
-
27
-
28
-
29
-
30
-
31
-
32
-
33
-
34
-
35
-
36
-
37
-
38
-
39
-
40
-
41
-
42
-
43
-
44
-
45
-
46
-
47
-
48
-
49
-
50
-
51
-
52
-
53
-
54
-
55
-
56
-
57
-
58
-
59
-
60
-
61
-
62
-
63
-
64
-
65
-
66
-
67
-
68
-
69
-
70
-
71
-
72
-
73
-
74
-
75
-
76
-
77
-
78
-
79
-
80
-
81
-
82
-
83
-
84
-
85
-
86
-
87
-
88
-
89
-
90
-
91
-
92
-
93
-
94
-
95
-
96
-
97
-
98
-
99
-
100
-
101
-
102
-
103
-
104
-
105
-
106
-
107
-
108
-
109
-
110
-
111
-
112
-
113
-
114
-
115
-
116
-
117
-
118
-
119
-
120
-
121
-
122
-
123
-
124
-
125
-
126
-
127
-
128
-
129
-
130
-
131
-
132
-
133
-
134
-
135
-
136
-
137
-
138
-
139
-
140
-
141
-
142
-
143
-
144
-
145
-
146
-
147
-
148
-
149
-
150
-
151
-
152
-
153
-
154
-
155
-
156
-
157
-
158
-
159
-
160
-
161
-
162
-
163
-
164
-
165
-
166
-
167
-
168
-
169
-
170
-
171
-
172
-
173
-
174
-
175
-
176
-
177
-
178
-
 179
179 -
 180
180 -
 181
181 -
 182
182 -
 183
183 -
 184
184 -
 185
185 -
 186
186 -
 187
187 -
 188
188 -
 189
189 -
190
-
191
-
192
-
193
-
194
-
195
-
196
-
197
-
198
-
199
-
200
-
201
-
202
-
203
-
204
-
205
-
206
-
207
-
208
-
209
-
210
-
211
-
212
-
213
-
214
-
215
-
216
-
217
-
218
-
219
-
220
-
221
 |
 |