HP Z3100 HP Designjet Z3100ps GP Photo Printer - User's Guide - Page 108
Europe ISO Coated FOGRA27, Preserve Embedded Profiles
 |
UPC - 882780677531
View all HP Z3100 manuals
Add to My Manuals
Save this manual to your list of manuals |
Page 108 highlights
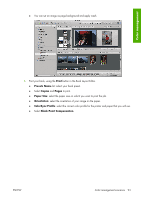
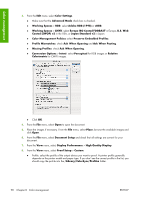
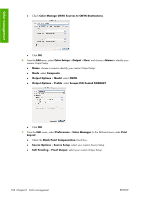
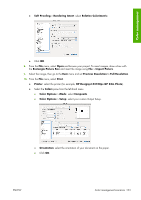
Color management 3. From the Edit menu, select Color Settings. ● Make sure that the Advanced Mode check box is checked. ● Working Spaces > RGB: select Adobe RGB (1998) or sRGB. ● Working Spaces > CMYK: select Europe ISO Coated FOGRA27 in Europe, U.S. Web Coated (SWOP) v2 in the USA, or Japan Standard v2 in Japan. ● Color Management Policies: select Preserve Embedded Profiles. ● Profile Mismatches: check Ask When Opening and Ask When Pasting. ● Missing Profiles: check Ask When Opening. ● Conversion Options > Intent: select Perceptual for RGB images or Relative Colorimetric for CMYK images. ● Click OK. 4. From the File menu, select Open to open the document. 5. Place the images if necessary. From the File menu, select Place; browse the available images and click Open. 6. From the File menu, select Document Setup and check that all settings are correct for your document. 7. From the View menu, select Display Performance > High Quality Display. 8. From the View menu, select Proof Setup > Custom. ● Profile: select the profile of the output device you want to proof. A printer profile generally depends on the printer model and paper type. If you don't see the correct profile in the list, you should copy the profile into the /Library/ColorSync/Profiles folder. 98 Chapter 6 Color management ENWW
-
 1
1 -
2
-
3
-
4
-
5
-
6
-
7
-
8
-
9
-
10
-
11
-
12
-
13
-
14
-
15
-
16
-
17
-
18
-
19
-
20
-
21
-
22
-
23
-
24
-
25
-
26
-
27
-
28
-
29
-
30
-
31
-
32
-
33
-
34
-
35
-
36
-
37
-
38
-
39
-
40
-
41
-
42
-
43
-
44
-
45
-
46
-
47
-
48
-
49
-
50
-
51
-
52
-
53
-
54
-
55
-
56
-
57
-
58
-
59
-
60
-
61
-
62
-
63
-
64
-
65
-
66
-
67
-
68
-
69
-
70
-
71
-
72
-
73
-
74
-
75
-
76
-
77
-
78
-
79
-
80
-
81
-
82
-
83
-
84
-
85
-
86
-
87
-
88
-
89
-
90
-
91
-
92
-
93
-
94
-
95
-
96
-
97
-
98
-
99
-
100
-
101
-
102
-
 103
103 -
 104
104 -
 105
105 -
 106
106 -
 107
107 -
 108
108 -
 109
109 -
 110
110 -
 111
111 -
 112
112 -
 113
113 -
114
-
115
-
116
-
117
-
118
-
119
-
120
-
121
-
122
-
123
-
124
-
125
-
126
-
127
-
128
-
129
-
130
-
131
-
132
-
133
-
134
-
135
-
136
-
137
-
138
-
139
-
140
-
141
-
142
-
143
-
144
-
145
-
146
-
147
-
148
-
149
-
150
-
151
-
152
-
153
-
154
-
155
-
156
-
157
-
158
-
159
-
160
-
161
-
162
-
163
-
164
-
165
-
166
-
167
-
168
-
169
-
170
-
171
-
172
-
173
-
174
-
175
-
176
-
177
-
178
-
179
-
180
-
181
-
182
-
183
-
184
-
185
-
186
-
187
-
188
-
189
-
190
-
191
-
192
-
193
-
194
-
195
-
196
-
197
-
198
-
199
-
200
-
201
-
202
-
203
-
204
-
205
-
206
-
207
-
208
-
209
-
210
-
211
-
212
-
213
-
214
-
215
-
216
-
217
-
218
-
219
-
220
-
221
 |
 |