HP Z3100 HP Designjet Z3100ps GP Photo Printer - User's Guide - Page 57
Select print quality, Select paper size, In the Mac OS Print dialog PCL driver
 |
UPC - 882780677531
View all HP Z3100 manuals
Add to My Manuals
Save this manual to your list of manuals |
Page 57 highlights
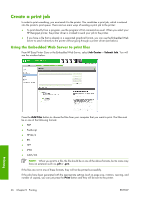
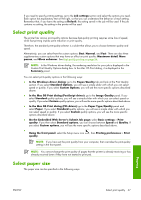
If you need to specify printing settings, go to the Job settings section and select the options you need. Each option has explanatory text on the right, so that you can understand the behavior of each setting. Remember that, if you leave the setting as Default, the setting saved in the job will be used. If the job contains no setting, the setting in the printer will be used. Select print quality The printer has various print-quality options because best-quality printing requires some loss of speed, while fast printing implies some reduction in print quality. Therefore, the standard print-quality selector is a slider that allows you to choose between quality and speed. Alternatively, you can select from the custom options: Best, Normal, and Fast. There are also three supplementary custom options that may have an effect on print quality: Maximum detail, More passes, and Gloss enhancer. See High-quality printing on page 54. NOTE: In the Windows driver dialog, the rendering resolution for your job is displayed in the Custom Print Quality Options dialog box. In the Mac OS Print dialog, it is displayed in the Summary panel. You can select print-quality options in the following ways: ● In the Windows driver dialog: go to the Paper/Quality tab and look at the Print Quality section. If you select Standard Options, you will see a simple slider with which you can select speed or quality. If you select Custom Options, you will see the more specific options described above. ● In the Mac OS Print dialog (PostScript driver): go to the Image Quality panel. If you select Standard quality options, you will see a simple slider with which you can select speed or quality. If you select Custom quality options, you will see the more specific options described above. ● In the Mac OS Print dialog (PCL driver): go to the Paper Type/Quality panel and select Paper. If you select Standard quality options, you will see a simple slider with which you can select speed or quality. If you select Custom quality options, you will see the more specific options described above. ● On the Embedded Web Server's Submit Job page: select Basic settings > Print quality. If you then select Standard options, you can choose between Speed and Quality. If you select Custom options, you will see the more specific options described above. ● Using the front panel: select the Setup menu icon quality. , then Printing preferences > Print NOTE: If you have set the print quality from your computer, that overrides the print-quality setting in the front panel. NOTE: You cannot change the print quality of pages that the printer is already receiving or has already received (even if they have not started to print yet). Select paper size The paper size can be specified in the following ways. Printing ENWW Select print quality 47
-
 1
1 -
2
-
3
-
4
-
5
-
6
-
7
-
8
-
9
-
10
-
11
-
12
-
13
-
14
-
15
-
16
-
17
-
18
-
19
-
20
-
21
-
22
-
23
-
24
-
25
-
26
-
27
-
28
-
29
-
30
-
31
-
32
-
33
-
34
-
35
-
36
-
37
-
38
-
39
-
40
-
41
-
42
-
43
-
44
-
45
-
46
-
47
-
48
-
49
-
50
-
51
-
 52
52 -
 53
53 -
 54
54 -
 55
55 -
 56
56 -
 57
57 -
 58
58 -
 59
59 -
 60
60 -
 61
61 -
 62
62 -
63
-
64
-
65
-
66
-
67
-
68
-
69
-
70
-
71
-
72
-
73
-
74
-
75
-
76
-
77
-
78
-
79
-
80
-
81
-
82
-
83
-
84
-
85
-
86
-
87
-
88
-
89
-
90
-
91
-
92
-
93
-
94
-
95
-
96
-
97
-
98
-
99
-
100
-
101
-
102
-
103
-
104
-
105
-
106
-
107
-
108
-
109
-
110
-
111
-
112
-
113
-
114
-
115
-
116
-
117
-
118
-
119
-
120
-
121
-
122
-
123
-
124
-
125
-
126
-
127
-
128
-
129
-
130
-
131
-
132
-
133
-
134
-
135
-
136
-
137
-
138
-
139
-
140
-
141
-
142
-
143
-
144
-
145
-
146
-
147
-
148
-
149
-
150
-
151
-
152
-
153
-
154
-
155
-
156
-
157
-
158
-
159
-
160
-
161
-
162
-
163
-
164
-
165
-
166
-
167
-
168
-
169
-
170
-
171
-
172
-
173
-
174
-
175
-
176
-
177
-
178
-
179
-
180
-
181
-
182
-
183
-
184
-
185
-
186
-
187
-
188
-
189
-
190
-
191
-
192
-
193
-
194
-
195
-
196
-
197
-
198
-
199
-
200
-
201
-
202
-
203
-
204
-
205
-
206
-
207
-
208
-
209
-
210
-
211
-
212
-
213
-
214
-
215
-
216
-
217
-
218
-
219
-
220
-
221
 |
 |