HP Z3100 HP Designjet Z3100ps GP Photo Printer - User's Guide - Page 88
Color management scenarios, Print a color photo for an exhibition (Photoshop, PS driver)
 |
UPC - 882780677531
View all HP Z3100 manuals
Add to My Manuals
Save this manual to your list of manuals |
Page 88 highlights
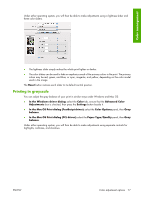
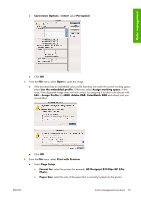
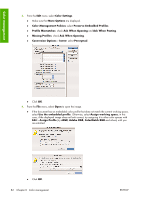
Color management ● The lightness slider simply makes the whole print lighter or darker. This slider is available under Windows in the same window as the other grayscale controls; it is available under Mac OS by selecting Lightness and Hue. ● The zone definition sliders can be used to define what you mean by highlight, midtone, and shadow. ● The other controls for highlight, midtone, and shadow can be used to adjust the gray balance of highlights, midtones, and shadows respectively. The Reset button restores each control to its default setting. Color management scenarios The following step-by-step instructions for specific printing jobs using specific software are similar to those you can find in HP's Knowledge Center on the Web. You are recommended to consult the Knowledge Center at http://www.hp.com/go/knowledge_center/djz3100/ for further examples and for the most up-to-date information. Print a color photo for an exhibition (Photoshop, PS driver) This example uses Adobe Photoshop CS2 under Mac OS X, with the PostScript driver. Color management is done by Photoshop. 1. Initial recommendations: ● Choose an appropriate paper type for the purpose. ● The paper type should be calibrated and profiled with the printer and the print-quality level that you intend to use. See Color calibration on page 68 and Color profiling on page 69. ● For a correct preview of the printed image, the monitor should also be profiled. 2. Open Adobe Photoshop CS2. 3. From the Edit menu, select Color Settings. ● Make sure that More Options are displayed. ● Working Spaces > RGB: select Adobe RGB (1998) or sRGB. ● Color Management Policies: select Preserve Embedded Profiles. ● Profile Mismatches: check Ask When Opening and Ask When Pasting. ● Missing Profiles: check Ask When Opening. 78 Chapter 6 Color management ENWW
-
 1
1 -
2
-
3
-
4
-
5
-
6
-
7
-
8
-
9
-
10
-
11
-
12
-
13
-
14
-
15
-
16
-
17
-
18
-
19
-
20
-
21
-
22
-
23
-
24
-
25
-
26
-
27
-
28
-
29
-
30
-
31
-
32
-
33
-
34
-
35
-
36
-
37
-
38
-
39
-
40
-
41
-
42
-
43
-
44
-
45
-
46
-
47
-
48
-
49
-
50
-
51
-
52
-
53
-
54
-
55
-
56
-
57
-
58
-
59
-
60
-
61
-
62
-
63
-
64
-
65
-
66
-
67
-
68
-
69
-
70
-
71
-
72
-
73
-
74
-
75
-
76
-
77
-
78
-
79
-
80
-
81
-
82
-
 83
83 -
 84
84 -
 85
85 -
 86
86 -
 87
87 -
 88
88 -
 89
89 -
 90
90 -
 91
91 -
 92
92 -
 93
93 -
94
-
95
-
96
-
97
-
98
-
99
-
100
-
101
-
102
-
103
-
104
-
105
-
106
-
107
-
108
-
109
-
110
-
111
-
112
-
113
-
114
-
115
-
116
-
117
-
118
-
119
-
120
-
121
-
122
-
123
-
124
-
125
-
126
-
127
-
128
-
129
-
130
-
131
-
132
-
133
-
134
-
135
-
136
-
137
-
138
-
139
-
140
-
141
-
142
-
143
-
144
-
145
-
146
-
147
-
148
-
149
-
150
-
151
-
152
-
153
-
154
-
155
-
156
-
157
-
158
-
159
-
160
-
161
-
162
-
163
-
164
-
165
-
166
-
167
-
168
-
169
-
170
-
171
-
172
-
173
-
174
-
175
-
176
-
177
-
178
-
179
-
180
-
181
-
182
-
183
-
184
-
185
-
186
-
187
-
188
-
189
-
190
-
191
-
192
-
193
-
194
-
195
-
196
-
197
-
198
-
199
-
200
-
201
-
202
-
203
-
204
-
205
-
206
-
207
-
208
-
209
-
210
-
211
-
212
-
213
-
214
-
215
-
216
-
217
-
218
-
219
-
220
-
221
 |
 |