HP Z3100 HP Designjet Z3100ps GP Photo Printer - User's Guide - Page 52
Turn the automatic cutter on and off, Feed and cut the paper, Settings, Cutter, Printer Settings
 |
UPC - 882780677531
View all HP Z3100 manuals
Add to My Manuals
Save this manual to your list of manuals |
Page 52 highlights
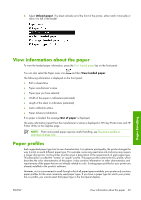
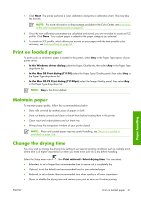
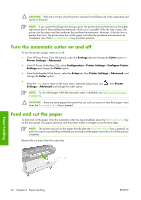
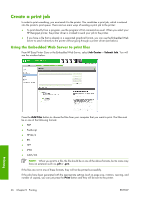
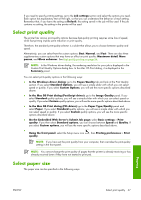
CAUTION: If the ink is not dry when the print is removed it could leave ink in the output tray and marks on the print. NOTE: If you cancel the drying time during a print, the printer may not feed and cut the paper right away due to the printhead maintenance, which runs in parallel. If the dry time is zero, the printer cuts the paper and then performs the printhead maintenance. However, if the dry time is greater than zero, the printer does not cut the paper until after the printhead maintenance has completed, even if the Form feed and cut key has been pressed. Turn the automatic cutter on and off To turn the printer's paper cutter on or off: ● From HP Easy Printer Care (Windows), select the Settings tab and change the Cutter option in Printer Settings > Advanced. ● From HP Printer Utility (Mac OS), select Configuration > Printer Settings > Configure Printer Settings and change the Cutter option. ● From the Embedded Web Server, select the Setup tab, then Printer Settings > Advanced, and change the Cutter option. ● Press the Menu key to return to the main menu, select the Setup menu icon Settings > Advanced and change the cutter option. , then Printer NOTE: To cut rolled paper while the automatic cutter is disabled, see Feed and cut the paper on page 42. CAUTION: There are some papers that cannot be cut, such as canvas or very thick paper, even when the Form feed and cut key is pressed. Feed and cut the paper To feed and cut the paper when the automatic cutter has been disabled, press the Form feed and cut key on the front panel. The paper advances and the printer makes a straight cut on the front edge. NOTE: The printer may not cut the paper directly after the Form feed and cut key is pressed, as each time a print is printed the printheads are serviced and the paper cannot be cut until the process completes. Remove the cut piece from the output tray. Paper handling 42 Chapter 4 Paper handling ENWW
-
 1
1 -
2
-
3
-
4
-
5
-
6
-
7
-
8
-
9
-
10
-
11
-
12
-
13
-
14
-
15
-
16
-
17
-
18
-
19
-
20
-
21
-
22
-
23
-
24
-
25
-
26
-
27
-
28
-
29
-
30
-
31
-
32
-
33
-
34
-
35
-
36
-
37
-
38
-
39
-
40
-
41
-
42
-
43
-
44
-
45
-
46
-
 47
47 -
 48
48 -
 49
49 -
 50
50 -
 51
51 -
 52
52 -
 53
53 -
 54
54 -
 55
55 -
 56
56 -
 57
57 -
58
-
59
-
60
-
61
-
62
-
63
-
64
-
65
-
66
-
67
-
68
-
69
-
70
-
71
-
72
-
73
-
74
-
75
-
76
-
77
-
78
-
79
-
80
-
81
-
82
-
83
-
84
-
85
-
86
-
87
-
88
-
89
-
90
-
91
-
92
-
93
-
94
-
95
-
96
-
97
-
98
-
99
-
100
-
101
-
102
-
103
-
104
-
105
-
106
-
107
-
108
-
109
-
110
-
111
-
112
-
113
-
114
-
115
-
116
-
117
-
118
-
119
-
120
-
121
-
122
-
123
-
124
-
125
-
126
-
127
-
128
-
129
-
130
-
131
-
132
-
133
-
134
-
135
-
136
-
137
-
138
-
139
-
140
-
141
-
142
-
143
-
144
-
145
-
146
-
147
-
148
-
149
-
150
-
151
-
152
-
153
-
154
-
155
-
156
-
157
-
158
-
159
-
160
-
161
-
162
-
163
-
164
-
165
-
166
-
167
-
168
-
169
-
170
-
171
-
172
-
173
-
174
-
175
-
176
-
177
-
178
-
179
-
180
-
181
-
182
-
183
-
184
-
185
-
186
-
187
-
188
-
189
-
190
-
191
-
192
-
193
-
194
-
195
-
196
-
197
-
198
-
199
-
200
-
201
-
202
-
203
-
204
-
205
-
206
-
207
-
208
-
209
-
210
-
211
-
212
-
213
-
214
-
215
-
216
-
217
-
218
-
219
-
220
-
221
 |
 |