HP Z3100 HP Designjet Z3100ps GP Photo Printer - User's Guide - Page 182
The Image Diagnostics Print
 |
UPC - 882780677531
View all HP Z3100 manuals
Add to My Manuals
Save this manual to your list of manuals |
Page 182 highlights
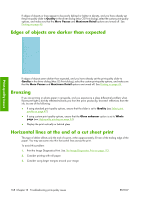
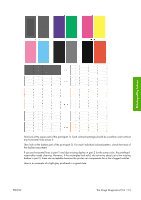
Adobe Acrobat or Adobe Reader software to the latest version. From version 7 onwards, these problems should be solved. The Image Diagnostics Print The Image Diagnostics Print consists of patterns designed to highlight printhead reliability problems. It helps you to check the performance of the printheads that are currently installed in your printer, and whether any printhead suffers from clogging or other problems. To print the Image Diagnostics Print: 1. Use the same paper type that you were using when you detected a problem. 2. Use the View loaded paper key on the front panel to check that the selected paper type is the same as the paper type loaded into the printer. 3. At the printer's front panel, select the Image Quality Maintenance menu icon diagnostic image. , then Print It takes about two minutes to print the Image Diagnostics Print. The print is divided into two parts, both of which test printhead performance. ● Part 1 (top) consists of rectangles of pure colors, one for each printhead. This part represents the print quality that you will get from each color. ● Part 2 (bottom) consists of small dashes, one for each nozzle on each printhead. This part complements the first, and aims more specifically to detect how many faulty nozzles each printhead has. Please look carefully at the print. The names of the colors are shown above the rectangles and in the center of the patterns of dashes. Print-quality issues 172 Chapter 13 Troubleshooting print-quality issues ENWW
-
 1
1 -
2
-
3
-
4
-
5
-
6
-
7
-
8
-
9
-
10
-
11
-
12
-
13
-
14
-
15
-
16
-
17
-
18
-
19
-
20
-
21
-
22
-
23
-
24
-
25
-
26
-
27
-
28
-
29
-
30
-
31
-
32
-
33
-
34
-
35
-
36
-
37
-
38
-
39
-
40
-
41
-
42
-
43
-
44
-
45
-
46
-
47
-
48
-
49
-
50
-
51
-
52
-
53
-
54
-
55
-
56
-
57
-
58
-
59
-
60
-
61
-
62
-
63
-
64
-
65
-
66
-
67
-
68
-
69
-
70
-
71
-
72
-
73
-
74
-
75
-
76
-
77
-
78
-
79
-
80
-
81
-
82
-
83
-
84
-
85
-
86
-
87
-
88
-
89
-
90
-
91
-
92
-
93
-
94
-
95
-
96
-
97
-
98
-
99
-
100
-
101
-
102
-
103
-
104
-
105
-
106
-
107
-
108
-
109
-
110
-
111
-
112
-
113
-
114
-
115
-
116
-
117
-
118
-
119
-
120
-
121
-
122
-
123
-
124
-
125
-
126
-
127
-
128
-
129
-
130
-
131
-
132
-
133
-
134
-
135
-
136
-
137
-
138
-
139
-
140
-
141
-
142
-
143
-
144
-
145
-
146
-
147
-
148
-
149
-
150
-
151
-
152
-
153
-
154
-
155
-
156
-
157
-
158
-
159
-
160
-
161
-
162
-
163
-
164
-
165
-
166
-
167
-
168
-
169
-
170
-
171
-
172
-
173
-
174
-
175
-
176
-
 177
177 -
 178
178 -
 179
179 -
 180
180 -
 181
181 -
 182
182 -
 183
183 -
 184
184 -
 185
185 -
 186
186 -
 187
187 -
188
-
189
-
190
-
191
-
192
-
193
-
194
-
195
-
196
-
197
-
198
-
199
-
200
-
201
-
202
-
203
-
204
-
205
-
206
-
207
-
208
-
209
-
210
-
211
-
212
-
213
-
214
-
215
-
216
-
217
-
218
-
219
-
220
-
221
 |
 |
