HP Z3100 HP Designjet Z3100ps GP Photo Printer - User's Guide - Page 159
Paper loading error messages, The paper type is not in the driver - paper rolls for banners
 |
UPC - 882780677531
View all HP Z3100 manuals
Add to My Manuals
Save this manual to your list of manuals |
Page 159 highlights
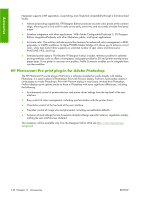
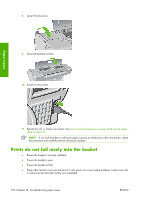
Paper issues If the sheet is not caught by the printer, the front-panel display asks you to push paper further into the printer, and tries to feed the paper again. If the sheet is caught by the printer but is not inserted straight, the front panel displays the following instructions. 1. When prompted by the front-panel display, lift the blue lever on the left. 2. Adjust the sheet to align with the front and right side blue lines. 3. Once the sheet is aligned, press OK on the front panel. 4. When prompted by the front-panel display, lower the blue lever. The printer checks the alignment. If the sheet is aligned, the printer measures the sheet and feeds it out the back into the roll feed. You are now ready to print. If the sheet is still not aligned, the front panel displays an error and instructions to start again. If you would like to start the load process again, cancel the process on the front panel and the printer ejects the sheet out the front. Paper loading error messages Here is a list of front-panel display messages related to paper loading, with the suggested corrective action. front-panel display message Paper incorrectly loaded Paper not found Paper loaded with too much skew Paper too small Paper too big Lever lifted Suggested action The paper has not been loaded correctly; the edge was not aligned with the load guide. Lift the blue lever, remove paper, and lower lever. During the paper load process the printer did not detect any paper. Ensure the paper is inserted fully and is not transparent. During the paper load process the printer detected that the paper had too much skew. Follow the instructions on the front-panel display. During the load process the printer detected that the paper is too narrow or too short to be loaded in the printer. Press the Cancel key to stop the load process. See Functional specifications on page 204. During the load process the printer has detected that the paper is either too wide or too long (sheet only) to be loaded correctly. Press the Cancel key to stop the load process. See Functional specifications on page 204. During the load process the blue lever was lifted. This prevents the printer from loading the paper. Follow the instructions on the front-panel display. The paper type is not in the driver To work with a paper not in the driver, you can add new paper to your driver, See Add a custom paper type on page 40. Adding your paper to the driver is recommended as it allows you to store custom parameters, such as a profile, for your paper. You can use your paper as one of the profiles already in the driver, however, you must identify whether your paper is transparent or translucent, glossy, matte, or HP Banners with Tyvek®. NOTE: For glossy paper, it is important to use a glossy paper type, as matte black ink does not print well on glossy paper. ENWW The paper type is not in the driver 149
-
 1
1 -
2
-
3
-
4
-
5
-
6
-
7
-
8
-
9
-
10
-
11
-
12
-
13
-
14
-
15
-
16
-
17
-
18
-
19
-
20
-
21
-
22
-
23
-
24
-
25
-
26
-
27
-
28
-
29
-
30
-
31
-
32
-
33
-
34
-
35
-
36
-
37
-
38
-
39
-
40
-
41
-
42
-
43
-
44
-
45
-
46
-
47
-
48
-
49
-
50
-
51
-
52
-
53
-
54
-
55
-
56
-
57
-
58
-
59
-
60
-
61
-
62
-
63
-
64
-
65
-
66
-
67
-
68
-
69
-
70
-
71
-
72
-
73
-
74
-
75
-
76
-
77
-
78
-
79
-
80
-
81
-
82
-
83
-
84
-
85
-
86
-
87
-
88
-
89
-
90
-
91
-
92
-
93
-
94
-
95
-
96
-
97
-
98
-
99
-
100
-
101
-
102
-
103
-
104
-
105
-
106
-
107
-
108
-
109
-
110
-
111
-
112
-
113
-
114
-
115
-
116
-
117
-
118
-
119
-
120
-
121
-
122
-
123
-
124
-
125
-
126
-
127
-
128
-
129
-
130
-
131
-
132
-
133
-
134
-
135
-
136
-
137
-
138
-
139
-
140
-
141
-
142
-
143
-
144
-
145
-
146
-
147
-
148
-
149
-
150
-
151
-
152
-
153
-
 154
154 -
 155
155 -
 156
156 -
 157
157 -
 158
158 -
 159
159 -
 160
160 -
 161
161 -
 162
162 -
 163
163 -
 164
164 -
165
-
166
-
167
-
168
-
169
-
170
-
171
-
172
-
173
-
174
-
175
-
176
-
177
-
178
-
179
-
180
-
181
-
182
-
183
-
184
-
185
-
186
-
187
-
188
-
189
-
190
-
191
-
192
-
193
-
194
-
195
-
196
-
197
-
198
-
199
-
200
-
201
-
202
-
203
-
204
-
205
-
206
-
207
-
208
-
209
-
210
-
211
-
212
-
213
-
214
-
215
-
216
-
217
-
218
-
219
-
220
-
221
 |
 |